
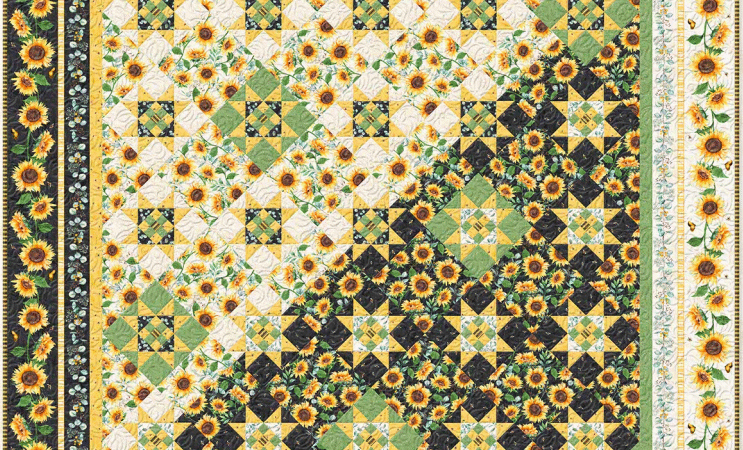
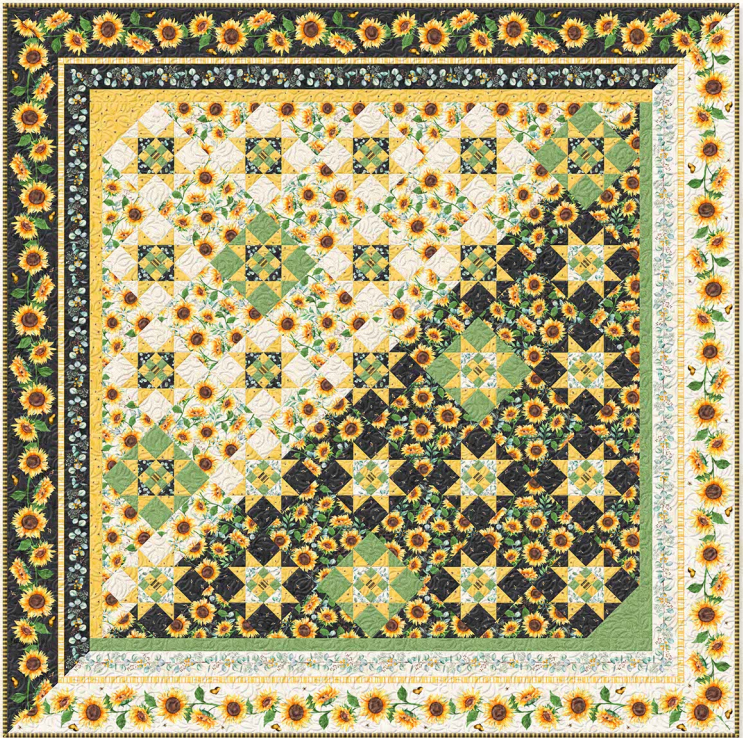
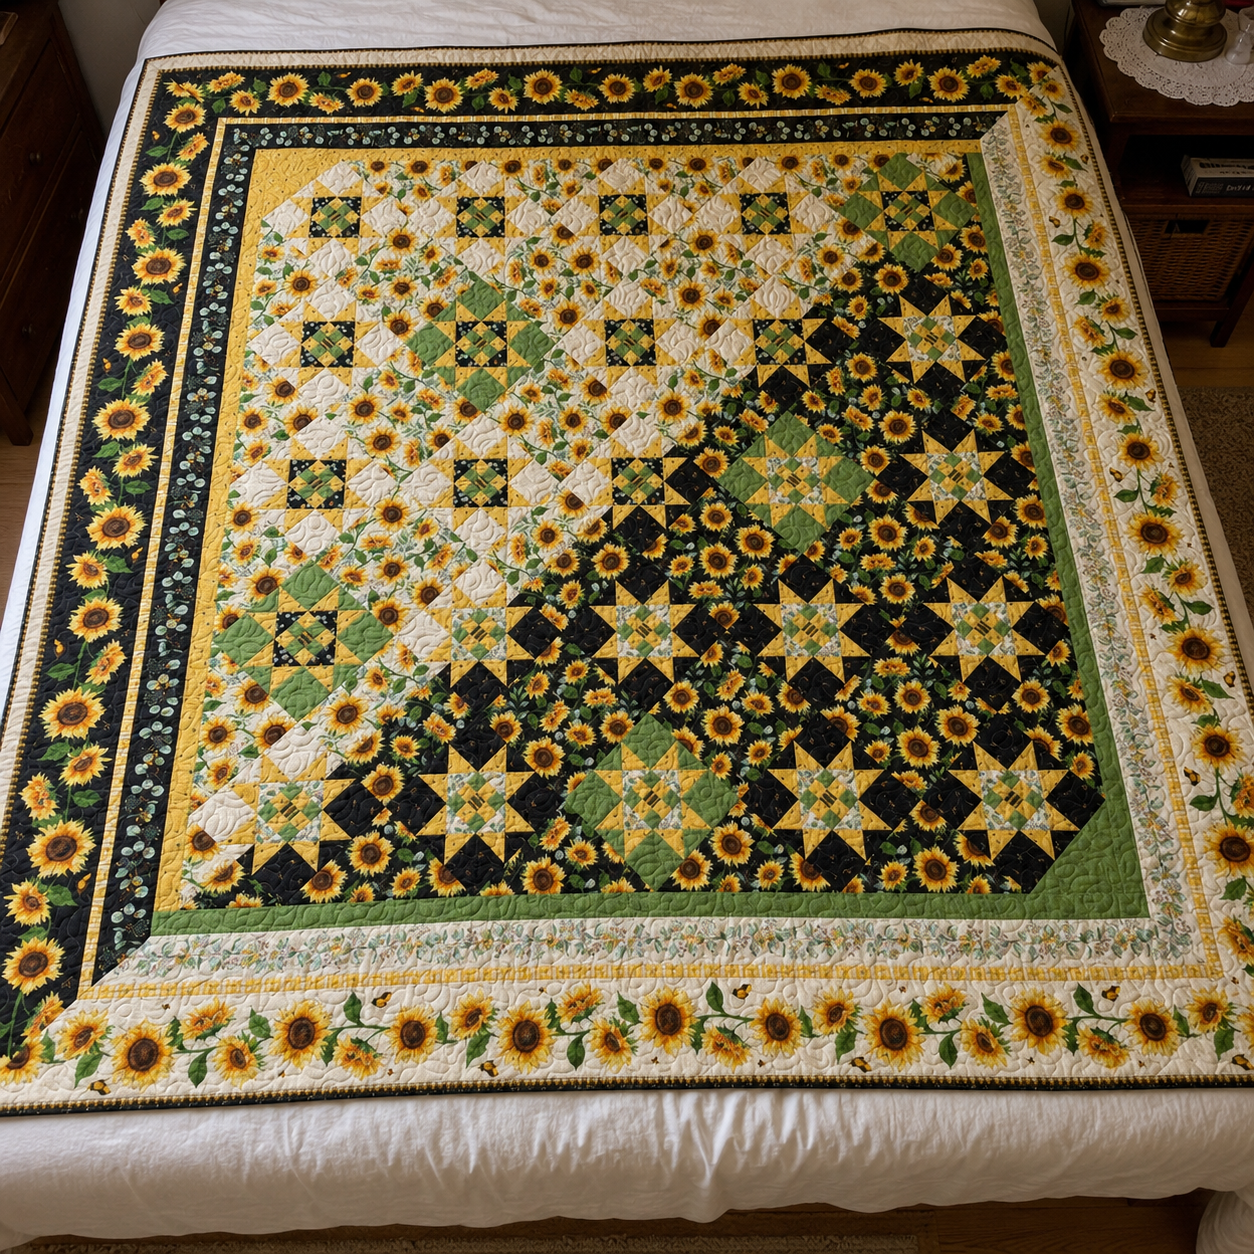
The Sundance Meadow quilt pattern turns a coordinated sunflower collection into a queen-size quilt with an unusually strong sense of movement. Light floral areas begin in the upper-left portion of the quilt, deeper black prints gather toward the lower right, and green units form a transition between them. Repeated star-like patchwork blocks sit inside a diagonal setting, while wide directional borders complete the garden-inspired frame.
Designed by Nancy Mink for Wilmington Prints, Sundance Meadow measures approximately 86 inches square when finished. The published project was created for the Sundance Meadow fabric collection, but its structure can be recreated with other coordinated prints if the replacement fabrics are selected by role, value, scale, and direction—not simply by color.
This independent companion guide does not reproduce the designer’s cutting chart, numbered construction diagrams, or quilt-layout page. Instead, it helps you understand the project before you cut: what makes the design distinctive, which fabrics perform the most important jobs, how to manage bias edges and diagonal rows, and why the final mitered borders deserve a practice sample. Use the authorized pattern link near the end for the exact measurements and diagrams.
Sundance Meadow at a Glance
| Project detail | Verified information |
|---|---|
| Pattern name | Sundance Meadow |
| Project/collection number | 1665 |
| Project sheet | 555-633B-555 |
| Credited designer | Nancy Mink |
| Publisher/manufacturer | Wilmington Prints |
| Finished size | 86″ × 86″ |
| Quilt-center size in the pattern | 64¼″ square unfinished |
| Skill level | Advanced beginner; intermediate-level organization is helpful |
| Construction style | Traditionally pieced |
| Main techniques | Strip piecing, bias-triangle piecing, varied nine-patch-style blocks, diagonal-row assembly, directional print placement, mitered borders, binding |
| Pieced block total | 31 blocks across eight block variations |
| Center layout | 11 diagonal rows plus setting squares and triangles |
| Border treatment | Narrow contrasting borders followed by wide directional stripe borders with mitered corners |
The square format makes Sundance Meadow suitable as a generous bed topper, display quilt, or oversized throw. Because it has multiple block variations and many bias-cut pieces, it is best approached as an organized multi-session project rather than a quick weekend quilt.
What Makes the Sundance Meadow Quilt Distinctive?
At first glance, the sunflower fabrics dominate the design. Look longer, however, and the value arrangement becomes the real story.
The upper-left area uses light cream and ivory prints. The lower-right area uses dark black-background florals. Green patchwork appears along the transition, giving the impression that light is moving diagonally across a meadow. The repeated pieced blocks participate in that shift: similar block structures are recolored so they belong to different regions of the quilt.
This is why replacing the original collection with random sunflower fabrics may not produce the same effect. The quilt does not rely only on a theme. It relies on four connected systems:
- A light-to-dark diagonal value change.
- Repeated pieced blocks that vary by color placement.
- Large floral setting pieces that let the collection remain visible.
- A directional border print that frames different sides with light and dark backgrounds.
The border is especially clever. The original repeating stripe contains several parallel designs, including sunflower bands on both cream and black grounds. Those bands are fussy-cut lengthwise. The darker border appears along the top and left, while the lighter version appears along the bottom and right. Mitered corners allow the stripe motifs to turn cleanly around the quilt.
The finished result feels more complex than a grid of identical blocks because the blocks, setting fabrics, and borders all reinforce the same diagonal movement.
Is Sundance Meadow Suitable for Beginners?
Missouri Star’s pattern listing classifies Sundance Meadow as an advanced beginner pieced quilt. That is a fair starting point, but the phrase “advanced beginner” should not be confused with “first sewing project.”
A confident beginner can make this quilt if they are comfortable with:
- a consistent ¼″ seam allowance;
- rotary cutting from a detailed chart;
- strip piecing and accurate subcutting;
- sewing triangles with exposed bias edges;
- making several similar-looking block variations;
- following a large diagonal layout diagram;
- sewing long borders without stretching the quilt;
- constructing mitered corners;
- keeping directional prints correctly oriented.
The pattern does not require appliqué, foundation paper piecing, or advanced curved seams. Its challenge comes from scale and coordination. One slightly inaccurate unit is manageable. Repeating the same error across dozens of units can change block size, and a rotated block can interrupt the carefully planned light-to-dark flow.
If you have never sewn quarter-square-triangle-style units or a mitered border, make practice samples before cutting the feature fabric. A sample made from inexpensive cotton is not wasted time; it establishes the seam setting, pressing method, and trimming strategy that will be repeated throughout the quilt.
Understanding the Original Fabric Roles
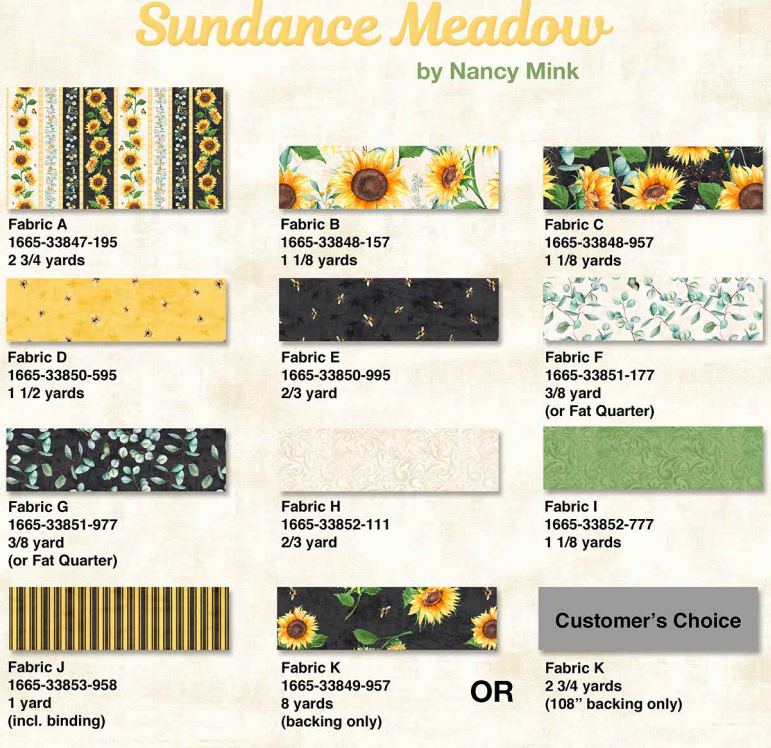
The project sheet labels its fabrics A through K. These letters are not interchangeable. Each fabric has a specific structural or visual role.
| Fabric role | Original purpose | Published quantity overview |
|---|---|---|
| A | Repeating directional stripe used for the wide mitered borders | 2¾ yards |
| B | Large sunflower print on a light ground | 1⅛ yards |
| C | Large sunflower print on a dark ground | 1⅛ yards |
| D | Yellow coordinate used in blocks and one pair of narrow borders | 1½ yards |
| E | Black coordinate used in selected blocks | ⅔ yard |
| F | Light leafy coordinate used in pieced units | ⅜ yard or 1 fat quarter |
| G | Dark leafy coordinate used in pieced units | ⅜ yard or 1 fat quarter |
| H | Light tonal coordinate | ⅔ yard |
| I | Green tonal coordinate used in blocks and the opposite narrow borders | 1⅛ yards |
| J | Narrow stripe used in piecing and binding | 1 yard, including binding |
| K | Backing | 8 yards of standard-width fabric, or 2¾ yards of 108″-wide backing |
This table is a planning summary. Use the publisher’s PDF for the exact cutting chart, because fabric width, directional placement, and fussy cutting affect what can be obtained from each yardage.
Fabric A: the hardest fabric to replace
Fabric A is not a conventional border print that runs across the width of fabric. It is a repeating stripe designed to be cut parallel to the selvage into long feature borders. The pattern distinguishes between portions of the stripe with dark and light backgrounds.
If the original print is unavailable, look for a lengthwise stripe with:
- at least two usable border bands;
- enough uninterrupted length for approximately 90-inch cuts;
- motifs that can turn attractively at mitered corners;
- a design that still looks intentional when cut into wide strips;
- clear contrast with the narrow borders beside the quilt center.
Purchase extra fabric if the repeat is large or if motifs must be centered. The printed yardage assumes the original collection and its specific repeat. A substitute may require more.
If no suitable stripe can be found, use a large-scale border print and accept a different appearance, or replace the feature border with four non-directional strips. That adaptation removes some of the original light-versus-dark framing effect but is safer than forcing an unsuitable directional print into the plan.
Fabrics B and C: the visual foundation
The light and dark sunflower prints fill large setting areas between the blocks. They create the diagonal value transition and allow the floral artwork to remain recognizable.
For substitutions, choose two related feature prints:
- one on a light background;
- one on a dark background;
- similar in motif scale and visual density;
- different enough in value to remain distinct in a grayscale photograph.
The two prints do not need to be recolorings of the exact same design, but they should feel related. For example, use cream-ground roses with black-ground roses, pale botanical prints with deep navy botanicals, or low-volume leaves with a charcoal version of the same theme.
Fabrics D through I: supporting coordinates
These fabrics make the repeated blocks legible. Select a light coordinate, dark coordinate, warm accent, green or medium-value bridge, and leafy or textured prints that connect visually with the feature florals.
Avoid choosing every coordinate at the same value. The pieced blocks need internal contrast so the star-like points and checker details remain visible. Lay the candidates beside Fabrics B and C, then view the group from several feet away. If the block fabrics visually merge, revise the pull before cutting.
Fabric J: stripe and binding
The original Fabric J is a narrow multicolor stripe. It appears in small pieced units and returns as the binding, creating a subtle connection between the center and outer edge.
A narrow stripe, tiny check, or high-contrast geometric can serve the same role. Because this fabric is cut into narrow sections, test how it reads at that scale. A wide motif may disappear or look irregular after subcutting.
How to Build a Substitute Palette
Start with value, then refine color.
Step 1: choose the paired feature prints
Find the light-background and dark-background large-scale prints first. These establish the quilt’s theme and diagonal division. Do not buy all the coordinates before confirming that this pair works.
Step 2: add a bridge color
The original uses green to soften the move from cream to black. Your bridge could be green, gold, teal, dusty rose, rust, or another medium value that appears naturally in both feature prints.
Step 3: add internal contrast
Select coordinates that create readable patchwork against one another. Include at least one light, one dark, and one warm or bright accent.
Step 4: choose the border separately
Do not assume the feature-print pair will also solve the border. The long mitered borders have different scale, orientation, and repeat requirements. Take measurements and a fabric-role list to the store.
Step 5: test in grayscale
Photograph the pull and remove the color. You should still see a clear light group, dark group, and medium bridge. If everything becomes similar gray, the finished diagonal movement will be weak.
Step 6: make a small mock layout
Cut paper swatches or print a simple unlabeled grid for private planning. Arrange the values from upper left to lower right. This is not a replacement for the publisher’s layout diagram; it is a color test that helps confirm the palette before fabric is cut.
Tools and Supplies
In addition to the fabrics, batting, thread, and sewing machine, prepare:
- a large self-healing cutting mat;
- a sharp rotary cutter and spare blade;
- a long quilting ruler for yardage and borders;
- a square ruler large enough to check the main blocks;
- a small square ruler with a clear 45-degree line;
- a 45-degree triangle ruler or reliable angle marking on a quilting ruler;
- fine pins or clips;
- removable fabric marker;
- seam gauge;
- iron and stable pressing surface;
- optional pressing spray or starch for bias-cut pieces;
- labels, numbered pins, or resealable bags;
- design wall, clean floor, or other large layout area;
- walking foot or even-feed foot for the final straight-line quilting, if desired.
A specialty triangle ruler is optional. The PDF uses squares divided diagonally according to the cutting chart. Whatever cutting method you choose, the finished units must match the published sizes.
Prepare Before Cutting
Read all six pages of the project sheet before beginning. The first pages contain the cutting and piecing information, but later pages reveal the diagonal layout, border orientation, backing options, and the exact jobs assigned to directional fabrics.
Check fabric width
The pattern assumes quilting cotton of usable width after selvages are removed. If a substitute fabric is narrower, a listed number of width-of-fabric strips may no longer be enough. Measure the actual usable width before cutting.
Decide whether to prewash
Prewashing is optional for many quilting cotton projects, but all fabrics should be treated consistently. Wash everything or nothing unless there is a specific reason to isolate one fabric. If using older stash fabric or combining manufacturers, test saturated black, yellow, and green prints for color transfer.
Stabilize bias-prone fabrics
The pattern creates many triangles by cutting squares diagonally. Some squares are divided once; others are divided twice. The resulting pieces include bias edges that stretch more easily than straight-grain rectangles.
A light application of pressing spray before cutting can improve control. Test the product first, use the same treatment throughout, and allow fabric to dry fully before stacking or cutting.
Label before the first cut
Prepare separate labels for Fabrics A through K and for the numbered unit and block families. Do not rely on memory. Several coordinates have similar colors, and some block variations differ mainly in placement.
Keep the uncut border fabric separate. Accidentally using Fabric A or the binding fabric for ordinary patchwork could make the long finishing strips impossible to cut later.
Protecting Bias Edges
Bias management is one of the most important skills in Sundance Meadow. A bias edge can be useful because it bends, but that same flexibility can distort triangles during handling, sewing, or pressing.
Use these habits:
- cut with a sharp blade so the fabric is not dragged;
- lift pieces from the mat rather than pulling them sideways;
- store triangles flat in labeled stacks;
- pin through matching points instead of stretching one layer to fit another;
- let the feed dogs move the fabric;
- press with an up-and-down motion;
- avoid heavy steam until the unit is stable;
- check unit size before incorporating it into a block.
If a triangle is slightly distorted, return it to the cutting mat and compare it with the intended geometry. Do not trim automatically. Determine whether trimming would remove the seam allowance or change the point position.
The quilt includes setting triangles along the diagonal edges of the center. Their outer edges must remain stable until the narrow borders are attached. Handle the completed center gently, support its weight, and staystitch close to the edge if you know it will be moved repeatedly before border construction.
Test the Quarter-Inch Seam
A presser foot labeled “¼ inch” is a guide, not a measurement guarantee. Needle position, thread thickness, fabric thickness, and pressing can alter the finished size.
Sew a three-strip test with the planned fabric and thread. Press it using the same method intended for the project and measure the center strip’s visible width. Adjust the needle or fabric guide until the unit is correct.
Use a leader-and-ender scrap at the beginning and end of a chain-pieced group. It reduces thread tangles and helps prevent small triangle points from being pulled into the needle plate.
The pattern instructs a ¼″ seam allowance unless stated otherwise. Consistency matters more than sewing quickly.
Understanding the Pieced Units
The PDF builds the quilt from numbered units, then combines those units into block variations. The exact cutting counts and diagrams belong in the pattern, but the construction logic is useful to understand before starting.
Narrow strip-pieced units
Contrasting strips are sewn lengthwise and subcut into small rectangular units. Some use the yellow and narrow stripe; others use the green coordinate and stripe. These become the central checker details in the larger blocks.
Measure the first strip set before cutting the entire batch. If its width is wrong, every subcut will repeat the error.
Quarter-square-triangle-style units
Several small units combine triangles from the light, dark, yellow, green, or leafy coordinates. Their fabric placement changes across the block families, which is how similar geometry supports different color regions.
Do not treat all these units as interchangeable. Label each variation immediately after piecing and trimming.
Large pieced blocks
Most of the main blocks are approximately 9½ inches square unfinished in the pattern. They use three-by-three arrangements with a strip-pieced center and triangle-based units around it. The fabric combinations vary across several versions.
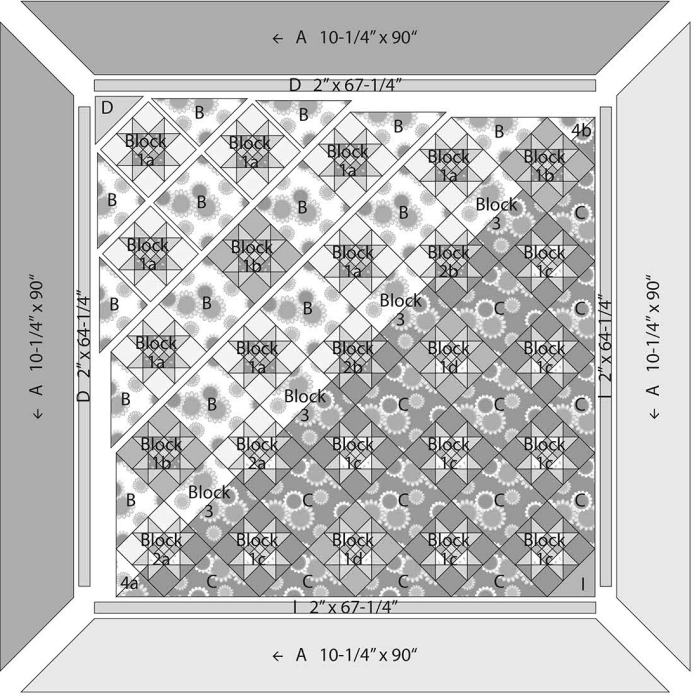
The published plan includes:
- 8 of Block 1a;
- 3 of Block 1b;
- 8 of Block 1c;
- 2 of Block 1d;
- 2 of Block 2a;
- 2 of Block 2b;
- 4 of Block 3;
- 1 each of Blocks 4a and 4b.
That produces 31 pieced blocks across eight variations. The remaining spaces in the diagonal center are filled with large floral squares and triangles shown on the layout page.
Block 3 is deliberately simpler than the star-like units and allows more of the large sunflower prints to show. Blocks 4a and 4b are partial edge units that complete opposite corners of the diagonal arrangement.
An Efficient Sewing Order
The following workflow supports accuracy without duplicating the publisher’s construction steps:
- Make one sample of each strip-set family. Measure before subcutting the full batch.
- Make one sample triangle unit. Confirm size, point placement, and pressing direction.
- Complete one representative large block. Check it against the unfinished size in the PDF.
- Cut and sew remaining units in labeled batches. Keep different fabric combinations separate.
- Assemble blocks one variation at a time. Place the completed blocks in numbered stacks.
- Cut large setting pieces only after reviewing the layout. Their print direction matters.
- Arrange the complete quilt center. Photograph it before sewing diagonal rows.
- Join and measure the center. Correct construction issues before borders are cut.
- Attach the narrow borders. Preserve the planned contrast on each side.
- Fussy-cut and miter the wide borders. Match motifs as closely as the print repeat permits.
- Quilt and bind. Use the backing option appropriate to the available fabric width.
Batching does not mean rushing. Finish and verify the first example before multiplying it.
Managing Directional Prints
Sundance Meadow uses arrows and stripe indicators in its diagrams to show print direction. This is especially relevant for the repeating border stripe, large sunflower prints, narrow striped units, and any replacement fabric with obvious stems or one-way motifs.
Before cutting, mark the top edge of directional yardage with a removable note. When stacking pieces, keep the marked edge consistent. For units that must be mirror images, lay them out exactly as shown before sewing.
A photograph can reveal orientation mistakes more easily than looking at the physical pieces for a long time. Take a photo of each block group, rotate the phone if necessary, and compare it with the pattern.
If using non-directional substitutes, some orientation concerns disappear. Still follow the block layout because the value placement, not only the printed motif, creates the design.
Assembling the 11 Diagonal Rows
The quilt center is not sewn as a conventional horizontal grid. Blocks and floral setting pieces are arranged into 11 diagonal rows, then the rows are joined to produce a square center.
Diagonal construction introduces three common risks:
- rows can be reversed;
- blocks can rotate while being carried to the machine;
- long bias edges can stretch before the center is stabilized.
Clear a large design area and place every block, square, and setting triangle before sewing. Confirm the transition from light upper-left to dark lower-right, with green units bridging the regions.
Label the rows in order and mark the end that begins each seam. Stack only one row at a time. After sewing it, return the row to the layout area before lifting the next one.
Pin at important intersections and avoid forcing seams to meet. If a block is consistently too small or large, correct the block rather than distributing a large discrepancy along the row.
The pattern states that the completed center should be 64¼ inches square unfinished. Measure across the top, middle, and bottom, then along both sides and through the vertical center. Also compare the diagonals. These measurements determine whether the borders can be attached without waves or puckers.
Attaching the Narrow Borders
The first borders are intentionally not all the same color. The original layout places one coordinate on the left and top and another coordinate on the right and bottom. This continues the light/dark diagonal concept and prepares the quilt for the two appearances of the outer stripe.
Use the border lengths specified in the PDF rather than sewing an unmeasured strip to the quilt and cutting off the excess. Compare the prescribed length with the actual measured center. If there is a meaningful difference, diagnose the center before attaching anything.
Fold the quilt edge and border strip into halves and quarters, mark those points, then pin corresponding marks together. Sew with the border on top if that helps control slight fullness. Press without dragging the long edge.
Fussy-Cutting the Wide Directional Borders
The wide outer border is the signature finishing detail. The project sheet calls for long cuts parallel to the selvage from different background areas within the same repeating stripe.
Before cutting:
- unroll the entire length on a clean surface;
- identify the stripe bands assigned to the dark and light sides;
- inspect the repeat for printing flaws;
- confirm that every required border can be cut continuously;
- mark a consistent reference point within the motif;
- reserve extra length for corner matching and mitering.
Do not fold a large motif where the design disappears inside the crease. Cut one border, label its intended side, and verify it against the quilt before cutting the next.
The pattern begins and ends the wide border seam ¼ inch from each corner. This leaves the seam allowances free for the miter. Backstitch securely without sewing beyond that pivot point.
Making Clean Mitered Corners
Mitered borders create a diagonal seam that lets the printed stripe appear to turn around the corner. They are beautiful but deserve patience.
After all four borders are attached to the quilt center and pressed outward:
- Work on one corner at a time.
- Fold the quilt so the adjacent borders align with right sides together.
- Match the border seams and motif reference points as closely as possible.
- Use a ruler’s 45-degree line to mark the miter from the corner seam toward the border edge.
- Pin and baste along the marked line.
- Open the corner and inspect it from the front.
- Adjust the motif alignment if necessary.
- Sew the final seam only after the test is satisfactory.
- Trim the allowance as directed and press it open.
Basting is especially valuable with a bold border stripe. A geometrically correct miter can still look distracting if a large sunflower is split awkwardly. Exact motif matching may not be possible on every corner because fabric repeats impose limits, but the transition should appear deliberate.
Do not trim before inspecting the corner from the front. The extra fabric makes correction possible.
Accuracy Checkpoints
Add these pauses to the project plan:
After the first strip set
Measure the complete set and one subcut. Confirm that the narrow stripe remains straight.
After the first triangle unit
Check unfinished size and point placement. Make sure the unit lies flat.
After the first main block
Compare it with the project sheet’s stated unfinished size. Measure through the center as well as along the edges.
After each block family
Count the blocks, label the stack, and photograph the group. Do not mix visually similar variations.
Before sewing diagonal rows
Audit the complete light-to-dark layout against the publisher’s diagram.
After completing the center
Measure width, height, and diagonals. Check the 64¼-inch unfinished target.
After the narrow borders
Lay the quilt flat and check for ripples before adding the wide borders.
Before trimming a miter
Open the basted corner and inspect motif alignment from the right side.
These checks take minutes and can prevent hours of unpicking.
Troubleshooting Sundance Meadow
Triangle units are too small
Check seam allowance, cutting accuracy, and pressing. Bias edges may have stretched before sewing and then contracted unevenly under the iron. Use a lighter pressing motion and verify the first unit before completing the batch.
Triangle points are disappearing
The point may not have been positioned with enough seam allowance beyond the future seam line. Compare the unit with the diagram before joining the block. A slightly scant seam is not a universal fix; it can make block size inconsistent.
Strip sets curve
Long strips may have been stretched, sewn in the same direction repeatedly, or pushed sideways while pressing. Match centers and ends before sewing, alternate sewing direction where practical, and press from the center outward without sliding the iron.
Similar block variations are being confused
Stop and sort by center fabric, corner value, and side-unit color. Label completed blocks with their published block names. Do not continue the layout until every variation has been counted.
The diagonal rows do not align
Verify orientation before measuring. If orientation is correct, compare individual block sizes and inspect long bias edges for stretching. Correct the source of the difference instead of trimming the assembled row blindly.
The center is not 64¼ inches square
Measure several blocks and seam allowances. A small difference can sometimes be distributed across accurately measured borders, but a large discrepancy indicates a construction problem. Borders should not be used to force an out-of-square center into shape.
Narrow borders wave
The border may have been cut too long or stretched during sewing. Remove it, measure through the quilt center, cut the border to the appropriate length, mark quarters, and pin evenly.
The outer border motif does not match at the corner
Check that adjacent borders were cut using the same motif reference. Baste the miter and adjust before final sewing. If the repeat cannot match perfectly, prioritize a straight stripe and balanced placement over an impossible exact match.
The miter forms a pucker
The border seams may extend beyond the intended ¼-inch stopping point, or the miter seam may not begin precisely at the corner. Release the stitches around the pivot, realign, and baste again.
Quilting Ideas
The large floral areas and geometric blocks invite quilting that is visible in texture but does not compete with the sunflower prints.
Suitable approaches include:
- a medium-scale allover meander or loop;
- leafy vines across the entire top;
- diagonal crosshatching that follows the row direction;
- continuous curves within the pieced blocks;
- simple arcs or orange-peel motifs across the large setting squares;
- outline quilting around selected sunflower motifs;
- straight lines that echo the narrow and wide borders.
For a domestic machine, stabilize the quilt with widely spaced diagonal or vertical lines before adding detailed quilting. Support the quilt’s weight so the 86-inch top does not pull against the needle.
Thread can blend or provide controlled contrast. A warm cream may cross light areas quietly but become visible on black. A medium gold or soft green can relate to both regions. Test the thread over samples of the light, green, and dark fabrics before committing.
Pay attention to the miter seams when quilting the border. Stitching that echoes the printed stripes can reinforce the impression that the border turns around the corner.
Backing and Batting
The project sheet offers two backing approaches:
- approximately 8 yards of standard-width fabric; or
- approximately 2¾ yards of 108-inch-wide backing.
Wide backing reduces seams and is often convenient for a large square quilt. Standard-width yardage offers more print choices but requires piecing.
Before purchasing, ask the intended longarm quilter how much extra backing and batting are required on every side. The pattern’s finished quilt size is 86 inches square, but professional quilting equipment typically needs a working margin beyond the top.
If piecing standard-width backing, use a balanced arrangement rather than placing a narrow leftover strip along one side. Press long backing seams open and inspect them for puckers. Remove selvages from seams because their tighter weave can cause distortion.
Select batting according to intended use. A washable cotton or cotton-blend creates a familiar quilt texture; wool provides loft and emphasizes quilting; low-loft polyester can be light and durable. Follow the batting manufacturer’s maximum quilting-distance and care instructions.
Binding the Quilt
The original plan uses Fabric J for binding, returning the narrow stripe seen within the pieced units. This creates a cohesive final edge.
Before cutting or joining binding, measure the completed quilt perimeter. Confirm that the prepared length includes generous allowance for diagonal joins and final closure.
Attach binding without stretching it along straight edges. At corners, fold consistently and keep the miter full but not bulky. Hand finish for an almost invisible back, or machine finish for durability. If machine stitching, test thread color and needle position on a sample sandwich first.
A bold stripe may look different depending on cutting direction. Straight-grain binding preserves the original stripe direction; bias binding rotates it diagonally and may require more fabric than the published amount. Follow the project’s cutting plan unless deliberately recalculating.
Color Variations That Preserve the Design
Autumn meadow
Replace yellow sunflowers with rust, copper, burgundy, and ochre botanicals. Use cream for the light region, chocolate for the dark region, and olive as the bridge.
Blue botanical
Pair pale blue flowers on ivory with the same motif on navy. Use teal or eucalyptus green as the medium transition and a gold narrow stripe for warmth.
Romantic rose garden
Use cream-ground and charcoal-ground rose prints, blush and burgundy coordinates, and sage for the bridge. A border stripe with climbing roses can echo the original directional frame.
Modern solids
Choose solid ivory, black, gold, and green for the blocks, then use two related graphic prints for the setting areas. The piecing becomes more prominent while the value flow remains intact.
Scrappy interpretation
A scrap version requires more control than it first appears. Sort scraps into light, medium-green or bridge, and dark groups. Repeat a few key prints across the quilt to create continuity. Reserve a single fabric family for the borders so the center does not feel visually unfinished.
Whatever palette you choose, preserve the light upper-left, dark lower-right, and medium transition if you want the quilt to retain the original Sundance Meadow movement.
Frequently Asked Questions
Who designed Sundance Meadow?
The original project sheet says “Sundance Meadow by Nancy Mink” and carries Wilmington Prints branding. Some retailer listings identify the designer more generally as Wilmington Prints. The clearest credit is: designed by Nancy Mink for Wilmington Prints.
What is the finished quilt size?
The cover and retailer listing state 86″ × 86″. During construction, the project sheet describes the bordered top as approximately 86½ inches square unfinished, which is consistent with an approximately 86-inch finished result after binding-related seam allowances.
What is the skill level?
The authorized retailer listing classifies it as advanced beginner. Experience with bias triangles, diagonal layouts, and mitered directional borders will make the project easier.
Is Sundance Meadow appliquéd?
No. The published quilt is traditionally pieced. The floral effect comes from the printed fabrics and patchwork arrangement.
How many pieced blocks are used?
The plan includes 31 pieced blocks divided among eight block variations. Large squares and setting triangles complete the 11 diagonal rows.
Can I use different fabric?
Yes, but substitute by role. You need paired light- and dark-background feature prints, contrasting block coordinates, a medium bridge, a narrow accent or binding print, and an appropriate feature border.
Do I need the original repeating stripe?
No, but it is the most difficult element to replace faithfully. A different lengthwise border stripe can work if it provides enough continuous length and a motif suited to mitered corners. A non-directional border is a simpler adaptation.
Are the borders mitered?
Yes. The wide feature borders use mitered corners. The project sheet shows a 45-degree marking and test-fitting method.
Why are the blocks arranged diagonally?
The diagonal rows support the visual transition from the light floral region to the dark region. They also let the blocks appear to move across the quilt rather than sit in a conventional horizontal grid.
Can I make a smaller quilt?
Reducing the design is not as simple as removing one row because the light-to-dark balance, partial corner blocks, setting triangles, and border lengths must all be reconsidered. Wilmington Prints also produced a separate Sundance Meadow throw project, so use a pattern designed for the smaller size instead of improvising from the queen layout.
Get the Authorized Sundance Meadow Pattern
Use the publisher’s complete project sheet for the cutting quantities, unit diagrams, block arrangements, border measurements, and 11-row layout.
Get the free Sundance Meadow Quilt pattern from Missouri Star
Missouri Star identifies the project as a free Wilmington Prints pattern, lists it as advanced beginner, and gives the finished size as 86″ × 86″. An account or sign-in may be required to complete the download.
You can also view the official Sundance Meadow collection page from Wilmington Prints for the manufacturer’s collection information.
Download the pattern for your own project reference and follow the terms supplied by the publisher or download source. A pattern offered at no cost remains copyrighted. Free access does not automatically grant permission to sell, rehost, alter, or redistribute the PDF.
Pattern Credit
- Pattern: Sundance Meadow Queen Quilt
- Collection/project number: 1665
- Project sheet: 555-633B-555
- Designer credited on the project sheet: Nancy Mink
- Publisher/manufacturer: Wilmington Prints
- Original fabric collection: Sundance Meadow by Nancy Mink for Wilmington Prints
- Finished size: 86″ × 86″
This independent companion article was written by Easy Quilting Patterns to help readers evaluate the project, select substitute fabrics, organize the varied blocks, control bias edges, and prepare the directional borders. Easy Quilting Patterns did not design Sundance Meadow and does not claim ownership of the pattern instructions, diagrams, layout, fabric artwork, or project photography.
Final Thoughts
Sundance Meadow is memorable because every part of the quilt contributes to one visual idea. The light and dark sunflower prints create the diagonal transition, the pieced blocks repeat that value change on a smaller scale, green fabrics connect the two regions, and the mitered stripe border carries the composition to the outer edge.
The best way to make the project manageable is to slow down at the points where one decision will be repeated: verify the first strip set, measure the first triangle unit, complete one sample block, and test one miter before trimming. Once those foundations are reliable, the remaining work becomes an organized series of batches.
Whether made in the original sunflower palette or reimagined with roses, autumn leaves, blue botanicals, or modern solids, the quilt will be most successful when its value structure remains clear. Treat the authorized PDF as the construction authority and this guide as the planning support that helps you reach the first cut with confidence.