
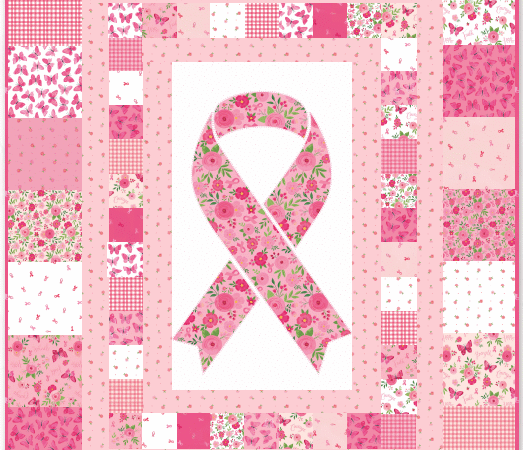
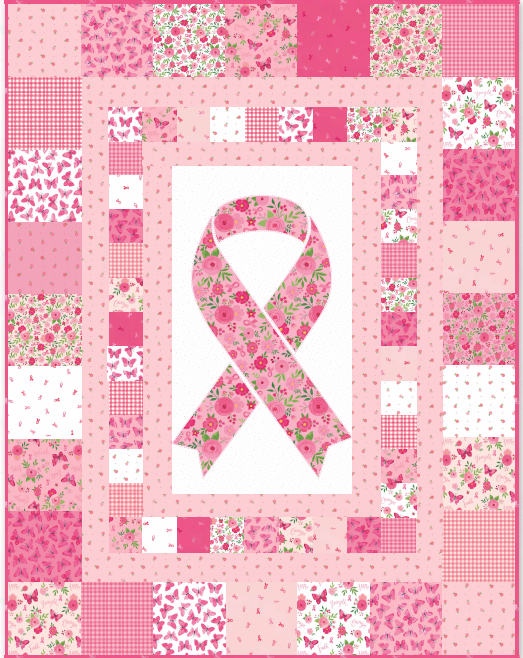
Quilting has always been more than just fabric and thread it is a language of care, resilience, and storytelling. The Strength In Pink Hope Quilt Pattern is a beautiful example of how creativity can carry deep meaning. Designed to symbolize courage, unity, and hope, this quilt is especially meaningful for those who wish to create something that honors strength during challenging times. Whether you are making it as a gift, for a charity project, or simply for your own home, this quilt carries a powerful message stitched into every block.
The soft and inspiring shades of pink traditionally represent awareness and compassion, making this quilt a heartfelt tribute. However, the beauty of quilting lies in personalization you can adapt the colors, fabrics, and layout to suit your own story. This pattern is perfect for quilters who want to combine creativity with purpose, resulting in a finished piece that is both visually stunning and emotionally meaningful.
In this article, you will find a complete step-by-step guide to creating the Strength In Pink Hope Quilt, written in a clear and professional style to help you achieve excellent results. At the end of this post, you will also find access to the full PDF pattern for easy download and printing.
Why You’ll Love the Strength In Pink Hope Quilt
This quilt is not just about aesthetics—it’s about expression. Here are a few reasons why quilters love this pattern:
- Meaningful Design: The layout often incorporates symbolic shapes such as ribbons, stars, or geometric forms that represent strength and hope.
- Beginner-Friendly Structure: While visually impressive, the pattern is constructed using straightforward piecing techniques.
- Customizable Colors: While pink is the central theme, you can incorporate neutrals, whites, or even bold contrasts.
- Perfect for Gifting: Ideal for comfort quilts, charity donations, or special handmade gifts.
Materials Needed
Before you begin, gather all your supplies to ensure a smooth quilting process.
Fabric Requirements:
- Pink fabrics (various shades for depth and dimension)
- Background fabric (white, cream, or light neutral)
- Accent fabric (optional for contrast)
- Binding fabric
- Backing fabric
Tools & Notions:
- Rotary cutter and cutting mat
- Quilting ruler (preferably 6” x 24”)
- Sewing machine with ¼” foot
- Thread (matching or neutral tone)
- Pins or clips
- Iron and pressing surface
- Batting (size according to your quilt dimensions)
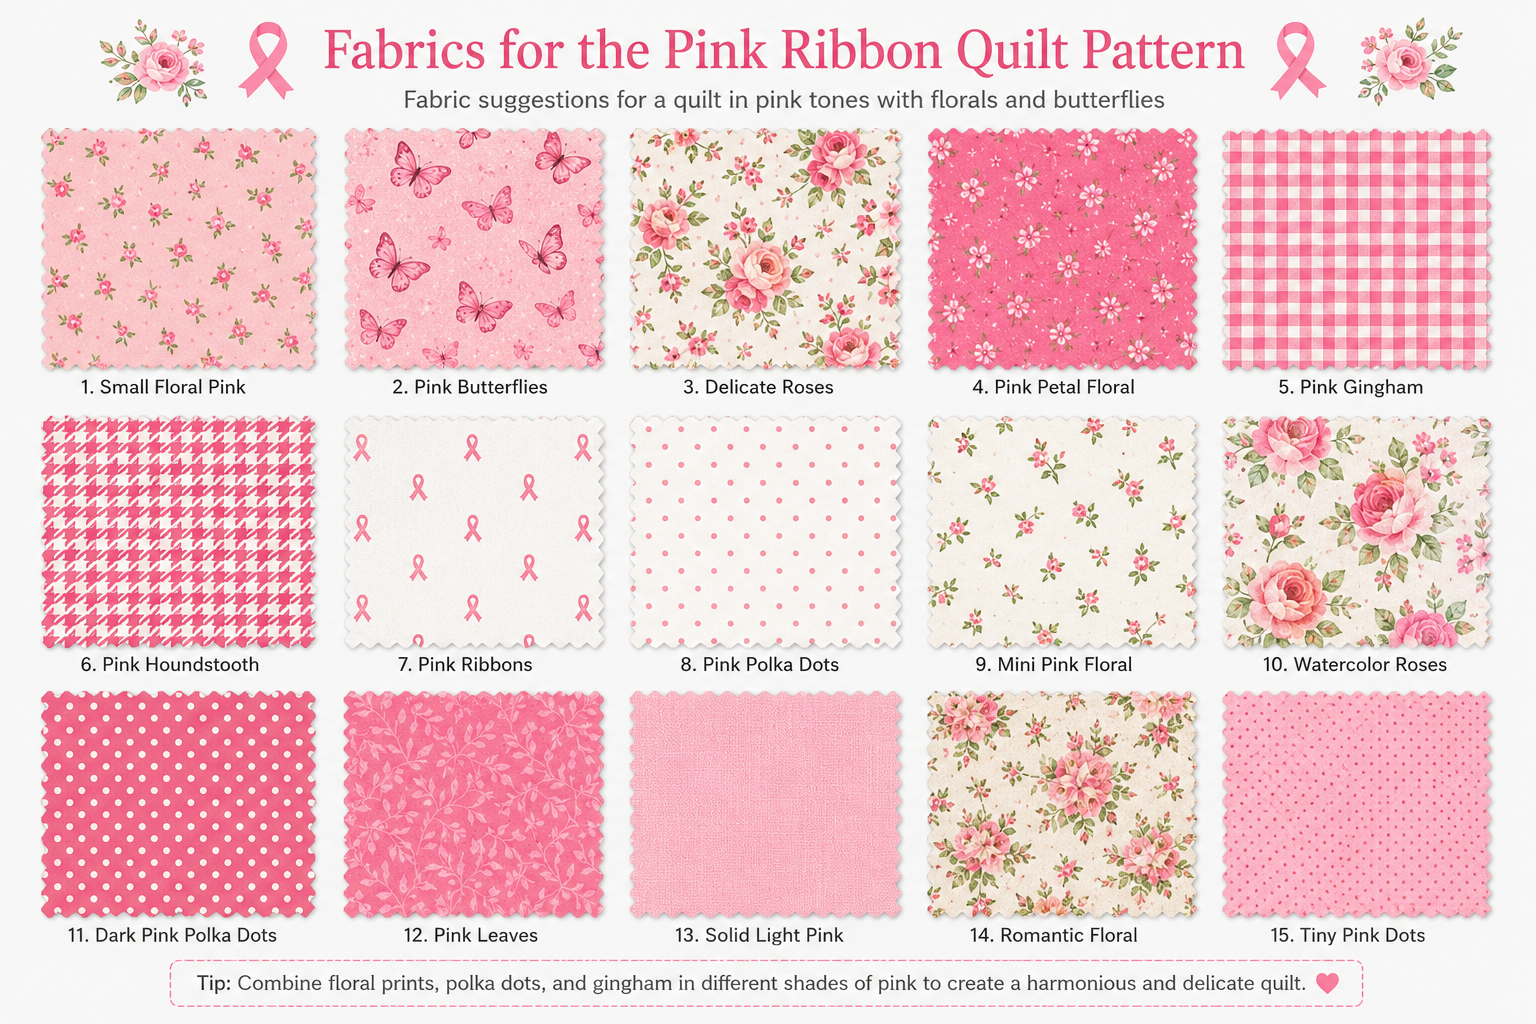
Fabric Preparation Tips
Choosing the right fabrics is essential for achieving a polished look. Consider using a mix of:
- Light pinks for softness
- Medium tones for balance
- Dark pinks or magenta for contrast
Pre-washing your fabric is recommended to prevent color bleeding, especially when working with vibrant pink tones. Press all fabrics היט before cutting to ensure accuracy.
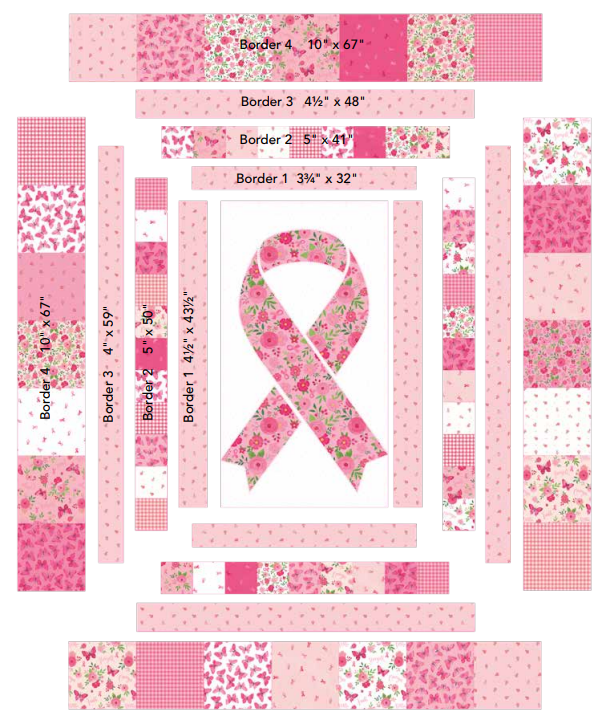
Cutting Instructions
Accurate cutting is the foundation of a successful quilt. Based on the pattern layout, you will typically cut:
- Squares for the main blocks
- Strips for sashing or borders
- Smaller units for accent details
For example (adjust according to your final pattern size):
- Cut 5” squares from pink fabrics
- Cut 5” squares from background fabric
- Cut 2.5” strips for borders and binding
Keep your pieces organized by color and size to streamline the sewing process.
Block Construction
The Strength In Pink Hope Quilt is built block by block. Each unit comes together to form a cohesive and meaningful design.
Step 1: Layout Your Pieces
Arrange your cut fabric pieces on a flat surface or design wall. This helps you visualize the final composition and balance the color distribution.
Step 2: Sew the Units
Using a consistent ¼” seam allowance, begin sewing your pieces together:
- Pair pink squares with background squares
- Stitch carefully, aligning edges precisely
- Chain piecing can help speed up the process
Step 3: Press Seams
Press seams open or to one side, depending on your preference. Consistent pressing ensures your blocks lay flat and align properly.
Step 4: Assemble Blocks
Join smaller units into larger blocks. Double-check alignment before sewing to maintain accuracy.
Assembling the Quilt Top
Once all blocks are completed, it’s time to assemble the quilt top.
- Arrange Blocks: Lay out all blocks in rows, ensuring a balanced color flow.
- Sew Rows Together: Join blocks into rows, then sew rows together.
- Add Borders: Attach inner and outer borders if desired for a finished look.
Take your time during this stage—proper alignment makes a significant difference in the final appearance.
Quilting Your Project
Now comes the step that truly brings your quilt to life.
Batting and Backing
Layer your quilt sandwich:
- Backing fabric (right side down)
- Batting
- Quilt top (right side up)
Secure the layers using pins or basting spray.
Quilting Designs
You can choose from several quilting styles:
- Straight-line quilting for a modern look
- Free-motion quilting for added texture
- Diagonal lines to enhance movement
Choose a design that complements the pattern without overpowering it.
Binding the Quilt
Binding gives your quilt a clean and professional finish.
- Cut binding strips (2.5” wide is standard)
- Join strips end-to-end
- Attach binding to the front of the quilt
- Fold over and hand-stitch or machine-stitch to the back
Take care at the corners to create neat mitered edges.
Tips for a Professional Finish
- Always use a consistent seam allowance
- Press frequently for crisp results
- Trim threads and square your blocks
- Take breaks to avoid mistakes
These small details make a big difference in the final quilt.
Creative Variations
One of the best aspects of this quilt is how easily it can be customized:
- Monochrome Style: Use only shades of pink for a soft, elegant look
- Scrappy Quilt: Mix different prints for a vibrant and dynamic design
- Memory Quilt: Incorporate meaningful fabrics or clothing pieces
You can even adjust the size to create anything from a baby quilt to a full-size bedspread.
A Quilt with Purpose
The Strength In Pink Hope Quilt Pattern is more than just a project—it’s a symbol. Many quilters choose to donate quilts like this to hospitals, support groups, or charity organizations. Handmade quilts offer comfort in a way that few other gifts can.
Creating this quilt allows you to combine your passion for quilting with a meaningful cause, making each stitch a small act of kindness.
Final Thoughts
The Strength In Pink Hope Quilt is a beautiful blend of simplicity, elegance, and emotional significance. Whether you are a beginner looking for a meaningful project or an experienced quilter wanting to create something impactful, this pattern offers both creativity and purpose. Take your time, enjoy the process, and let each stitch tell a story of strength and hope.
As promised, the complete Strength In Pink Hope Quilt Pattern PDF will be available right below. This printable version includes all measurements, diagrams, and step-by-step instructions to guide you through the entire process with ease.
Strength In Pink Hope Quilt Pattern PDF
Be sure to download it and keep it in your quilting collection for future projects.