
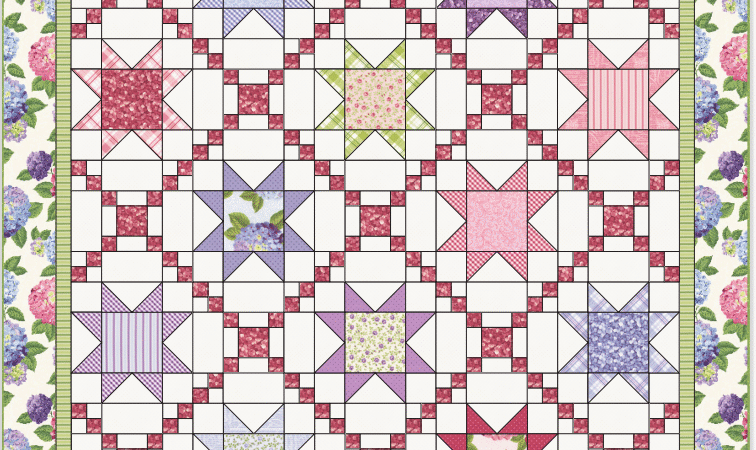
There’s something timeless about star quilts. They carry a sense of tradition, craftsmanship, and warmth that never goes out of style. The Starry Lattice Quilt is a beautiful example of how classic star blocks can be combined with lattice and Irish Chain elements to create a quilt that feels both traditional and fresh.
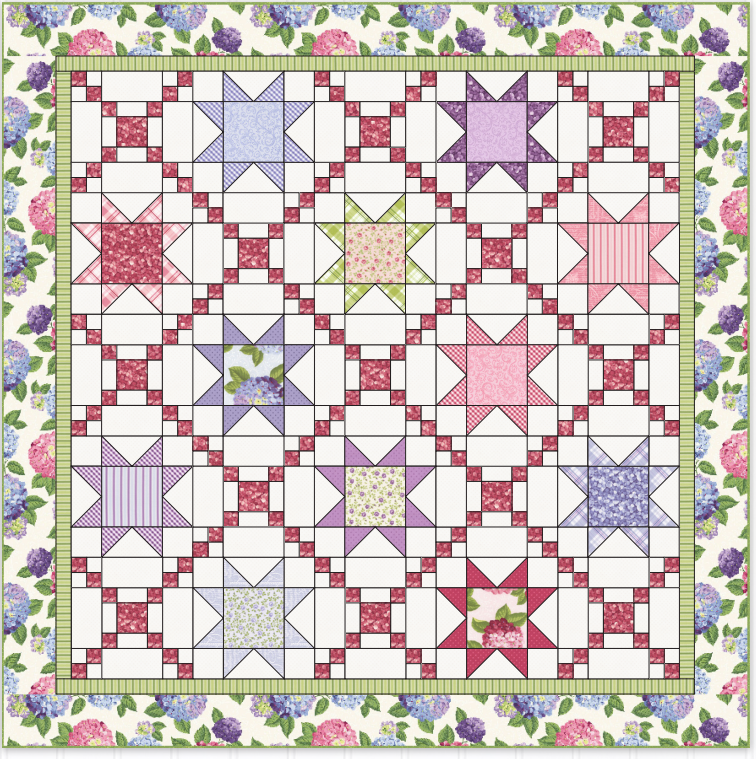
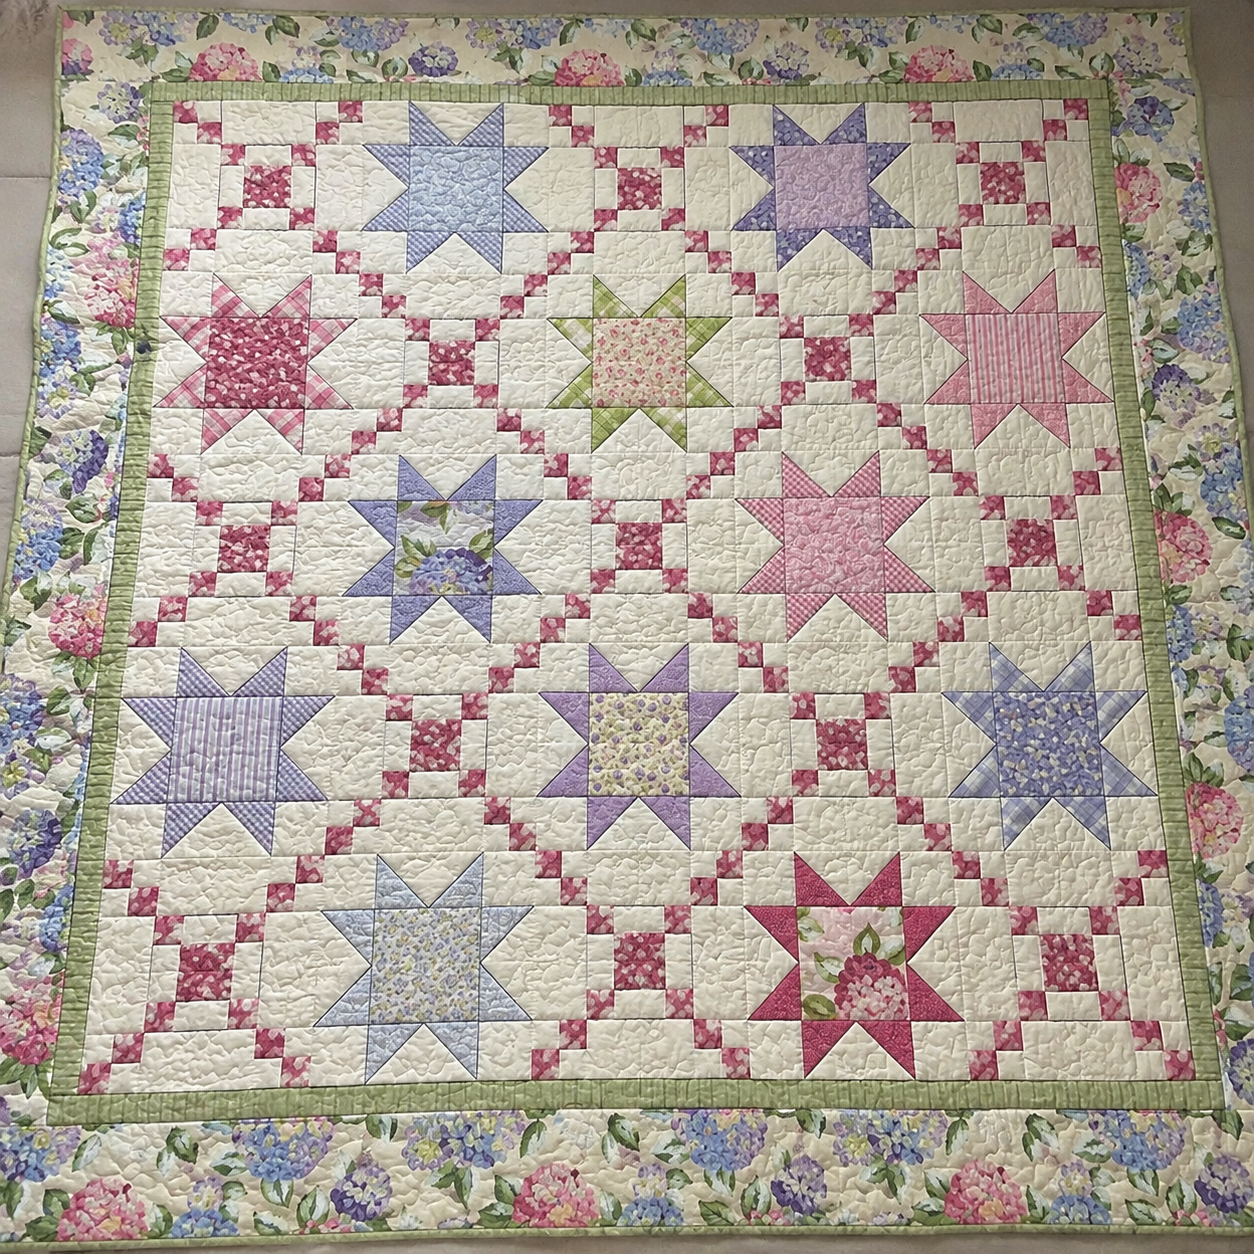
The Starry Lattice Quilt combines two familiar patchwork ideas in a layout that creates far more movement than either block would produce alone. Twelve colorful star blocks alternate with thirteen Irish Chain blocks, allowing the small pink squares to travel diagonally through the quilt center like a lattice woven around the stars.
The original sample features Hydrangeas in the Garden, a floral collection by Jennifer Bosworth for Riley Blake Designs. The quilt pattern is a Shabby Fabrics original design and finishes at 73½″ × 73½″. Its stars showcase selected 10-inch precut squares, while strip-pieced 4-Patch and 9-Patch units make the chain blocks efficient to assemble.
This article is an independently written companion guide. It explains how the design works, how to choose fabrics, where accuracy matters, and how to avoid the most common problems. It does not reproduce Shabby Fabrics’ complete cutting chart, diagrams, or assembly instructions. Keep the official six-page PDF beside you for all exact measurements and unit counts.
Starry Lattice Quilt at a Glance
| Detail | Information |
|---|---|
| Pattern | Starry Lattice Quilt |
| Pattern source and copyright | Shabby Fabrics |
| Featured collection | Hydrangeas in the Garden |
| Fabric designer | Jennifer Bosworth |
| Fabric company | Riley Blake Designs |
| Finished size | 73½″ × 73½″ |
| Quilt center before borders | 60½″ × 60½″ |
| Blocks | 12 Star Blocks and 13 Irish Chain Blocks |
| Unfinished block size | 12½″ × 12½″ |
| Main techniques | Strip piecing, 4-Patch units, 9-Patch units, no-waste flying geese, block assembly, and borders |
| Seam allowance | 1/4″, according to the pattern |
| Suggested experience | Confident beginner to intermediate |
| Use permission | Personal use only; not for commercial use |
The pattern does not assign an official skill-level label in the PDF. “Confident beginner to intermediate” is a practical assessment based on the repeated strip sets, 48 flying-geese units, point matching, and the need to keep twenty-five blocks consistent.
Important Personal-Use Restriction
The official PDF states that the pattern is “For personal use ONLY, not for commercial use” and that all rights are reserved. A free download is not a public-domain pattern and does not grant permission to upload the file elsewhere, reproduce its diagrams, sell copies, or use its design commercially.
For a responsible blog post:
- Link readers to Shabby Fabrics or the official Riley Blake-hosted PDF.
- Do not host a copied PDF on your own server.
- Do not paste the full cutting chart or complete assembly directions into the article.
- Do not use the PDF cover, diagrams, fabric swatches, or official quilt image without permission.
- Use original photographs only if you made the quilt yourself, or obtain written permission from the photographer.
- Contact Shabby Fabrics before selling finished quilts, kits, classes, or other products based on the pattern.
An independent review or companion article should add commentary, planning help, and technique education while requiring the reader to consult the copyright owner’s pattern.
How the Lattice Effect Is Created
At first glance, the quilt may look as though thin sashing strips cross between the stars. It actually uses Irish Chain blocks rather than conventional lattice sashing.
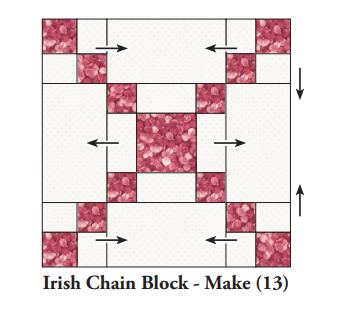
Each Irish Chain block combines small 4-Patch units, a larger 9-Patch unit, and white rectangular areas. When thirteen of these blocks alternate with twelve stars in a five-by-five layout, the pink squares line up from block to block. The repeated squares form diagonal paths that appear to pass behind and around the stars.
This construction gives the design two visual scales:
- Large star points provide bold focal shapes.
- Small pink chain squares provide continuous movement.
The background fabric connects the blocks and creates negative space. If the background changes noticeably between the star and chain units, the checkerboard construction becomes obvious and the lattice illusion weakens. Use the same background throughout unless you intentionally want a more fragmented look.
Understanding the Star Blocks
Each star is a classic nine-section arrangement with a colorful square at the center, four flying-geese units as points, and background squares in the corners. The official sample uses twelve different prints from the 10-inch Stacker, giving every star its own personality while preserving a consistent structure.
The star blocks finish visually clean because the center square and geese use the same print within each block. A large floral, stripe, plaid, or tonal print will look different after being divided between the center and the star points, so preview that transformation before cutting.
Place a paper window over a 10-inch square or fold strips of plain paper around it to reveal the approximate center area. Then examine which portions of the print will remain in the smaller flying-geese triangles. Large hydrangea clusters may dominate the center, while stripes or small florals can create clearer points.
The pattern requires twelve star blocks, each measuring 12½″ unfinished. Make one complete test block before chain piecing the remaining eleven. The test will reveal whether the geese are the correct size, whether the 1/4″ seam is accurate, and whether the points will retain their seam allowances.
Understanding the Irish Chain Blocks
The thirteen Irish Chain blocks contain more individual seams than the stars, but strip piecing makes them manageable. Rather than cutting and sewing every small square separately, the pattern joins long pink and white strips, crosscuts those strip sets into segments, and recombines the segments into 4-Patch and 9-Patch units.
The finished chain depends on three components:
- Small 4-Patch units at the block corners
- A 9-Patch unit in the center
- White rectangular block-side pieces between them
The placement of pink squares must remain consistent. If a 4-Patch is rotated incorrectly, the diagonal path will break after the blocks are joined. Use the PDF diagram and keep a finished reference block visible while assembling the others.
The Irish Chain blocks also measure 12½″ unfinished. When both block types finish at the same size, they can alternate cleanly without easing or stretching rows.
Original Fabric Roles
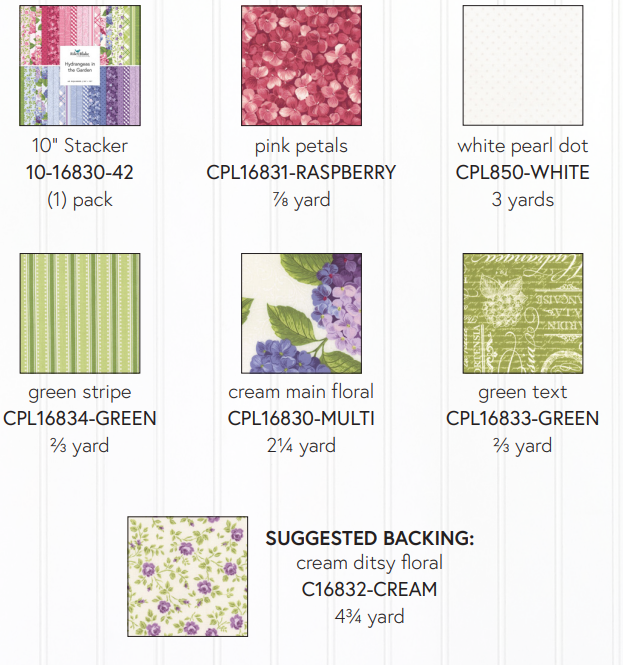
The official sample uses the Hydrangeas in the Garden collection rather than a generic mix of florals. Understanding each fabric’s job makes substitution easier.
| Fabric role | Original choice | Purpose in the quilt |
|---|---|---|
| Star prints | 10-inch Stacker | Supplies twelve star centers and twelve coordinated sets of points |
| Chain accent | Raspberry pink petals | Creates the small squares that form the lattice |
| Background | White pearl dot | Provides contrast and unifies both block types |
| Inner border | Green stripe | Separates the block center from the floral frame |
| Outer border | Cream main hydrangea floral | Creates a wide garden-inspired finishing frame |
| Binding | Green text print | Repeats the green accent at the outer edge |
| Suggested backing | Cream ditsy floral | Completes the original coordinated look |
Consult the official materials page for exact yardage and product numbers. The original list includes one 10-inch Stacker plus separate yardage for the accent, background, inner border, outer border, binding, and backing.
Choosing Substitute Fabrics
The pattern can showcase another collection, but successful substitutions should preserve contrast and print scale.
Star fabrics
Choose twelve distinct prints with enough contrast from the background. A coordinated Layer Cake is convenient, but you can cut the required pieces from fat quarters or yardage after consulting the PDF.
Avoid using twelve equally pale prints against a white background. The points may disappear. Include a range of light, medium, and medium-dark colors, then reserve any very low-volume print for a star center only if it remains visible.
Chain accent
The lattice color must be easy to follow from one Irish Chain block to the next. A medium or dark solid, tonal, or small-scale print works well. Large multicolor florals can interrupt the line because each small square captures a different part of the motif.
Repeat a color already present in several stars. In the original quilt, raspberry pink appears throughout the florals and becomes the continuous chain.
Background
Use a fabric that reads as nearly solid from a distance. A subtle dot, crosshatch, or tone-on-tone adds texture without competing with the chain. Strong directional prints are harder to keep aligned across the many block pieces.
Borders
The inner border should provide a clean transition; the outer border can carry a larger statement print. If the main floral is directional, confirm that the yardage and cutting orientation allow the motifs to run consistently around the quilt.
The official pattern cuts the broad floral borders along the length of fabric. Do not automatically replace those instructions with width-of-fabric cuts. A lengthwise cut can preserve direction, avoid multiple seams, and use the large floral more attractively.
Planning Color Placement
The official sample distributes pink, green, blue, lavender, and purple stars around the quilt rather than grouping similar colors. Before cutting, arrange twelve candidate star fabrics in a three-by-four grid and evaluate their values.
After the blocks are made, the final layout contains stars in alternating positions within a five-by-five block grid. Use a design wall and move the stars until:
- No two very dark stars dominate one corner.
- Similar prints are separated where possible.
- Stripes point in deliberate directions.
- The strongest large-scale florals are balanced across the quilt.
- Pink stars do not disappear into the raspberry chain.
Take both color and grayscale photographs. The color photo reveals repeated motifs, while grayscale makes light-dark imbalances easier to see.
Do not decide the final layout from the 10-inch squares alone. A print can become much lighter or darker after it is divided into a center and four star points.
Tools and Notions
The PDF recommends a Creative Grids Ultimate Flying Geese Tool and a long Creative Grids ruler. These branded tools are helpful but not mandatory; the pattern also allows use of a preferred ruler for trimming the units.
Useful equipment includes:
- Sewing machine with a reliable 1/4″ foot or seam guide
- Rotary cutter with a fresh blade
- Large cutting mat
- Long ruler for strips and borders
- Square ruler large enough for the unfinished blocks
- Flying-geese trimming ruler or a standard ruler with clear diagonal lines
- Fine-point removable marking tool
- Pins or clips
- Starch or light pressing spray, tested on scrap fabric
- Design wall or clean floor
- Labels for strip sets and blocks
Calibrate the seam before cutting all the strip sets. Sew three accurately cut strips together, press them, and measure the center strip. A small seam error multiplied across the 4-Patch and 9-Patch units can change the Irish Chain block size significantly.
Cutting and Labeling Strategy
Read the entire official pattern before cutting. Separate the instructions into five groups: star fabrics, background, chain accent, inner border, and outer border/binding.
Label pieces as soon as they are cut. The background fabric supplies several rectangles, squares, and strips with similar dimensions. An unlabeled stack can be mistaken for another part of the quilt.
For the 10-inch precuts, choose the star-center prints and flying-geese prints deliberately. The pattern uses twelve squares for centers and another twelve for geese. If your precut pack contains duplicates or closely related colorways, decide whether matching or contrasting center-and-point combinations best suit your version before making the first cut.
Square the folded edge of yardage before cutting long strips. If the strip bends like a shallow V when opened, the fold was not perpendicular to the selvage. Re-square before cutting the remaining strip sets.
Cut border fabric only after confirming the usable length and direction of the print. Keep the long outer-border pieces rolled or loosely folded so they do not stretch during block construction.
Strip Piecing Without Bowed Sets
Strip piecing is efficient, but uneven feeding can curve a long strip set. Use these habits:
- Align the strip edges without pulling either fabric.
- Support the fabric on the table so its weight does not drag behind the machine.
- Sew one strip set from top to bottom and the next from bottom to top.
- Press the seam before adding another strip.
- Let the pressed set cool flat before crosscutting.
Alternating sewing direction helps balance the tiny feed difference that occurs when one layer travels against the feed dogs. If all sets curve in the same direction, inspect presser-foot pressure and whether one strip is being stretched.
When crosscutting, place a ruler line on a sewn seam rather than trusting only the raw strip edge. Make a fresh straightening cut, then subcut the required segments. Check every few pieces so a drifting ruler does not produce an entire batch of parallelograms.
Accurate 4-Patch Units
The pattern uses fifty-two 4-Patch units in the Irish Chain blocks. Consistency is more important than speed.
Nest opposing seams where the construction permits and place a pin just beside the intersection. Sew through the intersection with the seam allowances remaining in their intended directions. Open the unit and check that the four corners meet without a visible step.
Measure a small sample before completing the batch. The official pattern gives the unfinished size. If every unit is oversized, the seam may be too narrow or the strip width too generous. If they are undersized, do not compensate by sewing the block sides with a scant seam; correct the source of the error.
Check the color rotation. Each 4-Patch must place the pink squares diagonally so the chain continues through the completed block.
Accurate 9-Patch Units
The thirteen 9-Patch units form the center of the Irish Chain blocks. They use two types of strip set, and those sets must be placed in the correct order.
Lay the segments beside the pattern diagram before sewing. The center square and corner squares should follow the intended pink-and-white sequence. Pressing the two strip-set types in opposite directions can help their seams nest when they are joined.
After assembly, measure the unit through the center in both directions. It should be square and match the unfinished dimension in the PDF. A slightly twisted 9-Patch can pull the entire Irish Chain block out of square.
Making Four-at-a-Time Flying Geese
The Starry Lattice pattern uses a no-waste method that makes four flying-geese units from one large background square and four smaller star-print squares. The pieces are intentionally oversized, then trimmed for accuracy.
At a high level, the method works in two rounds:
- Two smaller squares are placed on opposite corners of the large square, marked, sewn on both sides of the diagonal, and cut apart.
- A third small square is added to each resulting heart-shaped unit, sewn on both sides of its diagonal, and cut to produce four geese.
Use the official diagrams for exact placement and dimensions. Mark diagonals with a fine line that does not distort the square. A thick marker line can shift the seam enough to reduce the point allowance.
When the pattern directs you to trim overlapping corners to reduce bulk, do so consistently. Press without dragging across the bias edges. The freshly cut triangle edges can stretch easily.
Trim every flying goose to the official unfinished size, keeping the top point centered with the required seam allowance above it. Also preserve the quarter-inch extensions at the lower corners. If the unit is centered only by its outer rectangle, the points may still be uneven.
Flying-Geese Troubleshooting
The top point disappears
The unit may have been trimmed without leaving the required seam allowance above the point, or the block seam may be too deep. Check both the trimmed goose and the machine seam.
The side points float
The geese may have been trimmed too narrowly or shifted off center. Use the ruler’s diagonal guidelines and lower-corner references, not only the rectangular size.
Units are consistently too small
Verify the starting-square dimensions and the distance of the stitching lines from the marked diagonal. Do not stretch an undersized bias unit into the block.
Units curve after pressing
Reduce lateral iron movement. Press the seam, open the fabric gently, and set the unit flat. Starch can help, but test it first and apply it evenly.
Four units differ from one another
Check whether the small squares were exactly aligned and whether stitching stayed parallel to the diagonal. Trim conservatively after each unit has cooled.
Assembling the Star Blocks
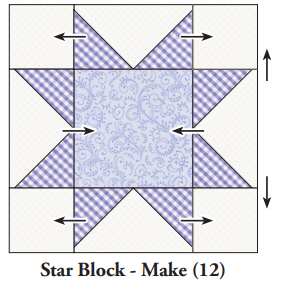
Arrange each star as a three-by-three grid: background corners, geese pointing outward, and a colorful center square. Confirm that all four geese use the intended print and face away from the center.
Sew the units into rows, then join the rows. Pin where the geese meet the center square. Press in the direction shown in the PDF; the official arrows are planned to help the block lie flat.
After every block:
- Confirm the unfinished size.
- Check that it is square.
- Verify that all star points have a visible seam allowance.
- Remove any stray dark threads visible through the white background.
- Label the block if it already has a planned layout position.
Do not trim a badly undersized block down to match. Diagnose the geese or seam allowance first. All twelve stars must work with the Irish Chain blocks in the same row.
Assembling the Irish Chain Blocks
Keep one printed diagram or completed reference block beside the machine. Arrange four 4-Patch units in the corners, four white side rectangles around the center, and one 9-Patch in the middle.
Rotate every corner unit so the pink squares continue toward the center. Stand up and view the layout from a distance before sewing. A rotated 4-Patch may be hard to notice on the machine bed but obvious after the quilt is assembled.
Join the components into three rows and then join the rows. Pin at intersections and avoid stretching the white rectangles. Measure each completed block, checking that the center 9-Patch is not twisted and that the block remains 12½″ unfinished.
Layout and Quilt-Center Assembly
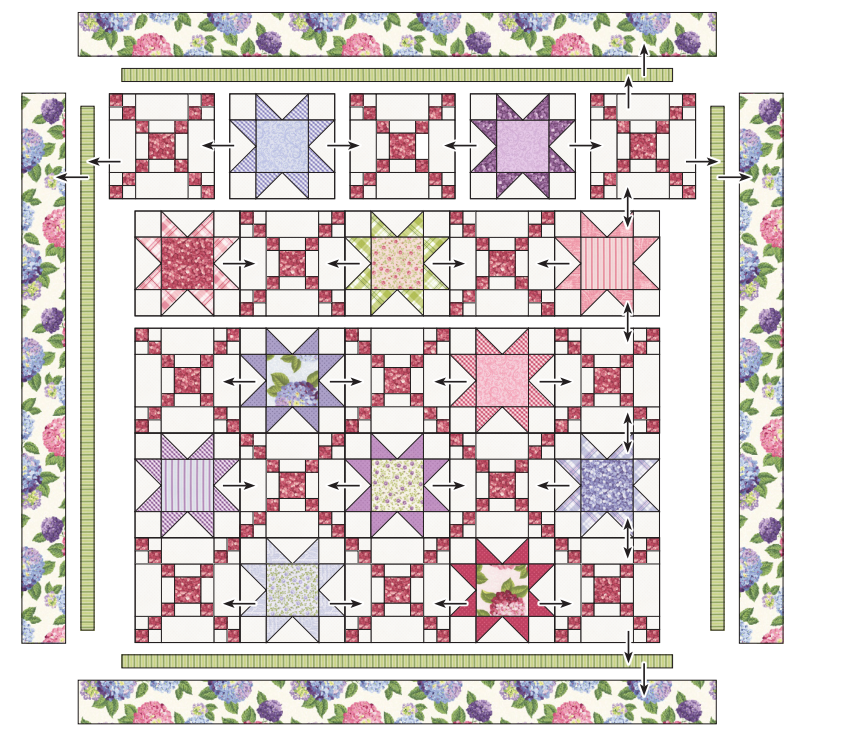
The twenty-five blocks form five rows of five. Star and Irish Chain blocks alternate like a checkerboard, with Irish Chain blocks occupying the corners of the quilt center. This arrangement lets the raspberry squares create uninterrupted diagonal routes.
Lay out the entire center before joining rows. Check three things separately:
- Block type: The star-and-chain alternation is correct.
- Chain direction: Every 4-Patch supports the diagonal path.
- Star distribution: Colors, values, and large motifs are balanced.
Photograph the final arrangement and label each row. Sew blocks into rows while preserving orientation, then join the rows. Pin at each block intersection. If the blocks are accurately sized, the rows should meet without stretching.
The completed center should measure 60½″ × 60½″ before borders. Measure through the center horizontally and vertically, then compare the diagonals to check for square.
Adding the Inner and Outer Borders
The narrow green stripe provides a visual pause between the geometric center and the large hydrangea floral. The outer border then repeats the garden theme at a scale large enough to be appreciated.
Even though the pattern provides border dimensions, measure the actual quilt center before sewing. Cut opposite borders to equal lengths and follow the pattern’s assembly order.
Mark the center and quarter points of each border and corresponding quilt edge. Match those points first, then distribute any small fullness evenly. Do not stretch a border to reach a corner.
For the outer floral:
- Check print direction before cutting.
- Compare opposite strips so the visual weight is balanced.
- Keep the long pieces supported during sewing.
- Press without distorting the lengthwise edge.
- Preserve equal border width when squaring after quilting.
If adapting the pattern with width-of-fabric borders that require joins, use diagonal seams when they are less noticeable in the print and avoid placing a seam at the exact center unless it creates a deliberate mirror match.
Accuracy Checkpoints
| Stage | What to verify | Correct before continuing if… |
|---|---|---|
| Strip sets | Straight, flat, and correct width | Sets bow or seams vary |
| 4-Patch units | Correct unfinished size and diagonal pink placement | Intersections step or colors rotate incorrectly |
| 9-Patch units | Square, flat, and correct color sequence | Center twists or unit is undersized |
| Flying geese | Correct size with point allowances intact | Points touch raw edges or unit skews |
| Star blocks | 12½″ unfinished and square | Geese pull the block inward |
| Irish Chain blocks | 12½″ unfinished with continuous path | A corner 4-Patch breaks the lattice |
| Quilt center | 60½″ × 60½″ before borders | Rows wave or diagonals differ substantially |
| Finished top | Approximately 73½″ × 73½″ | Border distortion changes the final shape |
A flat top that differs by a very small amount is preferable to an exact-size top stretched into compliance. Large discrepancies, however, usually point to a seam or cutting issue that should be corrected.
Pressing Strategy
Follow the pressing arrows in the PDF. An arrow pointing in both directions indicates a seam pressed open. Those directions help nested intersections align and distribute bulk between the small patchwork units.
Use a lifting motion on flying geese because of their bias edges. For strip sets, press along the seam rather than pushing across it. Let long pieces cool before moving them.
If a seam must be re-pressed in the opposite direction to nest with a neighboring block, first confirm that the change will not create excess bulk elsewhere. Consistency across repeated units makes block assembly more predictable.
Quilting Ideas for Starry Lattice
The piecing already creates strong geometry, so the quilting can either reinforce the structure or soften it with curves.
For a simple, unified finish, choose an open allover hydrangea, leaf, loop, or gentle meander. This approach works well when the floral prints are the main attraction.
For custom quilting:
- Echo or stitch in the ditch around the star points.
- Add a small motif in each star center.
- Quilt diagonal lines through the Irish Chain paths.
- Fill the white negative space with a low-density curve or crosshatch.
- Use a narrow continuous design in the green inner border.
- Quilt a vine, feather, or gentle wave in the floral outer border.
Stabilize the quilt along major block and border seams before adding dense details. Keep quilting density balanced between stars and chain blocks so one area does not shrink more than another.
Test thread on a layered scrap containing white, raspberry, green, and one dark star print. A pale neutral or soft lavender may blend better across the whole top than bright white, while a contrasting thread will make every wobble more visible.
Backing, Batting, and Binding
The original pattern suggests coordinated cream ditsy floral backing and lists the required yardage. Confirm your quilter’s preferred extra backing and batting before buying. Longarm requirements vary.
Choose batting according to use. A cotton or cotton-blend batting provides a traditional drape and shows the piecing clearly. Polyester or wool can create more loft around the star points but may change the finished texture.
The green text binding repeats the inner border and helps contain the floral edge. When substituting, select a medium-dark fabric found elsewhere in the quilt. A small print or subtle stripe usually reads more consistently in narrow binding than a large floral.
Prepare binding based on the actual perimeter after quilting. Join strips with diagonal seams to distribute bulk and check that any directional text will not look distracting once folded.
Frequently Asked Questions
Is the Starry Lattice pattern free?
Yes. Shabby Fabrics provides the six-page pattern as a free download. The file remains copyrighted and is limited to personal, noncommercial use.
Who designed the pattern?
Shabby Fabrics describes Starry Lattice as an original Shabby Fabrics design, and the PDF is copyright © 2026 Shabby Fabrics. The featured Hydrangeas in the Garden fabric collection was designed by Jennifer Bosworth for Riley Blake Designs.
What size is the quilt?
The finished quilt measures 73½″ × 73½″. The block center measures 60½″ square before the two borders are added.
How many blocks are used?
The layout uses twelve Star Blocks and thirteen Irish Chain Blocks, for twenty-five blocks arranged in five rows of five.
Is a special flying-geese ruler required?
No. The pattern recommends the Creative Grids Ultimate Flying Geese Tool but allows a preferred ruler. Whatever tool you use must accurately trim the oversized units to the dimensions in the PDF.
Can I use fat quarters instead of a 10-inch Stacker?
Yes, if the fat quarters provide enough usable fabric for the star-center and flying-geese pieces listed in the cutting chart. Plan each star print before cutting.
Is this a beginner pattern?
A confident beginner who already sews an accurate 1/4″ seam can attempt it, but the quantity of small units and trimmed flying geese makes it more demanding than a simple patchwork quilt. Making test units first is strongly recommended.
Can I change the finished size?
The official PDF provides one size. Adding or removing blocks changes the checkerboard alternation, border lengths, fabric requirements, and placement of the chain. Make the published version first or draft a complete revised layout before cutting.
Can I sell quilts made from this design?
The PDF expressly limits the pattern to personal, noncommercial use. Contact Shabby Fabrics and obtain permission before selling finished quilts, kits, classes, or other commercial products based on it.
May I upload the PDF to my own blog?
No permission to redistribute is provided. Link to the official Shabby Fabrics page or the Riley Blake-hosted file instead of uploading a copy.
Get the Official Pattern
The official PDF contains the complete material list, exact cutting chart, strip-set diagrams, flying-geese method, block diagrams, pressing arrows, layout, and border instructions.
Get the Starry Lattice pattern from Shabby Fabrics
Open the official six-page PDF
Read all six pages before cutting, preserve the copyright notice, and refer other makers to the official source.
Final Thoughts
Starry Lattice is a strong example of secondary design: the individual blocks are recognizable, but the full quilt becomes more than a collection of stars and Irish Chain units. Accurate 4-Patches allow the lattice to travel continuously, well-trimmed flying geese create crisp stars, and thoughtful fabric placement balances the floral colors across the five-by-five layout.
The most useful approach is to test before batching. Make a sample 4-Patch, 9-Patch, flying goose, Star Block, and Irish Chain Block. Confirm each measurement before producing the remaining units. That short pause protects the fabric and makes final assembly much more predictable.
With consistent seams, controlled pressing, and borders measured through the center, the quilt will remain square and the hydrangea stars will appear to float within a delicate raspberry lattice.
Pattern Credit
Starry Lattice is an original Shabby Fabrics quilt design and is copyright © 2026 Shabby Fabrics. The featured Hydrangeas in the Garden fabric collection was designed by Jennifer Bosworth for Riley Blake Designs. The pattern, diagrams, cutting chart, photographs, official quilt image, fabric artwork, and product names belong to their respective rights holders.
The official PDF states that it is for personal use only, not for commercial use, and that all rights are reserved. This independently written companion article by Easy Quilting Patterns does not reproduce or replace the complete instructions. Easy Quilting Patterns is not affiliated with or endorsed by Shabby Fabrics, Jennifer Bosworth, or Riley Blake Designs.
Download the pattern from the official source, retain its copyright notice, and do not upload, sell, reproduce, or commercially use the pattern without express permission from Shabby Fabrics.