
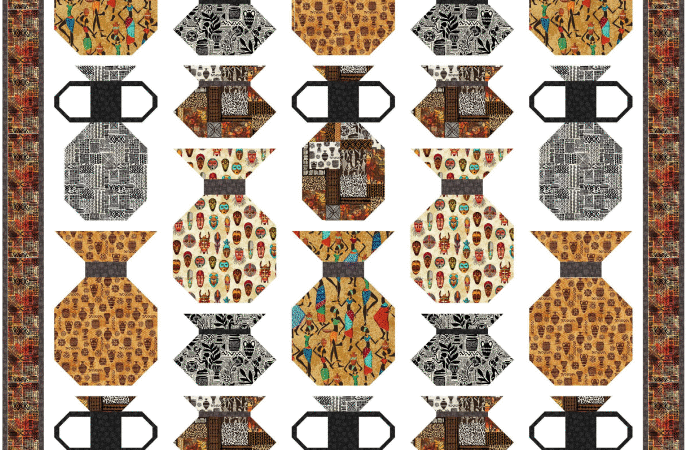
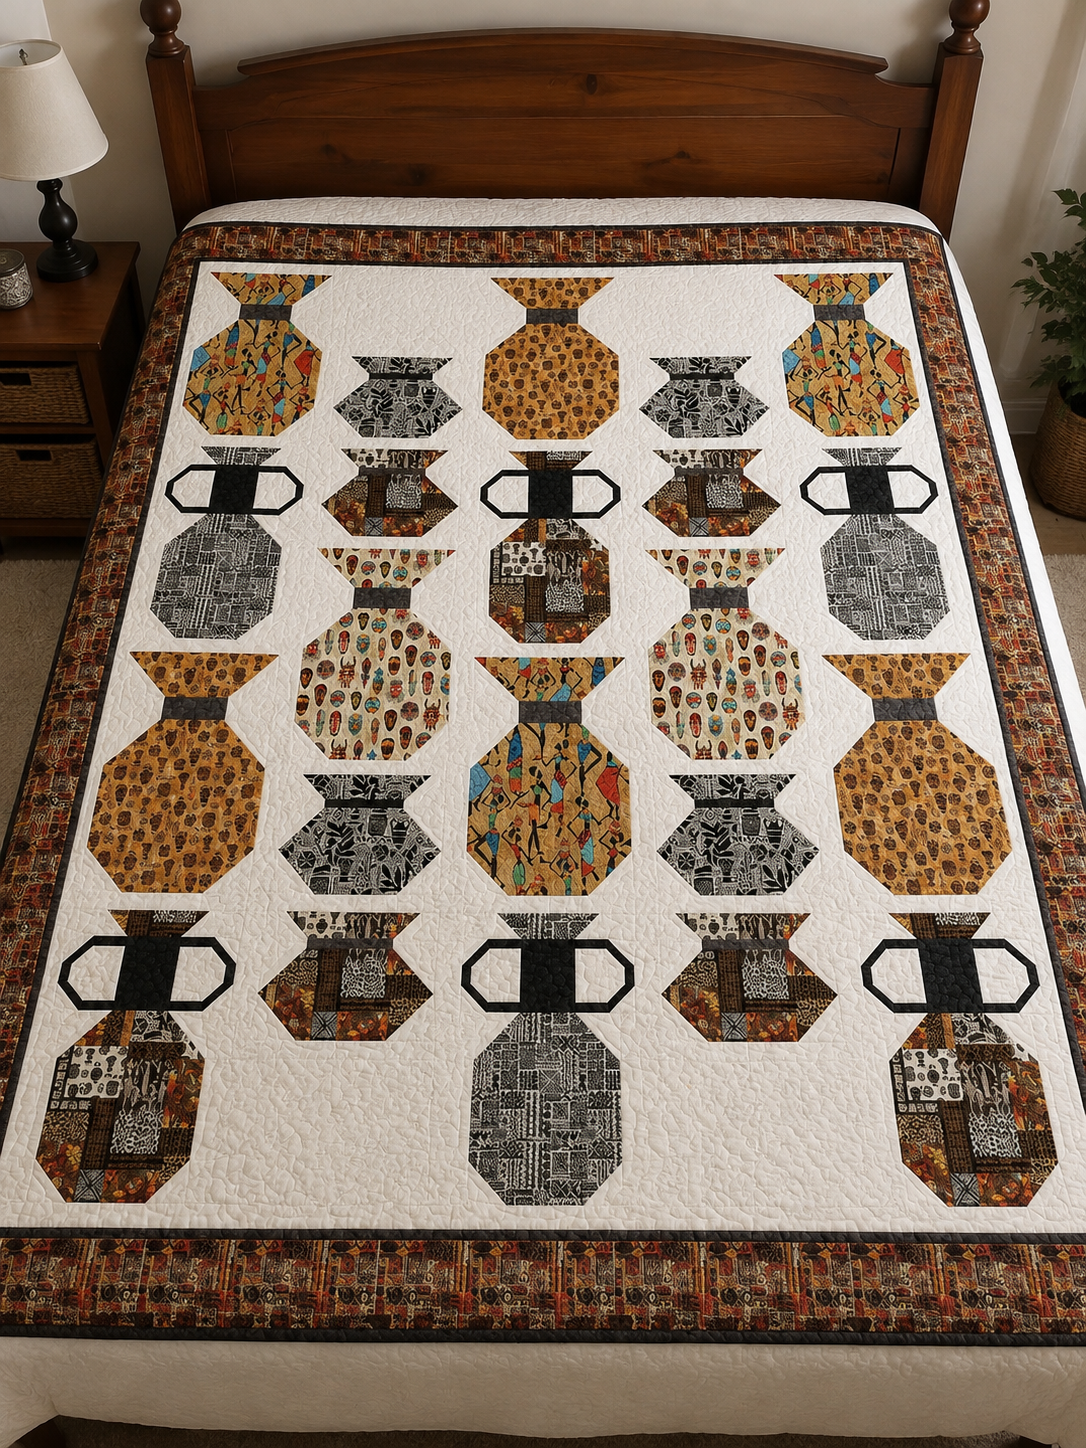
The Pottery Maker quilt builds a gallery of fabric vessels from rectangles, carefully placed stitch-and-flip corners, and slim sashing. Designed by Natalie Crabtree for Michael Miller Fabrics, it finishes at 65 x 72 inches and uses prints from the publisher’s Kenya fabric collection. The official pattern rates the project intermediate.
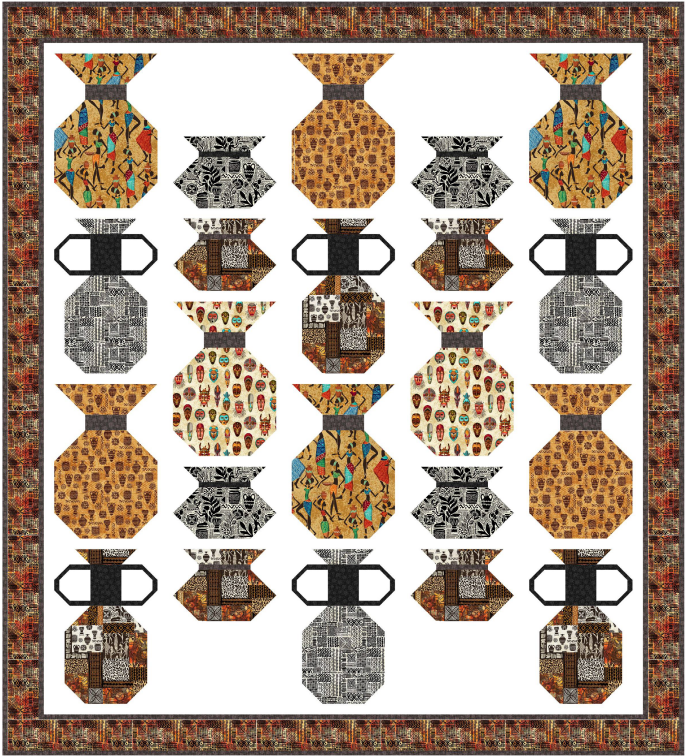
What first appears to be a collection of many unrelated shapes is actually a controlled system of three block families. Block A creates a tall vessel, Block B adds a geometric handle unit, and Block C stacks two smaller vessels. All three finish at the same unfinished checkpoint, so they can be arranged cleanly in five vertical rows.
This independently written guide explains how the design is organized, where accuracy matters most, and how to choose substitute fabrics when the original collection is unavailable. It is a companion to the publisher’s diagrams and cutting chart, not a replacement for them. Keep the official free PDF open while working.
Pottery Maker quilt at a glance
| Detail | Pattern information |
|---|---|
| Pattern | Pottery Maker |
| Designer | Natalie Crabtree |
| Publisher | Michael Miller Fabrics |
| Featured collection | Kenya |
| Finished size | 65 x 72 inches |
| Quilt-top size before binding | 65 1/2 x 72 1/2 inches unfinished |
| Skill level | Intermediate |
| Main techniques | Directional cutting, stitch-and-flip corners, strip piecing, sashing, and borders |
| Block A | 8 blocks in three colorways |
| Block B | 6 blocks in two colorways |
| Block C | 4 identical stacked-vessel blocks |
| Center layout | Five vertical rows separated by four long sashing strips |
| Binding | Eight 2 1/4-inch width-of-fabric strips from Fabric I |
Download the official free pattern
Use the publisher’s file for the complete cutting chart, numbered diagrams, pressing arrows, and exact layout:
The PDF contains a cover plus ten numbered instruction pages. Before cutting, return to the publisher’s free-project section and check for updates, as the cover itself recommends. Save the pattern for personal reference, but send other quilters to the official source rather than redistributing the file.
What makes this an intermediate quilt?
Pottery Maker does not require curves, applique, or paper piecing. Its challenge comes from repetition and orientation. Many white corner squares are sewn diagonally to printed rectangles, and their line direction determines the final vessel silhouette. Block B adds small handle components, while long sashing and three border rounds can reveal accumulated measurement errors.
The original feature prints are directional. The cutting chart therefore includes dedicated diagrams for Fabrics A, C, and G. A piece cut sideways may still fit perfectly, but its masks, figures, or pottery motifs will rotate inside the finished block. That visual mistake is difficult to correct after stitch-and-flip corners have been trimmed.
Another important detail is that the project sheet does not prominently state a general seam allowance. A quarter-inch seam is conventional for patchwork, but do not rely on convention alone. Sew a test block with your preferred quarter-inch setting and compare it with every unfinished measurement supplied by the publisher. Consistent unit size is the real standard.
Fabrics and quantities in the original quilt
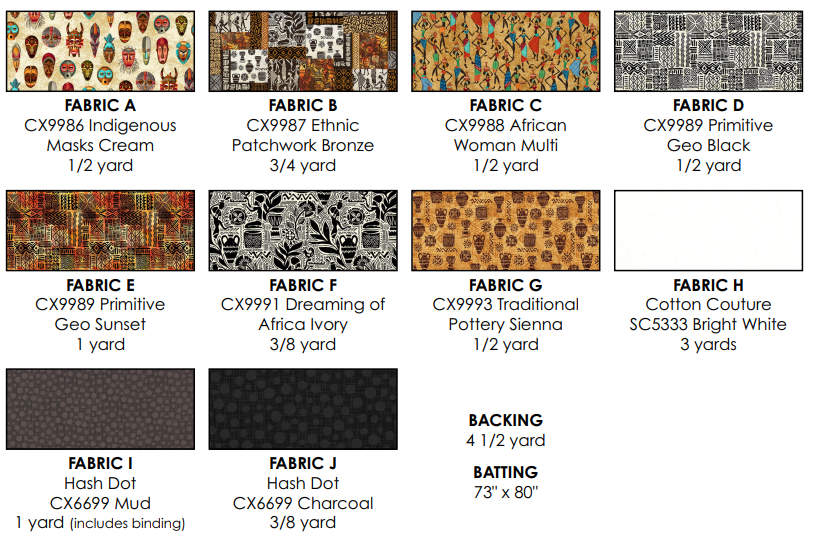
The pattern assigns ten fabrics, labeled A through J. Fabric H provides the bright white background and most sashing pieces. Fabric I supplies the narrow middle border, several vessel accents, and the binding.
| Label | Original fabric | Amount | Main job in the design |
|---|---|---|---|
| A | CX9986 Indigenous Masks Cream | 1/2 yard | Two tall Block A vessels |
| B | CX9987 Ethnic Patchwork Bronze | 3/4 yard | Three Block B vessels and lower halves of Block C |
| C | CX9988 African Woman Multi | 1/2 yard | Three tall Block A vessels |
| D | CX9989 Primitive Geo Black | 1/2 yard | Three Block B vessels |
| E | CX9989 Primitive Geo Sunset | 1 yard | Wide outer border |
| F | CX9991 Dreaming of Africa Ivory | 3/8 yard | Upper halves of Block C |
| G | CX9993 Traditional Pottery Sienna | 1/2 yard | Three tall Block A vessels |
| H | Cotton Couture SC5333 Bright White | 3 yards | Background, spacers, sashing, and first border |
| I | Hash Dot CX6699 Mud | 1 yard | Accents, second border, and binding |
| J | Hash Dot CX6699 Charcoal | 3/8 yard | Block B handles and Block C accents |
| Backing | Not specified by print name | 4 1/2 yards | Quilt back |
| Batting | Any suitable quilt batting | 73 x 80 inches | Middle layer |
Fabric I’s one-yard quantity includes the binding. If you change the binding color or cut wider strips, calculate that requirement separately. The backing quantity assumes ordinary quilting-width fabric; a directional backing, pattern matching, shrinkage, or a different usable width may require more.
Choosing replacement fabrics by role
The original collection may no longer be easy to find. A successful substitution does not need to imitate every print, but it should preserve the relationships between feature, background, accent, and border fabrics.
Choose three expressive focal prints for A, C, and G. They appear in the largest uninterrupted vessel areas, so medium- to large-scale motifs have room to remain visible. B and D should be distinct enough to separate the two Block B colorways. F coordinates with B but needs enough contrast for the two halves of Block C to read as separate vessels.
H should behave as negative space. A solid or quiet tone-on-tone usually gives the shapes the cleanest edges. I and J are dark accents: they outline narrow necks, handles, and small divisions. E becomes the wide outer frame, so audition it around a photograph or fabric mock-up of the center rather than evaluating it alone.
Take a grayscale photo of the full fabric pull. If the vessel edges disappear into H, increase the value difference. If I and J merge into every featured print, choose accents that are darker, quieter, or more consistent.
Describe the collection accurately
The publisher identifies the featured line as the Kenya fabric collection, and the individual print names are listed in the official pattern. When discussing the original fabrics, use those documented names and credit Michael Miller Fabrics. Avoid adding unsupported histories or using broad cultural labels for substitute prints. If you use textiles from a particular artist, region, or tradition, keep the maker and origin information and include accurate credit.
Tools that make the construction easier
Standard quilting tools are enough, but a few extras reduce errors:
- a fine mechanical pencil or removable fabric marker for diagonal lines;
- a ruler long enough to mark each square corner accurately;
- a quarter-inch presser foot or seam guide;
- a square ruler at least 12 1/2 inches wide;
- a rotating mat for trimming stitch-and-flip corners;
- labeled trays for the three block families and their colorways;
- a design wall or clean floor space for the five vertical rows;
- a long ruler or measuring tape reserved for borders and sashing.
Test every marking tool on a scrap, especially when using white background fabric. Marks can sometimes migrate when ironed or show through a pale solid.
Organize the cutting before you sew
Read pages 2 and 3 of the PDF as one continuous cutting chart. The Fabric H list continues onto the next page, and it contains many similar white squares and rectangles for different blocks. Stopping at the page break can leave the background pieces incomplete.
Create separate labels for:
- Block A background corners and neck pieces;
- Block B handle components, body corners, and side strips;
- Block C top, bottom, and separating strips;
- four long vertical sashing strips;
- thirteen short horizontal sashing strips;
- the four large background rectangles used at the tops and bottoms of rows 2 and 4;
- Border 1, Border 2, Border 3, and binding.
Keep the 3-inch, 3 1/2-inch, 2-inch, and 1 1/2-inch white squares in different containers. They are visually similar on a busy cutting table but are not interchangeable.
Preserve directional prints
The pattern gives individual cutting diagrams for A, C, and G. Before making the first cut, place each fabric right side up and identify its visual top. Attach a small arrow label to the selvage. Compare the motif direction with the diagrams, then cut one large rectangle and one smaller top rectangle as a trial.
Do not rotate those rectangles merely to save fabric unless you have decided that direction does not matter. Check the width and height labels carefully: the tall body and shallow top pieces are oriented differently on the cutting page. Stack each colorway with all top arrows pointing the same way.
If your substitute print is nondirectional, the process becomes easier, but still label the pieces by block type. Similar sizes occur in more than one family.
Improve stitch-and-flip accuracy
Stitch and flip, abbreviated SNF in the pattern, creates angled corners without templates. Draw a diagonal on the wrong side of each designated background square. Place it right sides together on the printed rectangle, sew on the line, trim the excess layers, and press the remaining triangle outward.
For reliable results, sew just a thread toward the corner that will be trimmed away. The folded triangle must cover the original corner completely. Before trimming, fold the square back and confirm that its two raw edges align with the rectangle. If the triangle falls short, unpick and resew while all layers are still intact.
Use the first trimmed corner as a test. The PDF specifies leaving a quarter-inch allowance beyond the seam when removing the excess. A small ruler with a marked quarter-inch line makes that cut more consistent than estimating by eye.
The diagonal direction matters as much as the seam position. When several squares sit on one rectangle, draw all lines, arrange the complete unit like the diagram, and photograph it before chain piecing. Sewing a perfect diagonal in the wrong direction produces the wrong silhouette.
Optional bonus-triangle method
Large trimmed corners may be saved as small half-square triangles. Before cutting away the excess, sew a second line about half an inch from the first seam on the waste side, then cut between the seams. Only do this if the extra stitching does not distort the required unit. These bonus pieces are not used in Pottery Maker, so store them as a separate scrap project.
Block A: the tall vessel
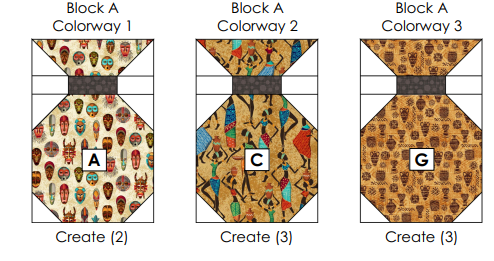
Block A is the clearest introduction to the construction method. A tall printed rectangle forms the vessel body. Stitch-and-flip corners shape its shoulders and lower sides, while a shallow printed unit creates the flared top. White rectangles and a narrow Fabric I accent connect the two sections.
The pattern makes eight Block A units:
- two Colorway 1 blocks from Fabric A;
- three Colorway 2 blocks from Fabric C;
- three Colorway 3 blocks from Fabric G.
Pay close attention to the direction of the printed motifs and drawn diagonal lines. After assembly, every Block A must measure 10 1/2 x 15 1/2 inches unfinished. Measure the first block before repeating it. If it is narrow, check whether the SNF triangles were pressed fully open and whether the vertical joining seams are too deep.
Do not trim the block down merely to make its edges look tidy until you understand why it differs from the checkpoint. Trimming an undersized neck or vessel top cannot restore missing width.
Block B: the handled vessel
Block B contains the most detailed piecing. The center handle band begins as a long strip set made from Fabric H between two narrow Fabric J strips. The strip set is crosscut into identical segments. Additional two-stage stitch-and-flip units form the angled ends of the handles.
Make one complete handle assembly before cutting or sewing the entire batch. It should measure 10 1/2 x 4 1/2 inches unfinished. Check that the dark outline runs continuously around both white handle openings and that the ends mirror one another.
The handle joins a shaped vessel top and body. Long white strips frame the sides, while smaller white rectangles fill the upper corners. The pattern makes six Block B units: three with Fabric B and three with Fabric D. Each completed block must measure 10 1/2 x 15 1/2 inches unfinished.
Because many Block B parts are small, press with the tip of the iron rather than dragging it across the unit. Keep the six handles flat and compare them side by side. If one is shorter, fix it before it becomes part of a full block.
Block C: two stacked vessels
Block C combines a Fabric F vessel above a Fabric B vessel, separated by a white strip. The upper and lower sections use different narrow accent fabrics, which helps distinguish the two forms even though their geometry is related.
Each half should measure 10 1/2 x 7 1/2 inches unfinished before the separating strip is added. The finished Block C checkpoint is 10 1/2 x 15 1/2 inches unfinished, matching Blocks A and B. Make four identical Block C units.
When placing the two halves together, compare the PDF illustration instead of relying on memory. The narrow rims face the central separator, while the fuller vessel bodies face outward. Press toward the white separator as directed so the center remains flat.
Use the measurement checkpoints
The pattern supplies useful dimensions throughout construction. Treat them as quality controls, not optional descriptions.
| Component | Unfinished measurement |
|---|---|
| Block B handle | 10 1/2 x 4 1/2 inches |
| Each Block C half | 10 1/2 x 7 1/2 inches |
| Block A, B, or C | 10 1/2 x 15 1/2 inches |
| Each completed vertical row | 10 1/2 x 63 1/2 inches |
| Quilt center | 56 1/2 x 63 1/2 inches |
| After Border 1 | 58 1/2 x 65 1/2 inches |
| After Border 2 | 59 1/2 x 66 1/2 inches |
| Completed top | 65 1/2 x 72 1/2 inches |
Measure after pressing and cooling. A warm unit can stretch. If a block differs by more than a tiny amount, diagnose the seam or SNF corner that caused it before continuing.
Assemble the five vertical rows
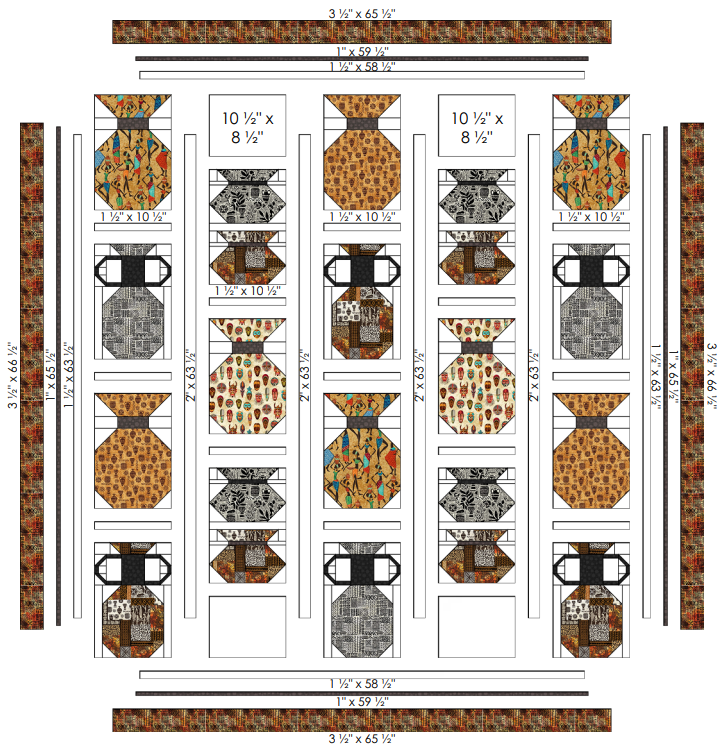
The quilt center uses five long rows arranged from left to right. In the official diagram, rows 1, 3, and 5 contain four large blocks. Rows 2 and 4 contain three blocks plus a large white rectangle at the top and another at the bottom. This offset creates the gallery-like rhythm of tall and stacked vessels.
Short white sashing strips separate blocks within the rows. Lay out all eighteen blocks and four large spacer rectangles before sewing. Confirm the exact colorway placement against page 10 of the PDF; the distribution is deliberate and prevents identical focal prints from clustering.
Label the rows 1 through 5 at the top. Sew one row at a time, matching centers and keeping the sashing from stretching. Each row should reach 10 1/2 x 63 1/2 inches unfinished.
Four long white strips separate the five rows. Pin each strip at the top, bottom, center, and quarter points. If the strip and row differ slightly, distribute the difference rather than pulling from one end. After joining, the center should measure 56 1/2 x 63 1/2 inches unfinished.
Add the three borders without waves
Pottery Maker uses three border rounds:
- Border 1: a 1 1/2-inch cut-width Fabric H frame that extends the white gallery background.
- Border 2: a narrow 1-inch cut-width Fabric I accent.
- Border 3: a 3 1/2-inch cut-width Fabric E outer frame.
The official chart gives exact cut lengths, but measure the quilt through its vertical and horizontal centers before attaching each round. Compare your measurement with the pattern checkpoint. If they agree, use the prescribed border lengths. If they do not, find the source of the difference rather than stretching a strip to fit.
Fold each border and quilt edge into quarters and match those points. Sew with the border on top so you can monitor its edge, then press outward. Check that the top remains flat before adding the next round. The final quilt top should be 65 1/2 x 72 1/2 inches unfinished, yielding a finished size of 65 x 72 inches after binding.
Quilting, backing, and binding
The pattern calls for 4 1/2 yards of backing and 73 x 80 inches of batting. Confirm the required backing overage with your longarm quilter before cutting; many professionals prefer at least four extra inches on every side, but requirements vary.
Straight-line quilting can reinforce the vertical gallery layout. Consider parallel lines through the white sashing, light echo quilting around each vessel, or a restrained geometric texture across the whole top. Dense quilting inside the background with lighter quilting on the vessels can make the shapes appear slightly raised.
Avoid outlining every tiny printed motif. The feature fabrics already carry substantial visual detail, so the quilting should support the silhouettes rather than compete with them. Test thread on both the bright background and darkest accents. A soft neutral may be less distracting than either pure white or black.
Binding is made from eight Fabric I strips cut 2 1/4 inches wide. Join them with diagonal seams to distribute bulk, press the long strip in half, and attach it by your preferred method. Fabric I also appears in the quilt, so the original binding relates naturally to the narrow middle border and vessel accents.
Troubleshooting common problems
A stitch-and-flip triangle does not cover the corner
Do not trim it. Fold the square back, check the marked line, and resew slightly toward the waste side. Confirm coverage first; only then remove the excess fabric.
Directional motifs are sideways
Return to the dedicated cutting diagrams for A, C, and G. Mark the visual top on every uncut piece. If a rotated part has already been trimmed, decide whether to remake it before assembling the block.
The Block B handles are uneven
Check the original strip-set width, the crosscut width, and the position of the small SNF corners. Build one accurate handle and use it as a physical reference for the other five.
A block is smaller than 10 1/2 x 15 1/2 inches
Measure its individual sections. Common causes are an overly wide seam allowance, SNF triangles pressed short of the original corner, or distorted narrow strips. Correct the construction method before making the remaining blocks.
Long sashing ripples
Measure both the rows and strips, match quarter points, and avoid pulling either layer. Press with the iron lifting and lowering instead of sliding along the length.
Borders wave at the edges
Do not cut borders by measuring only the outside edge of the quilt. Use the center measurement, cut paired borders to the same length, and distribute the quilt edge evenly between marked points.
A practical sewing schedule
Break the project into checkpoints:
- Session 1: read the complete PDF, choose fabrics by role, and test the palette in grayscale.
- Session 2: mark directional tops, cut one trial colorway, and organize all white background pieces.
- Session 3: make one Block A and confirm its unfinished size.
- Session 4: construct one Block B handle and one complete Block B.
- Session 5: make both halves and one complete Block C.
- Session 6: approve all samples, then chain piece the remaining units by block family.
- Session 7: arrange and sew the five vertical rows.
- Session 8: join the center with long sashing and add three measured border rounds.
- Session 9: prepare the backing, quilt, square, and bind.
Record the machine setting that produced accurate test blocks. When returning to the project later, check that setting before sewing another batch.
Is the PDF created by Easy Quilting Patterns?
No. The pattern belongs to its credited designer and publisher. This page provides an original companion guide and links readers to Michael Miller Fabrics for the complete instructions.
Final checklist
- Download the PDF from the official Michael Miller Fabrics source.
- Check the free-project library for updates before cutting.
- Read the complete Fabric H list across pages 2 and 3.
- Mark the top direction of Fabrics A, C, and G.
- Separate similar white squares and rectangles by block family.
- Test every stitch-and-flip corner before trimming.
- Confirm the Block B handle at 10 1/2 x 4 1/2 inches.
- Confirm every Block C half at 10 1/2 x 7 1/2 inches.
- Confirm all eighteen blocks at 10 1/2 x 15 1/2 inches.
- Label the five rows and verify the colorway layout.
- Measure through the center before adding each border.
- Credit Natalie Crabtree and Michael Miller Fabrics when sharing the project.
Pottery Maker succeeds through careful preparation rather than complicated tools. Preserve print direction, verify every diagonal before trimming, and use the pattern’s measurements as checkpoints. Those habits keep the vessel silhouettes crisp and the five-row gallery balanced from the first block to the final border.
Pattern credits
Pottery Maker was designed by Natalie Crabtree for Michael Miller Fabrics and features fabrics from the publisher’s Kenya collection. The complete pattern is offered through Michael Miller Fabrics’ free-project resources. All original pattern instructions, diagrams, quilt renderings, fabric artwork, product names, and trademarks remain the property of their respective rights holders. Easy Quilting Patterns is not affiliated with or endorsed by Michael Miller Fabrics; this independently written companion article provides additional planning, construction, and troubleshooting guidance. Please obtain the pattern from the official links above.