
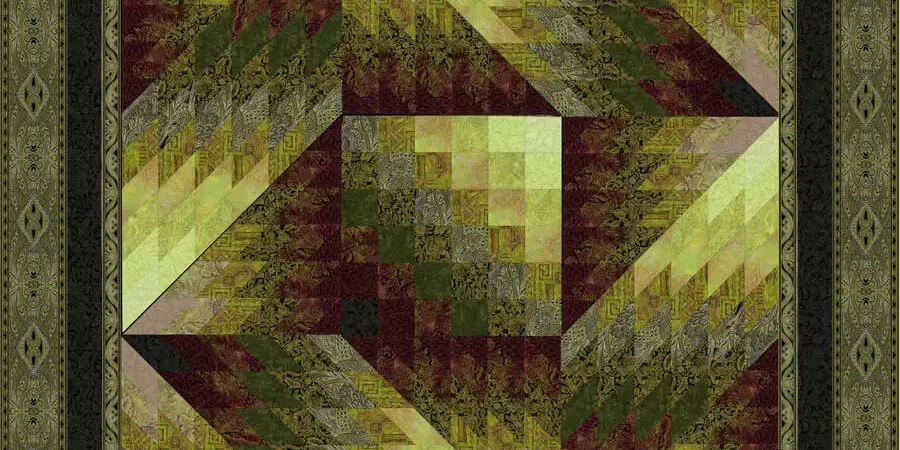
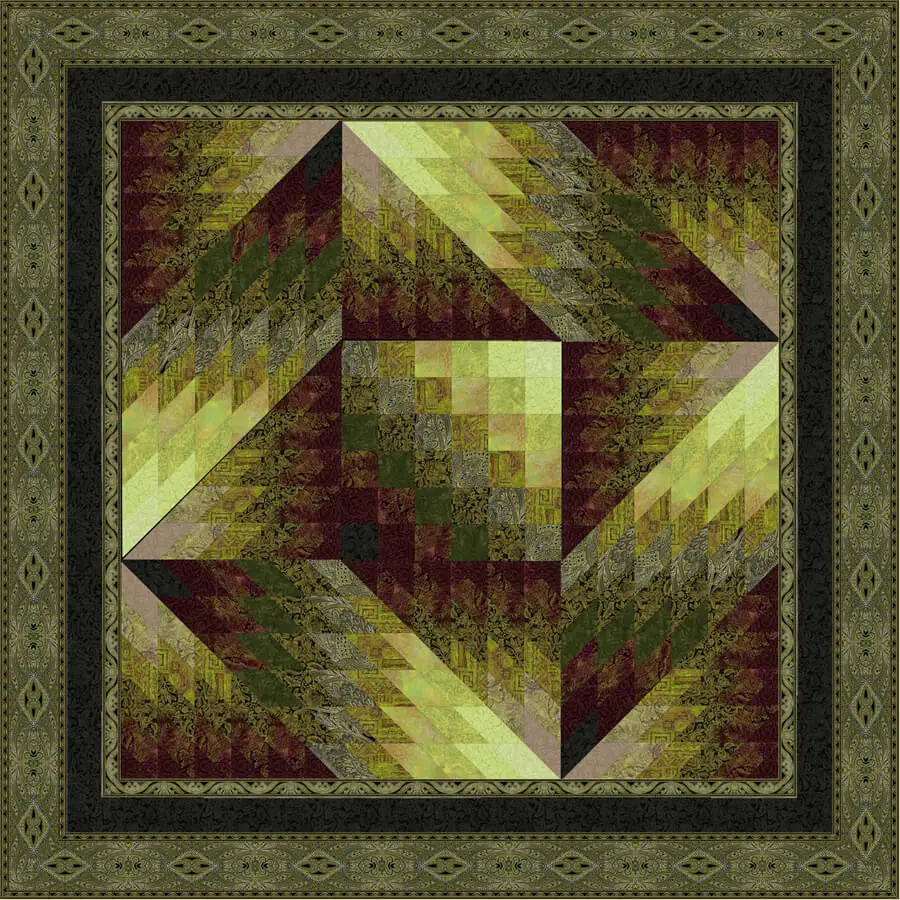
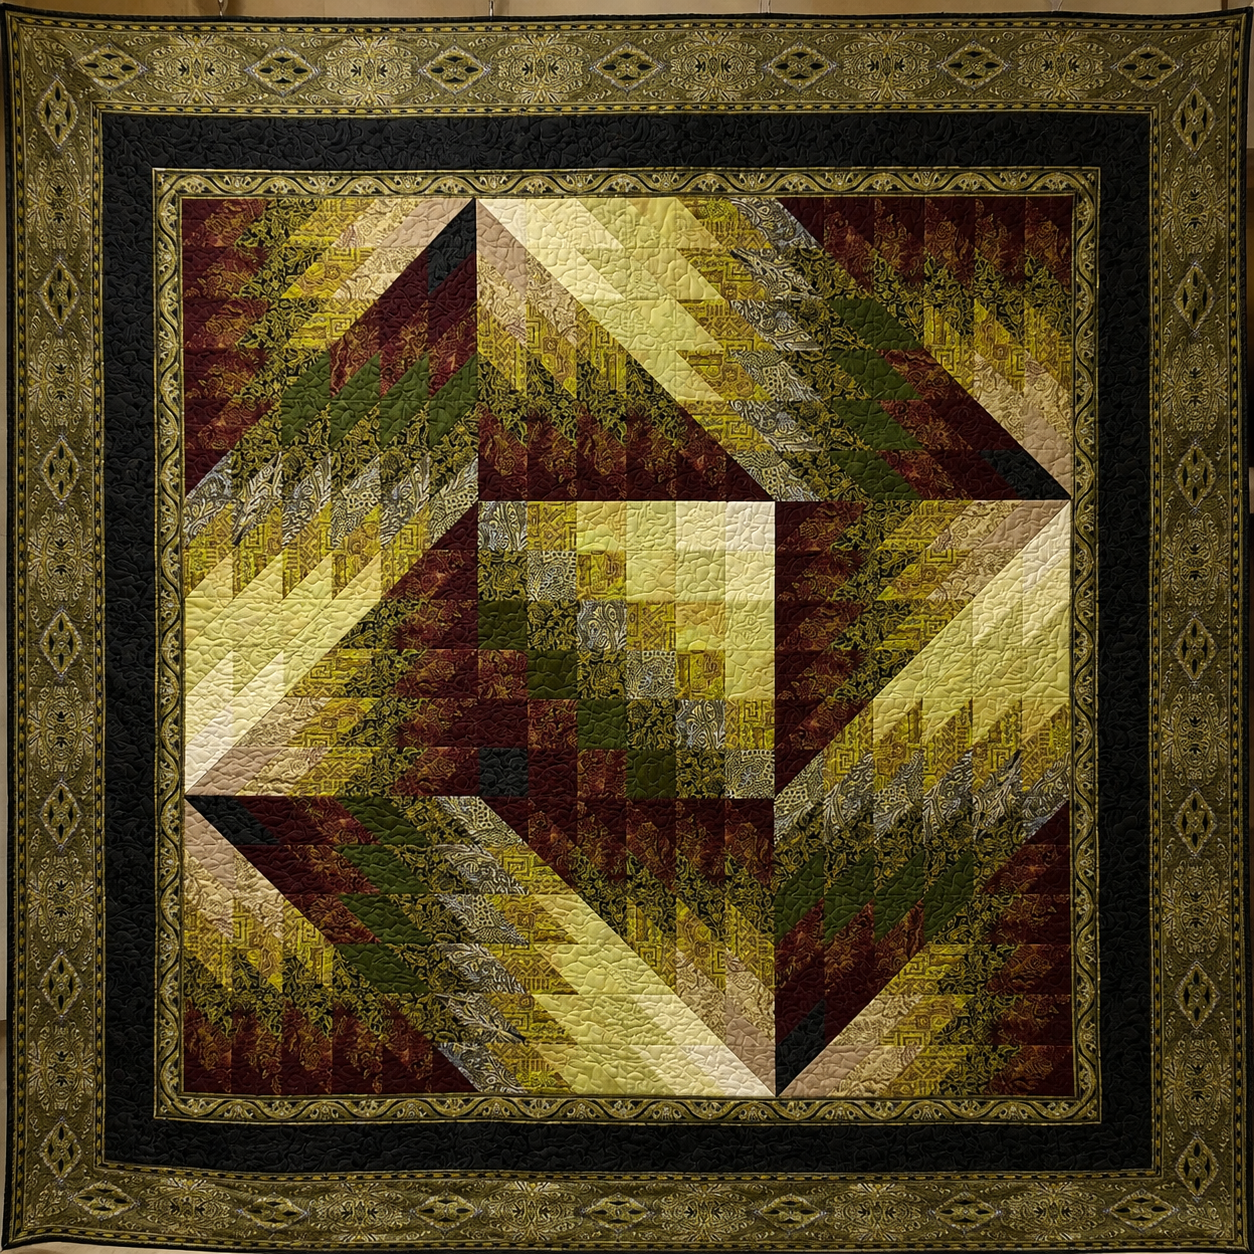
The Pacific Rim quilt pattern transforms a carefully shaded fabric palette into a striking contemporary medallion. The center begins as a small grid of squares, while strip-pieced diamond bands turn around it in four directions. Three framed borders complete the design, including two beautifully matched sections of border-print fabric.
The original quilt uses the Pacific Rim collection designed by Jinny Beyer for RJR Fabrics. The pattern was written by Debbie Beaves and finishes at approximately 60¾ inches square. Although the original fabrics are now difficult to find, the design remains an excellent study in gradual color movement, 45-degree strip cutting, bias-edge control, partial seams, and mitered borders.
This is an intermediate patchwork project. The units are efficiently strip-pieced, but the quilt rewards careful labeling and accurate work. The diagonal bands must retain their color order, bias edges must remain stable, and the four rectangular sections are assembled around the center with a partial-seam technique. The border print then requires thoughtful motif placement so all four sides appear balanced.
This independent guide explains the construction logic, palette planning, strip-set accuracy, partial-seam assembly, border-print matching, troubleshooting, and finishing choices. It is designed to accompany the authorized free pattern available from Jinny Beyer Studio. It does not replace the original cutting chart, templates, diagrams, or numbered instructions.
Pacific Rim Quilt at a Glance
| Detail | Original pattern information |
|---|---|
| Pattern name | Pacific Rim Quilt |
| Pattern writer | Debbie Beaves |
| Featured collection designer | Jinny Beyer |
| Original fabric company | RJR Fabrics |
| Finished size | Approximately 60¾″ × 60¾″ |
| Center square before surrounding units | 15½″ square |
| Pieced center before borders | 45½″ square |
| Main techniques | Strip piecing, 45-degree cutting, partial seams, mitered borders |
| Original interior fabric groups | 13 coordinating fabrics |
| Original border print | One additional fabric used in two framed borders |
| Backing suggestion | 4 yards of coordinating fabric |
| Binding width in original pattern | 2¼″ strips |
| Official skill level | Intermediate |
| Finished use | Wall quilt, lap quilt, or decorative throw |
The Jinny Beyer Studio pattern page rounds the size to 61 inches square, while the original PDF gives the more precise 60¾-inch measurement. Both refer to the same quilt. Use the cutting and assembly measurements in the authorized PDF when sewing.
What Makes the Pacific Rim Design Distinctive?
Pacific Rim creates motion without using curves. Rectangular pieced sections turn around a central square, and the diagonal patches inside those sections appear to flow from pale yellow-green through olive, gray, brown, burgundy, and black. The result resembles a rotating frame, woven ribbons, or light passing around a geometric opening.
Four design ideas work together:
- Graduated color: neighboring fabrics change gradually rather than randomly.
- Repeated diagonal bands: 45-degree slices transform horizontal strip sets into diamonds.
- Rotational symmetry: four rectangular sections turn around the center.
- Framed borders: matched border-print motifs give the top a finished, architectural edge.
The quilt does not depend on one recognizable block. Its identity comes from the relationship between the center, four rotating arms, and three borders. That makes palette planning especially important. If the fabrics are shuffled without considering value, the bands may lose their direction even when the piecing is technically correct.
Why the Pattern Is Intermediate
The official Jinny Beyer Studio page classifies Pacific Rim as intermediate, and that is an accurate description. The quilt does not require foundation paper piecing, appliqué, or curved seams, but several precision skills appear in the same project.
You will need to:
- Keep 13 interior fabrics in a specific shaded sequence.
- Construct multiple strip sets with different combinations.
- Stagger strips before trimming them at exactly 45 degrees.
- Cut consistent 3-inch-wide diagonal sections.
- Protect numerous bias edges from stretching.
- Add end triangles without reversing the color flow.
- Join the diagonal units into four matching rectangular sections.
- Assemble those sections around the center with a partial seam.
- Center motifs in a border print.
- Sew accurate miters without distorting the quilt edge.
A confident beginner who already makes accurate patchwork could complete the design slowly, but it should not be presented as an easy first quilt. Before cutting the feature fabric, practice a small strip set, one 45-degree slice, and a partial seam using scraps.
Understanding the Color-Shading Strategy
Jinny Beyer is known for using gradual transitions to move the eye through a quilt. In Pacific Rim, the fabrics do not form a simple light-to-dark line once and stop. They reappear in different positions, allowing the transition to turn around the center.
The original palette contains pale yellow and spring green, chartreuse, yellow-green textures, khaki, dark green, brown, sable, black, and neutral accents. Some fabrics read almost as solids from a distance, while others add paisley, floral, scroll, feather, or tapestry detail.
That combination performs two jobs. Value creates the large geometric movement; print adds richness when the quilt is seen closely.
Value before color
If replacing the discontinued fabrics, first arrange candidates by value. Photograph them and convert the image to grayscale. You should see a deliberate path from light to medium and dark, with a few transitional fabrics connecting the extremes.
Two fabrics can be different colors but share the same value. If too many neighboring fabrics are equally dark or equally light, the diagonal patches blend into one mass. That may be attractive, but it changes the Pacific Rim effect.
Temperature as a secondary movement
The original palette shifts between fresh yellow-green, earthy olive, warm brown, deep wine, and black. Warm and cool notes add another layer of motion. A substitute palette can use the same idea: aqua through teal into navy and violet, or peach through coral into burgundy and charcoal.
Print scale
Small and medium prints work well because many fabrics appear in 3-inch squares or diagonal patches. Very large motifs will be fragmented. They can still be used, but treat them as fields of color rather than expecting a complete flower or image to remain visible.
Border print as its own decision
Do not choose the border print only because it matches the colors. It must also contain repeatable bands that can be centered and mitered. A standard allover print will not automatically behave like the original engineered border print.
Original Fabric Planning Overview
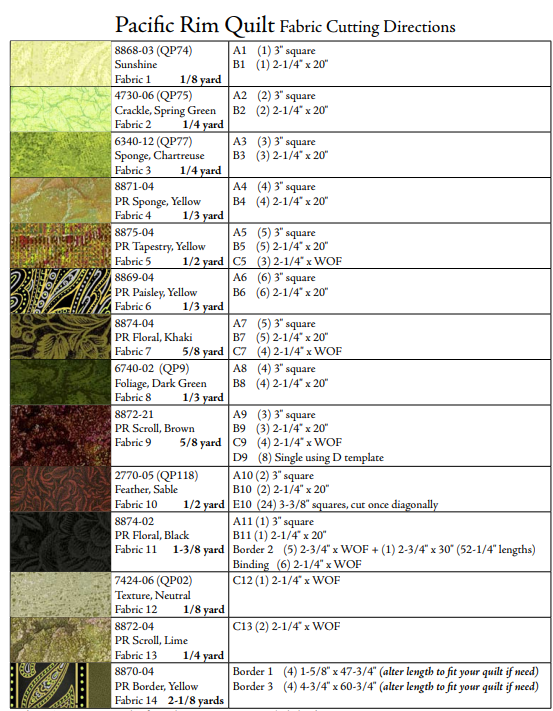
The authorized pattern contains the exact cutting directions. The table below summarizes the original fabric order and yardage so you can understand the scale of the palette without reproducing the cutting chart.
| Fabric | Original description | Yardage | General role |
|---|---|---|---|
| 1 | Sunshine | ⅛ yd | Lightest center and strip-set accent |
| 2 | Crackle, Spring Green | ¼ yd | Pale green transition |
| 3 | Sponge, Chartreuse | ¼ yd | Bright chartreuse transition |
| 4 | PR Sponge, Yellow | ⅓ yd | Warm yellow-green |
| 5 | PR Tapestry, Yellow | ½ yd | Golden patterned transition |
| 6 | PR Paisley, Yellow | ⅓ yd | Patterned gold and dark accent |
| 7 | PR Floral, Khaki | ⅝ yd | Khaki transition and diagonal bands |
| 8 | Foliage, Dark Green | ⅓ yd | Deep green anchor |
| 9 | PR Scroll, Brown | ⅝ yd | Brown sections and specialty patches |
| 10 | Feather, Sable | ½ yd | Sable transition and end triangles |
| 11 | PR Floral, Black | 1⅜ yd | Darkest interior fabric, middle border, binding |
| 12 | Texture, Neutral | ⅛ yd | Pale neutral strip-set accent |
| 13 | PR Scroll, Lime | ¼ yd | Lime transition in selected units |
| 14 | PR Border, Yellow | 2⅛ yd | Inner and outer mitered border print |
The original backing suggestion is four yards of a coordinating print. If your replacement border is directional or has a larger repeat, purchase extra fabric. Border matching can require more length than a simple yardage calculation suggests.
How to Choose Substitute Fabrics
The Pacific Rim collection is old enough that assembling the exact list may be impractical. A thoughtful substitute palette is more useful than searching indefinitely for every original SKU.
Start with fourteen positions
Lay fourteen empty labels on a table. Positions 1 through 13 are interior fabrics; position 14 is the border print. Fill the interior positions gradually, checking both color and value. Do not cut until every role has been assigned.
Use a bridge fabric
When two neighboring fabrics look unrelated, add a bridge fabric that shares something with both. It may carry the hue of one and the value of the other, or contain both colors in a small print. Smooth transitions create the luminous effect.
Repeat a visual language
The fabrics need not come from one collection, but they should feel related. Combine batiks, painterly textures, tonal prints, or small traditional motifs rather than mixing every possible style. A coherent print language lets the color movement remain dominant.
Test the smallest patches
Place a 3-inch window cut from paper over each candidate. This approximates the scale of many center squares and diagonal units. A fabric that looks balanced in a half-yard piece may become unexpectedly light, dark, or empty within a small patch.
Check the darkest fabric
Fabric 11 has several important jobs, including the dark middle border and binding. Choose a fabric that provides a strong visual pause without feeling disconnected from the interior palette.
Audition the border at full width
Unroll enough of the border print to see at least one complete repeat. Fold it around a paper square or place four photocopied strips at right angles. This reveals whether the motif will form convincing corners.
Four Alternative Color Stories
Coastal turquoise
Move from pale sand through seafoam, aqua, turquoise, deep teal, indigo, and driftwood brown. Use a border print with waves, coral-like bands, or a geometric stripe. The ocean palette suits the name without copying the original colors.
Royal blue and gold
Use ivory, pale blue, several royal and sapphire tones, muted gold, navy, and a deep near-black blue. A formal border print with gold details gives the quilt an elegant framed appearance.
Rose garden
Build the transition from cream to blush, rose, mauve, wine, sage, and deep green. Choose small florals and tonal leaves, then frame the quilt with a border print containing roses and narrow ornamental bands.
Modern grayscale with one accent
Arrange white, silver, gray, charcoal, and black, then introduce several values of one accent such as red, teal, or lime. Use a high-contrast striped border print. This version emphasizes the rotating geometry more than surface decoration.
Tools That Improve Accuracy
Pacific Rim can be made with standard quilting tools, but several items make the diagonal work easier.
- Sharp rotary cutter and spare blade
- Large cutting mat
- Long ruler with a clear 45-degree line
- Square ruler at least 6½ inches
- Right-angle triangle ruler for planning border miters
- Quarter-inch presser foot or reliable seam guide
- Fine pins or washable fabric glue
- Removable paper labels numbered 1 through 14
- Letter labels for the cutting groups used in the pattern
- Shallow trays or pieces of batting for bias-edged units
- Design wall or large flat surface
- Dry iron and firm pressing board
- Camera or phone for recording fabric order
Use the same ruler markings for every repeated diagonal cut. Switching between different rulers or measurement sides can introduce small discrepancies.
Labeling: The Most Valuable Preparation Step
The original pattern specifically recommends labeling each fabric with its number and cutting letter. Follow that advice. Several fabrics appear in more than one component, and the construction depends on exact sequences rather than general color categories.
Create a master card containing:
- Fabric number
- Fabric description or replacement name
- Small fabric swatch
- Pattern cutting letters used for that fabric
- Original yardage
- Remaining yardage after cutting
Place smaller labels inside each cut-piece bag. A strip from Fabric 5 may look nearly identical to Fabric 7 under evening light. A number is safer than a memory-based description such as “olive floral.”
Photograph the full 1–14 order in natural light. Keep the image available at the sewing machine. If a label falls off, the photograph can help restore the sequence.
Preparing and Cutting the Fabric
Read all six pages of the original PDF before cutting. The final pages contain cutting suggestions, templates, yardages, and border information that affect earlier planning.
Decide whether to prewash based on your normal practice. Treat the full group consistently. Press the yardage flat and refold it on grain before cutting width-of-fabric strips.
The border print deserves separate preparation. Identify:
- The direction of the printed bands
- The full motif repeat
- The centerline of the motif you want on each side
- The bands intended for the narrow inner border
- The bands intended for the wider outer border
- Enough extra length for four miters
Do not remove selvages or cut the entire border yardage into narrow strips until you understand how the print is organized.
The templates on the authorized pattern must be printed or viewed at the correct scale. If printing, use 100 percent or “actual size,” not “fit to page.” Verify the template against any provided measurement before cutting feature fabric.
Constructing the Central Square
The quilt begins with 3-inch squares labeled from the light and dark palette. They are arranged in six rows of six squares, creating a gradual diagonal movement through the center.
After the rows are joined, the center should measure 15½ inches square. That measurement is an important early checkpoint.
Organize before sewing
Lay out the complete six-by-six grid. Label each row and photograph it. The colors repeat in offset positions, so a single misplaced square changes the shading pattern.
Press alternating rows
The original diagram provides pressing directions that alternate by row. This allows neighboring seam allowances to nest when the rows are joined. Follow those arrows rather than pressing every row the same way.
Pin intersections
Match the row seams before sewing. A fine pin placed directly through the two seam lines helps maintain alignment. Press the completed row joins according to the pattern.
Measure before continuing
Check the center horizontally, vertically, and diagonally. It should be flat and approximately 15½ inches square. If it is too small, examine the seam allowance before building larger units around it. If it is not square, identify the row that has shifted rather than trimming away important squares.
Understanding the B Strip Sets
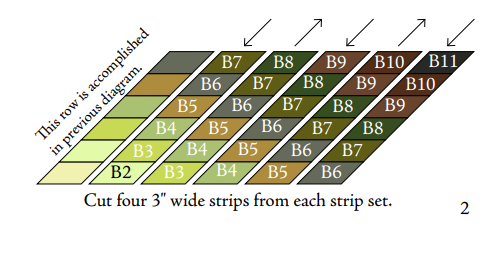
The B strip sets create much of the repeating color spectrum visible in the four rotating rectangular sections. Each set uses a specific sequence of 2¼-inch-wide strips. The strips are staggered before the first 45-degree cut so there is enough usable fabric across the diagonal sections.
The original pattern begins by shifting the strips 2¼ inches to one side. That amount relates to the strip width and the geometry of the later cuts. Do not align all strip ends or substitute a guessed offset.
Sew long strips without bowing
Match the ends, add a few pins, and support the fabric on the table. Alternate the direction of stitching from one long seam to the next. This reduces the tendency of the strip set to curve.
Press without stretching
Set each seam, then press in the direction shown in the pattern. Lower and lift the iron rather than sliding along the strip. Check that the set remains straight after every addition.
Confirm the color order
Place the pressed set beside your master palette card. Read the fabric numbers from one edge to the other. Correct a reversed strip before cutting diagonal units.
Cutting the B Units at 45 Degrees
The first trimming cut establishes the angle for all later sections. Align the ruler’s 45-degree line with a long seam or stable edge as shown in the authorized diagram. Make a clean cut with a sharp blade.
The pattern then cuts 3-inch-wide sections from each strip set. Measure the width perpendicular to the angled edge, not along the strip-set seam.
For consistent cuts:
- Recheck the 45-degree alignment before every slice.
- Keep the entire ruler supported on the strip set.
- Use one smooth cutting pass.
- Lift each section without pulling its diagonal edges.
- Stack sections in the order cut.
- Label the stack with its strip-set identity and orientation.
The newly exposed long sides are bias edges. Keep the sections flat. Do not drape them over the sewing machine or handle them by one pointed corner.
Joining the B Sections into Larger Units
The diagonal sections are arranged into longer pieced units. Color placement and orientation matter because these units will eventually turn around the center.
When matching two diagonal sections, the internal seams must intersect at the future quarter-inch stitching line. Their raw edges may require a small offset. Place the pieces right sides together, insert a pin through matching seam intersections, and test one seam before chain piecing.
Open the test unit without pressing. Check that the color bands form continuous diagonal lines. If every intersection is displaced in the same direction, adjust the offset. If individual intersections vary, measure the strip widths and diagonal cuts.
The original instructions make four matching B-based units. Keep them oriented the same way during construction, then label the top edge of each.
Understanding the C Strip Sets
The C strip sets use a smaller group of fabrics and are staggered in the opposite direction from the first B sets. This reversal is intentional. It creates units that complement the B sections when assembled into the larger rectangular shapes.
Use a separate work area or tray for the C components. Similar widths and colors make it easy to combine them accidentally with B sections.
The C sets are also trimmed at 45 degrees and cut into 3-inch-wide diagonal strips. After cutting, additional pieces—including end triangles and the specialty D pieces from Fabric 9—complete the triangular shapes shown in the original pattern.
Do not replace the template-based components with approximate triangles. Their angles and seam allowances are designed to finish the diagonal row and create a straight outer edge.
Adding the End Triangles
The pattern uses triangles cut from Fabric 10 at the ends of selected C sections. A separately templated Fabric 9 piece completes other units. These pieces stabilize the visual end of the color run and help convert diagonal strips into larger triangular sections.
Before sewing, fold or mark the midpoint of the triangle’s long edge and the matching pieced edge. Align the centers and ends gently. If the lengths do not match, check for stretching or a reversed component.
Sew without pulling. Press the allowance as directed and place the completed unit flat to cool. Make one correct master before repeating the full batch.
The original pattern makes eight of these triangular assemblies. Count and label them before moving to the rectangular-unit stage.
Building the Four Rectangular Sections
The B and C-based components combine into four large rectangular shapes. Each one contains a flowing sequence of diamonds that turns at one end. When all four are rotated around the center, those turns create the large woven appearance.
Use a design board to assemble one rectangle at a time. Compare three landmarks with the original diagram:
- The lightest band and the direction it travels
- The darkest band at the opposite area
- The direction of the angled turn
Sew the components in a consistent order. Pin the color-band intersections first, then the ends and remaining edge. Support the completed rectangle because several of its outer edges remain vulnerable to stretching.
Make all four rectangles and compare them. They should be matching units, not four separately improvised rotations. The rotation happens during quilt assembly.
The Partial-Seam Assembly
The four rectangular sections surround the 15½-inch center square. A standard complete seam on the first side would block the final section from fitting. The solution is a partial seam.
The original diagram shows exactly where to stop and how to work counterclockwise. Use that diagram during assembly. The general logic is:
- Align the first rectangular section with the center.
- Sew only part of the first seam, leaving the end open.
- Add the second rectangle along the next side.
- Continue around the center in the same direction.
- Add the third and fourth rectangles.
- Return to the unfinished first seam.
- Complete it after the fourth unit provides the necessary edge.
This is sometimes called a “courthouse step” style of partial-seam assembly, although the Pacific Rim units are far more detailed than simple strips.
Mark the stopping point
Use a removable marker or pin to show where the first seam must stop. Backstitch lightly or shorten the stitch length for a few stitches at that point so the partial seam does not open while the top is handled.
Maintain the direction
Place a counterclockwise arrow on a paper note beside the machine. Rotating the work in the wrong direction can make the third section appear impossible to attach.
Press after each addition
The original instructions call for pressing as the sections are added. Support the full unit and avoid pressing across exposed bias edges with a sliding motion.
Check the 45½-inch measurement
After closing the partial seam, the pieced center should measure approximately 45½ inches square. Check the middle of each side and both diagonals. Resolve distortion before adding the borders.
Troubleshooting the Partial Seam
The fourth rectangle does not fit
Confirm that the first seam was left sufficiently open and that all sections were added in the same rotational direction. Also verify that the rectangles are identical and not mirror images.
The center square puckers
One partial seam may have been completed too early, or a rectangle may have been stretched. Open the affected seam, let the fabrics lie naturally, and repin from landmarks.
There is a small hole at the intersection
The partial seam may not overlap the later seam enough, or the starting stitches may have opened. Reinforce the intersection from the back without pulling the fabric off grain.
The outer edge waves
Bias edges may have grown during construction. Measure each side through the center. Gentle stay-stitching within the seam allowance can prevent further stretching, but do not force a wavy top flat with steam.
Preparing the Quilt Center for Borders
Before working with the border print, make sure the 45½-inch center is stable and square.
- Press the center on a large, clean surface.
- Allow it to cool completely before moving.
- Measure each side through its midpoint.
- Compare the two diagonals.
- Check that no diamond point reaches the raw edge without a seam allowance.
- Stay-stitch vulnerable bias sections if appropriate for your fabric and pattern.
Do not trim the center aggressively to force it to the measurement. Determine whether the difference comes from seam allowance, stretched edges, or one incorrect unit.
Understanding the Three-Border Frame
The original quilt uses three border stages:
- A narrow border cut from the engineered border print
- A dark coordinating middle border
- A wider outer border cut from another band of the same border print
The narrow and wide border-print bands visually echo each other. The dark middle border provides breathing room so the two motifs do not compete.
All three borders are shown with mitered corners in the finished quilt. The engineered print makes careful motif matching particularly noticeable.
Choosing a Usable Border Print
A true border print typically runs in bands parallel to the selvage. It may include multiple stripe widths or repeating ornamental motifs.
Look for:
- A clearly identifiable center motif
- A repeat that can be matched on all four sides
- Enough width for both inner and outer border roles
- Colors that connect the quilt center and dark middle border
- Motifs that form attractive 45-degree corners
- Sufficient yardage for repeat matching and cutting loss
If you cannot find a suitable border print, a stripe can work, but it creates a different effect. A tonal or solid border can also be mitered without motif matching. Preserve the border widths and measure the actual quilt before cutting.
Centering the Border Motif
Jinny Beyer’s framing technique begins by placing a border strip across the middle of the quilt and centering a chosen motif at the exact midpoint. This ensures that the design reads symmetrically from the center toward both corners.
Mark the center of each quilt edge and the center of the border motif with removable indicators. Do not rely on the cut ends of the fabric strip, since one end may contain a partial repeat.
Audition the strip from a distance. The most visually obvious motif should sit at the center, not an accidental gap or awkward crop.
Once one border piece is planned, use it as a master for the other three sides so the printed design begins and ends in the same place.
Planning Accurate Mitered Corners
A miter joins two border strips at a 45-degree angle, allowing the printed motif to turn the corner. For a convincing match, both border pieces must use corresponding portions of the repeat.
The authorized pattern shows how to use a right-angle triangle to mark the miter while leaving seam allowance. Follow that diagram for the exact operation.
General accuracy habits include:
- Mark the finished corner intersection on the wrong side.
- Add the seam allowance beyond the marked line.
- Place adjoining border pieces right sides together.
- Match the printed lines or motifs at the future seam, not only at raw edges.
- Baste the miter first with a longer stitch.
- Open and inspect the match from the front.
- Adjust before sewing the permanent seam.
Use the first successful border piece as a cutting guide for the remaining sides. All four should contain the same motif placement.
Sewing the Borders to the Quilt
Pin the midpoint of the border to the midpoint of the quilt edge. Then pin the corners and distribute the fabric between those points. The quilt edge may be slightly longer than the center because of seams or bias, but it should not be forced dramatically.
Sew the straight border-to-quilt seams before closing the corner miters, following the official technique. Stop precisely at the corner intersection rather than sewing into the adjacent seam allowance.
After all four sides are attached, fold the quilt diagonally at one corner with adjacent border strips right sides together. Align the motif, baste, inspect, and then stitch the miter. Repeat for the remaining corners.
Press the miter allowances open to reduce bulk unless the fabric or official instructions require another direction. Support the border while pressing.
Repeat the measuring, motif-centering, and mitering process for each border stage. Do not assume that a border length printed in the old pattern will perfectly fit a top with a different seam allowance. The PDF itself advises altering certain border lengths to fit the quilt if needed.
What to Do If You Cannot Match the Motif
Perfect matching may be impossible when the print repeat, quilt size, or available yardage differs from the original.
Prioritize in this order:
- Center the motif on all four sides.
- Keep the same band visible on each side.
- Match the most obvious line at the corners.
- Maintain equal border widths.
- Accept a small mismatch in secondary details.
Do not narrow one border or stretch another solely to make every tiny printed element meet. A balanced frame with minor motif variation is better than a distorted quilt.
If necessary, use a solid corner square instead of a miter, but recognize that this changes the original design. Test the idea with paper strips before cutting fabric.
Quilting Ideas for Pacific Rim
The quilt top already contains strong direction and rich surface pattern. Quilting should support the geometry without obscuring the shading.
Echo the rotating bands
Quilt parallel lines inside selected diamond rows, following the movement around the center. This reinforces the woven appearance.
Use a diagonal grid
A broad crosshatch aligns naturally with the 45-degree patchwork. It also distributes quilting evenly across the bias-heavy center.
Separate the center and frames
Quilt the six-by-six center grid with simple diagonal or continuous-curve lines. Use a different but related treatment in the four surrounding rectangles.
Highlight the borders
Follow the printed lines of the border motif. In the dark middle border, add a simple cable, feather, or straight-line channel.
Choose a quiet edge-to-edge pattern
A medium-scale meander, leaf, or soft geometric can provide texture while allowing the color transitions to remain dominant.
Test thread on every value. A medium olive, taupe, smoke, or muted gold may blend across the original palette better than bright white or black. For an alternate colorway, choose a middle-value thread that does not create distracting lines in the lightest patches.
Backing, Batting, and Binding
The original pattern suggests four yards of coordinating backing fabric. Confirm the actual usable width and the extra margin required by your quilting method. Longarm quilters often request several inches beyond the top on all sides.
For a 60¾-inch-square top, a pieced standard-width backing will usually require more than one width of fabric. Remove selvages before joining the lengths and press the seam flat. A wide backing may reduce piecing.
Choose batting based on the desired drape and quilting density. Cotton produces a traditional texture; an 80/20 blend offers durability and modest loft; wool can emphasize custom quilting.
The original binding is cut from Fabric 11 in 2¼-inch strips. Measure the finished perimeter before joining the binding. Diagonal joins distribute bulk, and a dark binding creates a clean outer edge against the border print.
A Practical Project Schedule
Session 1: Palette planning
- Assign fabrics 1–14.
- Photograph the color order.
- Review the palette in grayscale.
- Audition the border-print repeat.
Session 2: Cutting preparation
- Read all six pattern pages.
- Print templates at 100 percent.
- Label yardage and cut groups.
- Test the quarter-inch seam.
Session 3: Central square
- Lay out the six-by-six grid.
- Sew and press rows.
- Join rows and verify the 15½-inch measurement.
Sessions 4–5: B strip sets
- Sew one test strip set.
- Confirm color order and staggering.
- Cut one 45-degree section and verify width.
- Complete and label the B-based units.
Sessions 6–7: C and end units
- Construct the C strip sets.
- Cut and store bias-edged sections flat.
- Add the Fabric 9 and Fabric 10 end pieces.
- Complete and count eight triangular assemblies.
Session 8: Rectangular sections
- Build one master rectangle.
- Compare its landmarks with the official diagram.
- Complete the four matching sections.
Session 9: Partial-seam center
- Mark the first stopping point.
- Work counterclockwise around the center.
- Close the first seam and verify 45½ inches.
Sessions 10–11: Borders
- Measure the actual center.
- Center and cut matching motifs.
- Baste every miter before permanent stitching.
- Repeat for all three border stages.
Sessions 12–13: Finishing
- Prepare backing and batting.
- Baste and quilt.
- Trim and bind.
- Add a quilt label crediting the pattern writer, collection designer, and original publisher.
Common Problems and Solutions
The strip set bows
Likely causes: all long seams were sewn in the same direction, layers fed unevenly, or the set was stretched during pressing.
Solution: alternate sewing directions, support the strips, and press with an up-and-down motion. Correct a bowed seam before cutting diagonal sections.
The 45-degree slices vary in width
Likely causes: the ruler angle drifted or width was measured along the wrong axis.
Solution: reestablish a clean 45-degree edge and measure 3 inches perpendicular to that edge. Use the same ruler line for every cut.
Internal diamond seams do not meet
Likely causes: diagonal sections were aligned only at raw edges, the seam allowance varies, or a strip width is inaccurate.
Solution: match the intersections at the quarter-inch stitching line. Sew and inspect a test seam before completing the stack.
A color band changes unexpectedly
Likely causes: one strip was reversed, units were stacked in mixed orientations, or a B section entered a C group.
Solution: compare the unit with the numbered master palette. Correct the earliest reversed component rather than rotating the finished rectangle.
The 15½-inch center is too small
Likely cause: the quarter-inch seam is too wide or the 3-inch squares were trimmed inaccurately.
Solution: measure a row and test the seam allowance. Do not automatically trim the surrounding units smaller.
The rectangular sections are not identical
Likely causes: components were mirrored, end triangles were reversed, or one unit stretched.
Solution: place all four in the same orientation and compare the lightest, darkest, and turning bands. Remake the incorrect component before partial-seam assembly.
The partial seam will not close
Likely causes: the first seam was sewn too far, the rotation direction changed, or the fourth rectangle is reversed.
Solution: reopen enough of the first seam, restore the counterclockwise order, and compare every rectangle with the master.
The 45½-inch center waves
Likely causes: bias edges stretched or long seams were forced.
Solution: identify the seam where fullness begins and resew without stretching. Let the unit cool flat after pressing.
The border motif is off-center
Likely cause: the strip was measured from its cut end instead of the motif center.
Solution: identify the true repeat, mark the desired motif center, and align it with the midpoint of the quilt edge before cutting the miters.
Mitered corners do not match
Likely causes: noncorresponding portions of the repeat were used, the seam was marked at the raw edge rather than finished intersection, or the border shifted.
Solution: baste, inspect from the front, and adjust. Use the first successful border piece as the template for the other three.
The borders ripple
Likely causes: borders were cut to the outer-edge measurement, quilt edges stretched, or pinning was insufficient.
Solution: measure through the quilt center, cut opposite borders equally, and pin at center and quarter points. Do not steam a long border into submission.
Accuracy Checkpoints
| Stage | Check before continuing |
|---|---|
| Fabric selection | Numbered order, grayscale transition, border repeat |
| Printed templates | 100 percent scale and verified measurement |
| Center rows | Correct six-square sequence and alternating pressing |
| Center square | Flat and approximately 15½″ square |
| First B set | Correct order, 2¼″ staggering, no bowing |
| First diagonal cut | True 45-degree angle and 3″ width |
| C assemblies | Correct orientation and stable bias edges |
| Four rectangles | Matching color landmarks and dimensions |
| Partial-seam center | Counterclockwise assembly and approximately 45½″ square |
| First border | Centered motif and equal opposite pieces |
| Each miter | Basted and inspected from the front |
| Completed top | Approximately 60¾″ square and flat borders |
Original Photos That Add Real Editorial Value
Replace screenshots of the PDF with photographs of your own process. Useful subjects include:
- Fourteen substitute fabrics arranged in numbered order
- The palette shown in color and grayscale
- A 3-inch paper window over different prints
- One correctly staggered strip set
- A ruler aligned at 45 degrees before cutting
- Labeled B and C section stacks
- Matching diagonal intersections before pressing
- The four rectangular units in the same orientation
- A marked partial seam before sewing
- The 45½-inch center laid flat
- Border-print motif centered on a quilt edge
- A basted miter before final stitching
- Finished quilting across the diamond bands
These images demonstrate hands-on understanding and are more useful than reproducing the publisher’s cutting chart or diagrams.
Frequently Asked Questions
What size is the Pacific Rim quilt?
The original PDF gives an approximate finished size of 60¾ inches square. The Jinny Beyer Studio page rounds this to 61 inches square.
Who wrote the pattern?
The pattern credits Debbie Beaves as the writer.
Who designed the fabrics?
The Pacific Rim collection was designed by Jinny Beyer for RJR Fabrics.
Is Jinny Beyer the pattern writer?
The PDF specifically credits Debbie Beaves for writing the pattern. Jinny Beyer designed the featured fabric collection, and the quilt uses her border-print framing technique and signature color-shading approach.
Is this pattern associated with Pacific Rim Quilt Company?
No. This particular Pacific Rim Quilt is an RJR Fabrics project using Jinny Beyer’s collection, with a pattern written by Debbie Beaves. It should not be confused with the separate business named Pacific Rim Quilt Company.
What is the official skill level?
Jinny Beyer Studio classifies it as intermediate. The strip piecing is efficient, but bias edges, partial seams, and mitered border-print corners require accuracy.
How large is the central grid?
The center contains six rows of six squares. After sewing the rows together, it should measure approximately 15½ inches square.
Why are the strips staggered?
The stagger provides usable fabric across the diagonal cuts. Aligning every strip end would leave incomplete patches at the beginning or end of the 45-degree slices.
Why must the diagonal cuts be exactly 45 degrees?
The angle determines the diamond geometry and how seams align when slices are joined. A drifting angle creates uneven diamonds and curved larger units.
How do I prevent bias stretching?
Store diagonal sections flat, support them while sewing, avoid pulling, and press by lifting the iron rather than sliding. A light stabilizing spray can be applied before cutting if tested and used consistently.
What is a partial seam?
A partial seam is deliberately left unfinished so another section can be added. After the remaining sections surround the center, the first seam is completed. It allows four units to rotate around a square without an inset seam.
Can I use ordinary allover fabric for the border?
Yes, but it will not create the same matched-frame effect. A true border print or stripe makes the mitered corners more intentional. Solids and tonals are easier to miter because motif matching is unnecessary.
Must I use mitered borders?
Miters are a defining feature of the original design. Straight borders with square corners could be substituted after recalculating lengths, but they will change the framed appearance.
Can I use precut strips?
Not as a direct substitution without checking dimensions. The original strip sets use 2¼-inch strips, while most commercial strip rolls are 2½ inches. Changing the width changes the diagonal units, rectangles, center relationship, and finished size.
Can I make the quilt larger?
Adding wider borders is safer than resizing the internal strip-pieced geometry. Plan the new border proportions, backing, batting, and binding separately. Avoid scaling the PDF because the cutting dimensions will not automatically remain compatible.
Can I make it smaller?
Reducing strip width would require recalculating every diagonal section, end triangle, rectangle, partial-seam center, and border. A simpler alternative is to make the pattern as written or design a separate small project inspired by one color-shaded strip unit.
How much backing does the pattern suggest?
The original pattern suggests four yards of a coordinating print. Confirm the actual backing width and your longarm quilter’s required margin.
Where can I download the official pattern?
The authorized free download is available from the Jinny Beyer Studio product page. Use that page rather than a copied PDF hosted by an unrelated website.
Download the Authorized Free Pattern
Jinny Beyer Studio currently provides Pacific Rim as a free downloadable pattern and identifies it as an intermediate patchwork quilt. Its page also confirms that the design uses strip-pieced units, bias-edged diamonds, and a partial-seam assembly.
View and download the official Pacific Rim Quilt Pattern
Linking to the official page ensures readers receive the current authorized file and preserves the creator’s context. This article intentionally does not host or reproduce the six-page PDF, cutting chart, templates, or border diagrams.
Final Preparation Checklist
- I downloaded the pattern from Jinny Beyer Studio.
- I read all six pages before cutting.
- My fabrics are numbered 1 through 14.
- I photographed the color order and checked it in grayscale.
- My border print contains a usable repeat.
- I printed the templates at 100 percent.
- My quarter-inch seam is accurate.
- My strip sets remain straight after pressing.
- My ruler has a clear 45-degree line.
- I have flat storage for bias-edged units.
- The center square measures approximately 15½ inches.
- All four rectangular sections match.
- I marked the partial-seam stopping point.
- The pieced center measures approximately 45½ inches before borders.
- I will baste every border miter before permanent sewing.
- The backing and batting meet my quilting method’s requirements.
Pattern Credit
Pattern: Pacific Rim Quilt
Pattern written by: Debbie Beaves
Featured collection designed by: Jinny Beyer
Original fabric company and copyright holder: RJR Fabrics
Original finished size: Approximately 60¾″ × 60¾″
Current authorized free-pattern source: Jinny Beyer Studio
The original pattern, cutting chart, templates, diagrams, fabric artwork, and PDF layout remain the property of their respective creators and rights holders. Easy Quilting Patterns provides this independent planning and technique guide for educational commentary and does not claim ownership of the original design.
Final Thoughts
Pacific Rim is a beautiful lesson in controlled movement. The central grid introduces the palette, diagonal strip units extend the shading outward, and four partial-seam rectangles turn that movement around the square. The mitered border print then brings every direction back into a balanced frame.
The project becomes manageable when it is divided into precise checkpoints. Label every fabric, test the first strip set, protect the bias, compare all four rectangles, and baste the miters before committing to permanent stitches. Those habits matter more than speed.
With accurate construction and a thoughtfully graduated palette, the design remains powerful even when none of the original fabrics are available. The result is a polished wall or lap quilt that rewards close inspection while still reading as one bold composition from across the room.