
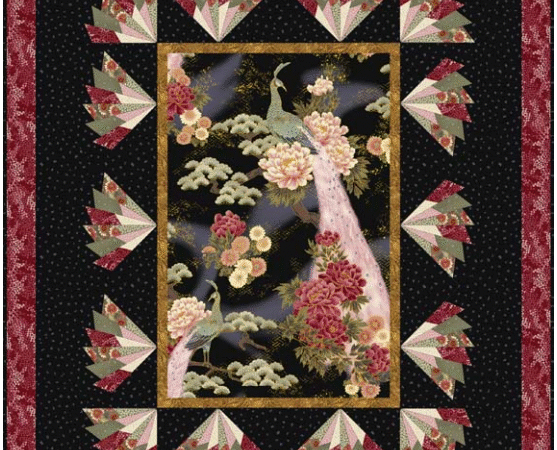
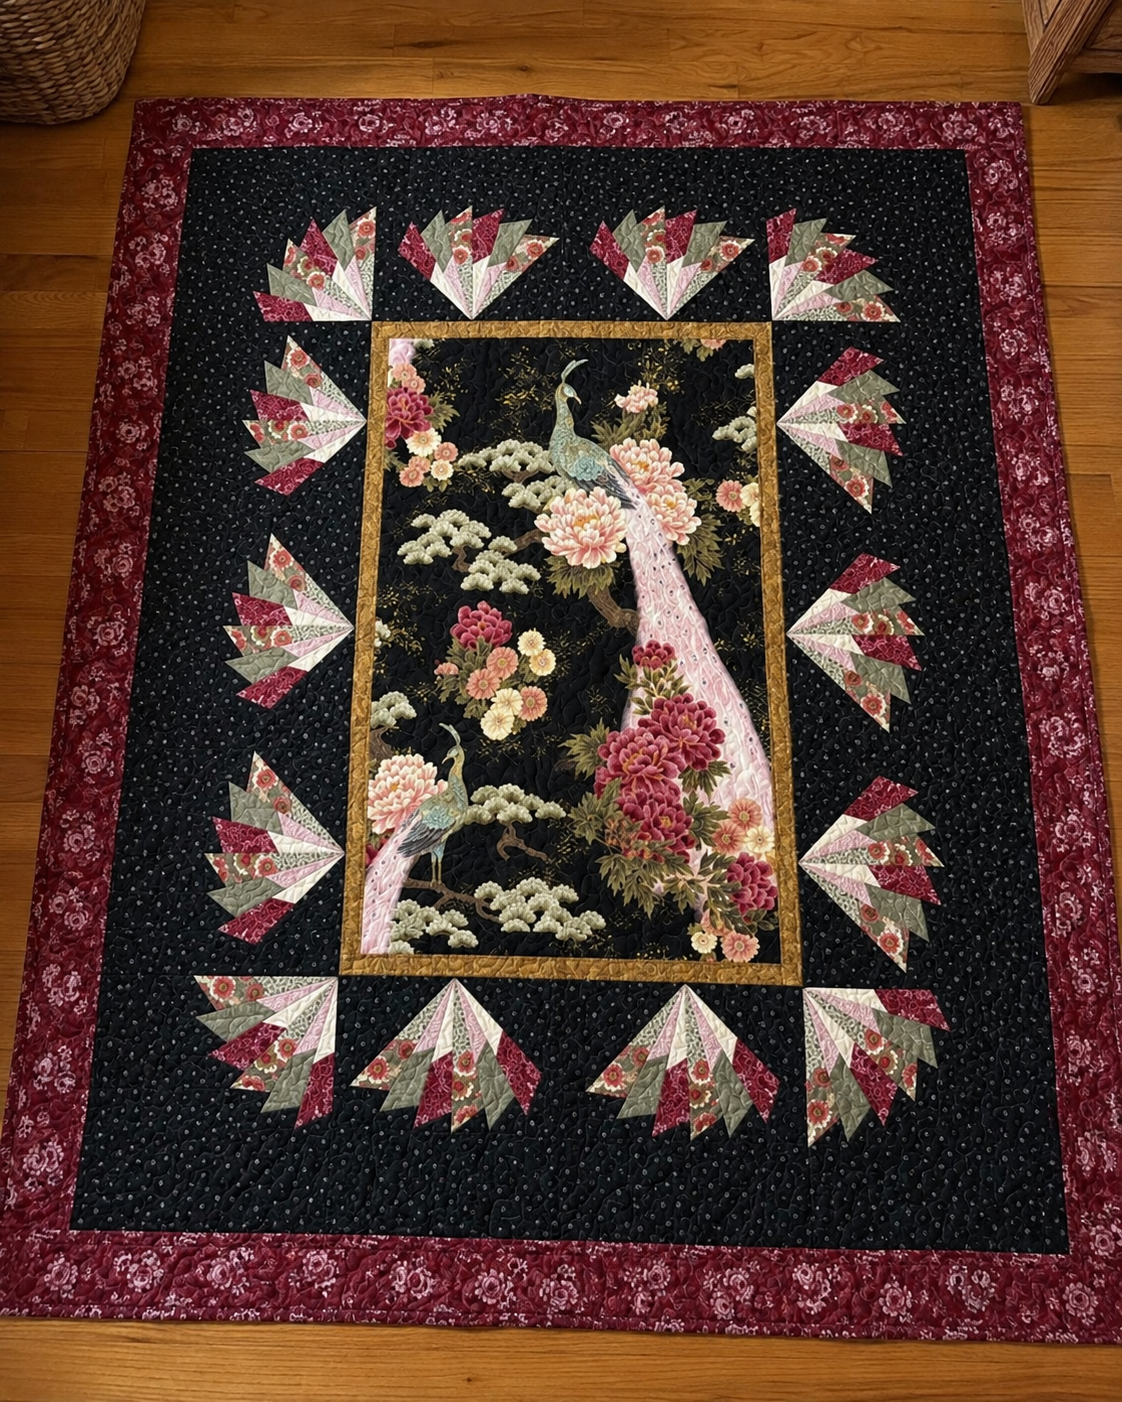
The Milady’s Mural quilt pattern frames a dramatic feature print with a ring of elegant pieced fans. Rather than cutting a beautiful mural into small patches, the design preserves one large scene as the focal point and uses repeated fan blocks to create movement around it. Slim gold and red borders complete the effect, making the finished quilt resemble a carefully framed work of textile art.
Debbie Beaves designed the quilt and wrote the pattern for RJR Fabrics. The original version uses the Han e Mai collection, designed by Demi Hayward, and finishes at approximately 38½″ × 47″. Its size and vertical orientation make it especially suitable for a wall display, though it can also serve as a decorative accent quilt.
This article is an independent project companion, not a reproduction of the copyrighted pattern. It explains how the quilt is structured, what makes the fans challenging, how to choose a replacement mural print, and which accuracy checks can prevent problems. Use the authorized source near the end for the designer’s templates, cutting chart, placement diagrams, and complete instructions.
Milady’s Mural at a Glance
| Project detail | Verified information |
|---|---|
| Pattern name | Milady’s Mural Quilt |
| Quilt designer and pattern writer | Debbie Beaves |
| Original fabric collection | Han e Mai |
| Collection designer | Demi Hayward |
| Publisher | RJR Fabrics |
| Finished size | Approximately 38½″ × 47″ |
| Skill level | Intermediate |
| Main techniques | Strip piecing, freezer-paper template work, angled fan-blade piecing, appliqué, on-point border assembly, conventional borders, quilting, binding |
| Fan count | 14 fans |
| Blades per fan | 6 |
| Total fan blades | 84 |
| Original mural cut | 16″ × 24½″ |
| General seam allowance | ¼″ unless the pattern states otherwise |
| Binding seam in the pattern | ⅜″ |
Milady’s Mural is compact compared with a bed quilt, but it should not be mistaken for a very quick project. The 84 accurately shaped blades, 14 appliquéd fans, on-point border sections, and multiple framing stages reward careful preparation.
Correct Credits for the Project
Several creative roles appear in the original project sheet, and separating them prevents accidental misattribution:
- Debbie Beaves designed the Milady’s Mural quilt and wrote the pattern.
- Demi Hayward designed the Han e Mai fabric collection.
- RJR Fabrics published the project for the collection.
- Violet Patch Quilts and RJR Fabrics hold rights identified in the PDF.
The mural image, the quilt design, the fabric artwork, and the pattern are not all the same intellectual property. Crediting only the fabric company overlooks the pattern designer; crediting only the pattern designer overlooks the collection artist and publisher. The Pattern Credit section near the end preserves these distinctions in a reader-friendly format.
What Makes Milady’s Mural Different?
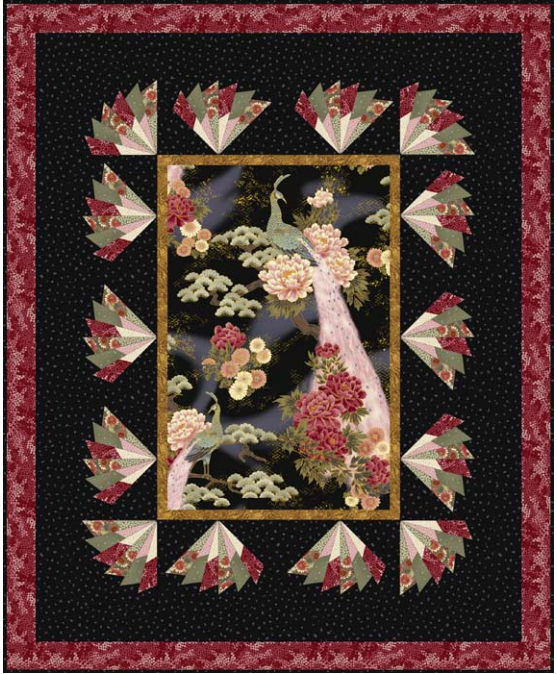
The quilt uses a framed-medallion structure. A large rectangular mural sits in the center. A narrow inner border separates that image from the fan units, and an outer border creates a final frame.
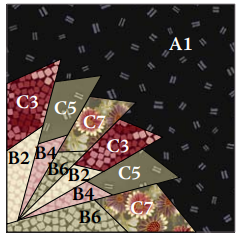
The fans are not simply printed motifs. Each one contains six elongated blades built from two-color strip sets. The blades radiate from a corner of a square background, creating partial fan shapes that become especially dynamic when the blocks are placed on point around the mural.
Three fabric combinations distribute cream, pink, red, light green, and deeper green through the border. The black fan-block background connects visually with the dark ground of the original peacock mural. Gold provides a fine inner accent, while red closes the composition at the outer edge.
This design succeeds because it balances a highly detailed image with controlled repetition. The central print provides the story. The fan border adds rhythm. The narrow borders prevent the two detailed areas from competing.
Is This Really a Panel Quilt?
The original cutting directions call for one mural rectangle cut from yardage in the Han e Mai collection. In modern quilting language, many readers would describe it as a panel quilt because one large printed scene becomes the center. However, the original fabric may have been sold as a scenic mural repeat rather than as a separately printed panel unit.
This distinction matters when substituting fabric. A modern panel may include margins, printed labels, multiple scenes, or a size that differs from the required rectangle. Do not assume that every panel can be trimmed to 16″ × 24½″ while preserving its important artwork.
Before buying a substitute, measure the usable image—not just the full printed panel. Allow for seam allowances and examine where the design will be cut. A bird’s tail, face, flower, or architectural feature should not disappear into a border seam.
Skill Level: Why the Pattern Is Intermediate
The publisher identifies an intermediate skill level, which accurately reflects the combination of techniques. The project does not require difficult curved piecing, but its fan blades include angled shapes, off-grain edges, precise points, and unusual matching references.
You will be better prepared if you can already:
- maintain an accurate ¼″ seam allowance;
- cut strip sets and subcut consistently;
- work with freezer-paper shapes or templates;
- match points that do not align at the visible fabric seams;
- control bias and off-grain edges;
- appliqué by hand or machine;
- assemble blocks on point with setting triangles;
- measure borders through the center of a quilt;
- recognize when a pattern uses a different seam allowance for binding.
A confident beginner can use the project to develop these skills, but should make one complete practice fan block before preparing the remaining 13. The original pattern itself recommends making one fan before beginning assembly-line production.
Understanding the Original Fabric Plan
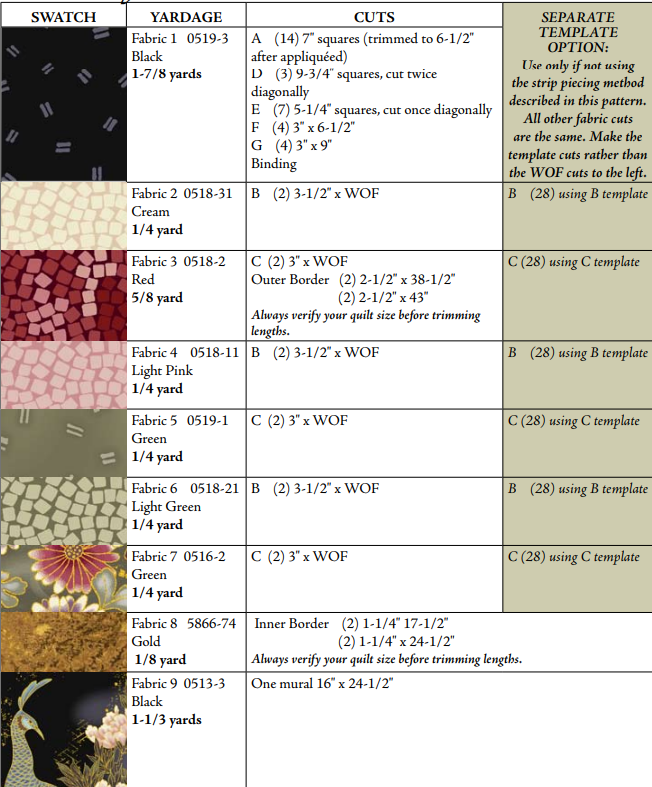
The project uses nine fabrics plus backing. Because the Han e Mai collection is older, exact prints may be difficult to find. Replacing them by function is more practical than searching indefinitely for every original SKU.
| Fabric role | Original color or function | Published yardage overview |
|---|---|---|
| Fabric 1 | Black fan-block background, setting pieces, extensions, and binding | 1⅞ yards |
| Fabric 2 | Cream fan-blade section | ¼ yard |
| Fabric 3 | Red fan-blade section and outer border | ⅝ yard |
| Fabric 4 | Light pink fan-blade section | ¼ yard |
| Fabric 5 | Green fan-blade section | ¼ yard |
| Fabric 6 | Light green fan-blade section | ¼ yard |
| Fabric 7 | Green fan-blade section | ¼ yard |
| Fabric 8 | Gold inner border | ⅛ yard |
| Fabric 9 | Black-ground mural print | 1⅓ yards |
| Suggested backing | Originally coordinated black fabric | 2¾ yards |
These quantities are a shopping overview rather than a replacement cutting chart. The designer’s PDF contains the exact cuts and alternate template option.
Fabric 1: the visual anchor
The black background gives the fan points clear definition and relates them to the original dark mural. A substitute does not have to be black, but it should contrast strongly with every blade fabric and with the setting details around the border.
Dark navy, charcoal, aubergine, deep forest green, or a quiet tone-on-tone can work. Avoid a busy medium-value print that hides the fan edges.
Fabrics 2 through 7: three blade combinations
The six fan fabrics are organized into three contrasting pairs. Each blade includes a seam between its two fabrics, and the combinations repeat around the quilt.
Build three pairs with clear contrast:
- a light neutral with a warm accent;
- a pale tint with a deeper related color;
- another light tint with a second medium or dark coordinate.
The pairs should relate to the mural without copying every color in it. Repetition will make the border cohesive even if the mural contains many colors.
Fabric 8: the inner frame
The narrow gold border acts like a picture-frame liner. It separates the central artwork from the fan border and introduces a small flash of light.
A metallic print is optional. A warm solid, pale neutral, narrow stripe, or high-contrast accent can perform the same job. Because the visible border is narrow, choose a fabric that reads clearly in a slim strip.
Fabric 9: the mural
The central mural is the focal point and should be selected first. Look for a scene with a vertical composition, strong central subject, and enough calm space near its edges for cropping and seams.
Suitable subjects include:
- peacocks or other ornamental birds;
- Japanese gardens or floral landscapes;
- botanical studies;
- cranes, koi, or butterflies;
- art-nouveau figures;
- stained-glass-style prints;
- a large photographic or painterly textile panel;
- an original piece of appliqué or embroidery sized to fit the opening.
If the desired image is horizontal, rotating the entire quilt design is not automatically simple. Fan-border unit lengths and the final wall orientation must also be reconsidered. The easiest substitution preserves the original vertical mural proportion.
How to Audition a Replacement Mural
Create a paper window measuring the mural’s required cut size. Place it over the prospective fabric and move it until the composition looks balanced.
Check four things:
- Subject placement: Is the primary subject centered or intentionally offset?
- Edge safety: Will important details be lost in the ¼″ seams?
- Value connection: Does the mural contain a dark, medium, or light value that can be repeated in the fan border?
- Directional logic: Will the image appear upright after the quilt is assembled?
Photograph several possible crops. A phone screen makes it easier to compare them as complete rectangles rather than as part of a large piece of yardage.
If the panel is smaller than the required mural, add a narrow fabric frame to reach the necessary dimensions before following the project structure. If it is larger, crop only after determining the final focal area. Either change alters the framing measurements, so calculate and test carefully.
Designing a New Color Palette
The mural should lead the palette. Pull three or four colors from the artwork and assign them to the fan pairs and narrow borders.
Peacock-inspired palette
Use deep navy for the background, ivory and gold for one blade pair, turquoise and emerald for another, and pale aqua with royal blue for the third. A narrow antique-gold inner border preserves the ornate character.
Red and black gallery palette
Use black background, cream and burgundy, blush and crimson, sage and deep olive. This stays close to the dramatic value contrast of the original.
Soft botanical palette
Choose warm cream background, dusty rose and mauve, pale sage and moss, and soft blue with slate. Use muted gold or taupe as the inner border.
Modern jewel-tone palette
Pair charcoal with coral and magenta, aqua and teal, and citron with emerald. Use a quiet abstract mural and a narrow brass-colored border.
Monochromatic blue palette
Use navy background with three pairs progressing from pale blue to sapphire. A silver-gray inner border separates the fans from a blue-and-white scenic panel.
View the entire pull in grayscale. The mural, fan blades, background, inner border, and outer border should remain distinguishable without color.
Tools and Supplies
Beyond ordinary quilting cotton, batting, thread, and a sewing machine, prepare:
- freezer paper suitable for printing or tracing;
- ordinary paper for test prints;
- a sharp rotary cutter;
- self-healing cutting mat;
- long acrylic ruler;
- small ruler for blade trimming;
- paper scissors and fabric scissors;
- fine straight pins;
- removable fabric marker;
- water-soluble glue stick or appliqué glue, if desired;
- fine hand-appliqué needle for turned-edge work;
- lightweight fusible web for raw-edge appliqué, if using that option;
- pressing cloth for fusible products;
- dry iron and stable pressing surface;
- light starch or pressing spray for off-grain edges;
- tracing lightbox or bright window, optional;
- square ruler large enough to check the fan blocks;
- labels or small paper markers for fabric numbers and cut letters.
Use a glue product intended for fabric and test that it does not stain. Follow the fusible-web manufacturer’s heat, timing, and laundering instructions rather than assuming every product behaves like the one named in an older pattern.
Print the Templates at 100 Percent
The PDF contains half-inch calibration squares and instructs the maker to print at actual size or 100% scale. Printer settings such as “fit,” “shrink oversized pages,” or “scale to printable area” can alter the templates.
Before printing multiple freezer-paper sheets:
- Print the template page once on ordinary paper.
- Measure the calibration square with an accurate ruler.
- Confirm both dimensions, not only one side.
- Adjust printer scaling if necessary.
- Print the working freezer-paper copies only after the test is correct.
The original method requires multiple copies because each blade uses an individual freezer-paper shape. It calls for 84 single templates: 28 for each of the three fabric combinations.
Do not reduce the number by reusing a shape before understanding the workflow. Freezer paper can sometimes be reused, but its grip and accuracy decline, and the pattern’s batch method depends on keeping blades stable while they are joined.
The Fan-Blade Construction Method
Milady’s Mural uses a freezer-paper template approach that differs slightly from familiar sew-through-paper foundation piecing.
First, two fabrics are joined into a long strip set. A freezer-paper blade foundation is pressed to the right side of the strip set in the planned position. The blade is then cut with seam allowance around the foundation and trimmed at specified corners. The paper remains in place while the blades are joined, helping the unusual shapes stay accurate.
Each fan contains six blades. The two-fabric seam within each blade adds a secondary rhythm, but those internal seams do not necessarily align from one blade to the next. The important matching points are the foundation references identified by the designer—not the visible color-change seams.
This is one reason the complete PDF is essential. A generic fan tutorial cannot replace the pattern’s specific template geometry and matching marks.
Prepare the Strip Sets Accurately
Each strip set supplies blades for one color pairing. Long-strip errors will repeat across many pieces, so check the first set before cutting all 28 blades in that combination.
Use these practices:
- straighten one fabric edge without removing excessive yardage;
- measure strip width at several points;
- sew with a tested ¼″ seam;
- avoid pulling one layer as it feeds;
- press the seam allowance in the direction required by the pattern;
- keep the strip set flat and square;
- label the top fabric and combination number.
The original cutting notes encourage labeling fabrics and strip sets with their numbers and cut letters. This is particularly useful because the same color may appear in several roles.
If a strip set bows, do not begin tracing blades. Check whether one strip stretched, whether the seam was sewn in a curve, or whether pressing pushed the set out of shape.
Placing and Trimming the Blade Foundations
Efficient placement matters because the original method expects a specific yield from each strip set. A template positioned too far from the edge can reduce the number of blades available.
Before cutting:
- study the placement diagram in the authorized PDF;
- confirm which side of the freezer paper contacts the fabric;
- keep the template orientation consistent;
- preserve the required seam allowance;
- use the supplied trimming guide where directed;
- count the planned blades before making irreversible cuts.
Do not place templates by eye after reviewing only one example. Small differences can alter the elongated point and make blade-to-blade matching difficult.
If a strip set does not yield the expected count, the pattern provides a separate-template option. Do not shrink the templates or cut away seam allowance to force one more blade from the fabric.
Joining Six Blades Into a Fan
Lay out all six blades before sewing. Check color order, orientation, top and bottom edges, and the reference points that must match.
Join two blades at a time, pinning through the designated points. Sew from the foundation end toward the outer fabric edge as directed. Continue adding blades until the fan is complete.
After each seam:
- open the blades without stretching them;
- confirm that the foundation edges meet as expected;
- check that the fan remains flat;
- compare the growing unit with the spacing guide;
- postpone aggressive pressing until the unit is stable.
If the fan cups, the blade seams may be too wide or the points may be mismatched. If it ripples, the seams may be too scant or off-grain edges may have stretched. Correct the geometry rather than forcing the fan flat with steam.
The pattern folds the points and outer edge allowances to the back and secures them before appliqué. Use small amounts of water-soluble glue or hand tacking. Excess glue can stiffen the edge and make needlework difficult.
Choosing an Appliqué Method
The project information includes both fusible and freezer-paper appliqué guidance. Your choice affects appearance, speed, and fabric hand.
Turned-edge freezer-paper appliqué
This method folds the seam allowance around a freezer-paper shape, secures it, and stitches the clean folded edge to the background.
It produces a traditional finish with no exposed raw edge. It is ideal for a display quilt where crisp curves and points matter. Preparation takes longer, and the papers must be removed at the appropriate stage.
Fusible raw-edge appliqué
Fusible web secures the fan to the background before a narrow zigzag, blanket stitch, or other machine stitch finishes the edge.
This approach is faster and stabilizes the shapes, but it may add stiffness. The older project sheet mentions one specific fusible product; modern alternatives vary in weight and bonding temperature. Test before applying fusible to all 14 fans.
Hybrid method
You can prepare the fan points with freezer paper, use a small amount of temporary glue for positioning, and machine-stitch close to the turned edge. This combines a clean edge with efficient finishing.
Whichever method you choose, make a complete sample that includes the black background. Dark fabric can show glue residue, lint, needle marks, and light thread more readily than pale fabric.
Positioning the Fans on the Background Squares
Each completed fan is placed in the lower-left corner of a background square according to the original orientation. Consistent placement matters because the blocks later form connected border units.
Use the pattern’s corner and spacing guides. Mark only what is necessary with a removable tool tested on the actual background fabric. Check that marks disappear before applying heat.
After appliqué, the blocks are trimmed to the size stated in the pattern. Square from the fan placement and preserve the ¼″ seam allowance beyond points that will meet later seams.
Do not trim all blocks from an unverified sample. Complete one, place it in the border diagram, and confirm that its fan orientation and point clearance are correct.
Building the Fan Border
The 14 fan blocks are combined with background extensions, setting triangles, and corner sections to create long and short border units. Because the blocks are used on point, the fan shapes appear to radiate around the mural.
This stage benefits from a design wall. Arrange all blocks around a paper rectangle representing the framed mural. Confirm that the fan openings and color combinations follow the intended sequence.
Sew the individual sections into rows, then join the rows as shown in the PDF. Press in the indicated directions when possible so intersections nest. Setting-triangle edges can be stretchy, so support them and avoid hanging incomplete border units over a chair or table edge.
Label the two long units, two short units, and any corner sections. Their proportions are similar enough to confuse when folded.
Framing the Central Mural
The narrow inner border is sewn to the central rectangle before the fan units are added. This border works like a visual pause and establishes the dimensions that the fan border must fit.
Measure the mural through its center in both directions. Cut border strips to the pattern’s dimensions only after confirming the actual rectangle. The PDF itself reminds makers to verify quilt size before trimming border lengths.
If the mural print is noticeably off-grain, do not pull it square with the border. Decide whether a slight visual crop can correct it. Scenic prints can be printed imperfectly relative to the fabric grain, so a compositionally square image may not follow the threads exactly.
Attach long sides first and short sides second as specified. Mark centers and quarters on both the mural and border strip, pin corresponding marks, and sew without stretching.
Joining the Border Sections
The long fan units attach to the long sides of the framed mural. The short border-and-corner units complete the top and bottom. An outer border then frames the entire fan composition.
Before sewing each stage:
- measure the quilt through its center;
- compare opposite border units;
- mark midpoint and quarter points;
- check fan orientation;
- pin important intersections;
- sew with the more stable piece against the feed dogs when appropriate;
- press instead of sliding the iron.
If a border unit is longer than the center, investigate the fan-block sizes and setting-triangle edges. Do not simply cut off a fan point or create a pleat. Very small fullness can be distributed; a large discrepancy should be corrected at its source.
Accuracy Checkpoints
After printing the templates
Measure the half-inch test square and verify 100% scale.
After the first strip set
Check width, straightness, pressing direction, and fabric order.
After the first blade
Compare it with the foundation and trimming guide. Confirm seam allowance and orientation.
After the first six-blade fan
Place it flat without stretching. Check the matching points and the fan’s overall spread.
After the first appliquéd block
Verify placement and block size before making the remaining 13.
After each fan-border unit
Measure it, confirm orientation, and keep it labeled.
After framing the mural
Measure through the center and compare the result with the next border stage.
Before attaching the outer border
Lay the quilt flat and check that the fan frame is rectangular and free of waves.
These pauses protect the mural fabric and make later stages more predictable.
Troubleshooting Common Problems
The template printed at the wrong size
Turn off “fit to page,” automatic scaling, or “shrink oversized pages.” Print one test page at actual size and measure the calibration square again.
The strip set does not yield enough blades
Review the pattern’s placement diagram. The first foundation has a specific relationship to the edge. If the remaining fabric is insufficient, use the separate-template option rather than reducing seam allowances.
The internal color seams do not line up between blades
They are not necessarily intended to align. Match the foundation reference points identified in the designer’s diagram, not the visible seam between the two colors.
The fan forms a bowl
Check seam width and blade-point alignment. Seams that are too wide reduce the fan’s inner spread. Correct the seams before appliquéing.
The fan ripples
Off-grain edges may have stretched, or seams may be too scant. Use light starch for future pieces, reduce handling, and press without sweeping the iron.
The fan points are blunt
Check the trimming template and folded seam allowances. Use a blunt turning tool or needle to refine the fold without weakening the fabric.
Glue shows on the black background
Use less product and keep it away from visible edges. Test removal on a scrap. Some temporary glues become more visible after heat, so inspect before final pressing.
The appliqué causes puckers
Reduce machine tension if appropriate, add temporary stabilizer, and avoid pulling the block. A dense zigzag can draw fabric inward; test stitch width and length on a sample.
Fan blocks are different sizes
Square every block using the same reference points after appliqué. Do not trim one block based only on its outer fabric edges if the fan placement has shifted.
The border units do not fit the framed mural
Measure both components through their centers. Check block size, seam allowances, and stretched setting edges. Correct meaningful differences before attachment.
The quilt hangs unevenly
Confirm that borders were measured rather than sewn on as excess strips. Square the top before quilting and use balanced quilting density across the mural, fans, and borders.
Quilting the Mural Without Hiding It
The central image should remain readable after quilting. Dense allover stitching can flatten or visually interrupt the scene.
Consider:
- outlining the principal bird, flowers, or architectural elements;
- adding gentle background fill around the focal subject;
- stitching in the ditch around the inner border;
- echo quilting the fan arcs;
- using continuous curves within the blades;
- quilting a simple geometric line in the black background;
- echoing the outer red border with parallel lines.
Varying density can add dimension, but large unquilted areas must remain within the batting manufacturer’s recommended spacing. If the mural has a large central subject, outline it and add discreet internal details so the fabric does not sag.
Thread selection should be tested on every major area. Clear monofilament may reduce color changes, but it must be high quality, used with suitable tension, and kept away from excessive heat. A fine neutral thread can be easier to manage. Decorative gold thread may suit the inner frame but should be tested for abrasion and tension.
Preparing a Wall Hanging
If the finished quilt will be displayed, add a hanging sleeve and label before final hand-finishing becomes inconvenient.
A sleeve distributes weight along a rod and avoids puncturing the quilt. Make it from fabric that will not show through the front. Leave a small amount of fullness so the hanging rod does not create a visible horizontal ridge.
The label can include:
- quilt name;
- completion date;
- maker designation such as “Made by Easy Quilting Patterns” only if the site actually made the physical quilt;
- pattern credit to Debbie Beaves;
- Han e Mai collection credit if original fabrics were used;
- fiber and care information.
Do not claim “made by” or “tested by” when publishing only an informational article. Authorship of the article and construction of a physical quilt are different claims.
Avoid long exposure to direct sunlight, especially with saturated red, green, and black fabrics. Rotate displayed quilts periodically and inspect the sleeve and rod for dust or stress.
Backing, Batting, and Binding
The original project suggests 2¾ yards of backing. Confirm the actual top size and the needs of the chosen quilting method before purchasing. A longarm quilter may request a larger working margin than a domestic-machine quilter.
Choose batting based on the desired display texture. Low-loft cotton keeps the mural relatively flat. Wool adds dimension around appliqué and outlined motifs. A stable blend can balance drape and definition.
The project generally uses ¼″ seams but specifies a ⅜″ seam for attaching the binding. This is an easy detail to miss. The wider seam may relate to the prepared binding width and desired finished coverage.
Follow the project’s binding dimensions and test the fold on a sample sandwich. After attaching, trim the layers as directed and bring the folded edge to the back so it covers the machine stitching. Secure with small hidden stitches or an accurately positioned machine finish.
Frequently Asked Questions
Who designed Milady’s Mural?
Debbie Beaves designed the quilt and wrote the pattern. Demi Hayward designed the Han e Mai fabric collection used in the original, and RJR Fabrics published the project.
What is the finished size?
The published finished size is approximately 38½″ × 47″.
How many fans are used?
The quilt uses 14 fans. Each fan has six blades, producing 84 blades in total.
Is this foundation paper piecing?
It uses freezer-paper foundations/templates, but the method differs from typical sew-through-paper foundation piecing. The freezer-paper shapes are pressed to strip sets, used for cutting and stability, and remain in place during blade assembly.
Can I use fusible appliqué?
Yes. The project includes fusible-appliqué and freezer-paper-appliqué guidance. Test the chosen fusible for stiffness, bond, and compatibility with the fabric.
Does the project require the Han e Mai mural?
No, but a substitute must supply a usable vertical focal rectangle and a palette that works with the fan border. Measure the visible artwork before buying.
Can I enlarge the mural opening?
Changing the mural size affects the inner border, long and short fan-border units, outer border, backing, and final proportion. It requires a full recalculation rather than a simple crop adjustment.
Should I make all the blades at once?
Only after completing and checking one full fan block. A test block reveals printer-scaling, seam, placement, and appliqué issues before they are repeated.
Why do the seams inside adjacent blades not match?
The two-color seams are not the primary matching references. Use the foundation points shown in the authorized pattern.
Is the PDF free to download?
An established needlecraft distributor currently provides a free-download page for the pattern. The PDF remains copyrighted and explicitly prohibits reproduction without written consent, so it should be downloaded from the source rather than copied to another website.
Get the Authorized Milady’s Mural Pattern
The exact freezer-paper templates, trimming guide, fabric cuts, blade-placement diagram, fan-border layout, and assembly measurements are contained in the copyrighted project sheet.
Visit the Milady’s Mural pattern page at Needlecraft, Inc.
The distributor’s page identifies Milady’s Mural by Debbie Beaves and provides the pattern download. If the page does not open correctly in a particular browser, the distributor also maintains its Milady’s Mural PDF download.
Download one copy for your project use and follow the terms in the document. The PDF states that the pattern, or any part of it, may not be reproduced without written consent from the author and publisher. That restriction applies even though a source makes the pattern available without charge.
Pattern Credit
- Pattern: Milady’s Mural Quilt
- Quilt designer and pattern writer: Debbie Beaves
- Associated studio: Violet Patch Quilts / Debbie Beaves Designs
- Original fabric collection: Han e Mai
- Collection designer: Demi Hayward
- Publisher: RJR Fabrics
- Finished size: Approximately 38½″ × 47″
- Skill level stated in the pattern: Intermediate
This independent companion article was written by Easy Quilting Patterns to help readers select a focal print, plan substitute fabrics, understand the freezer-paper fan method, prepare appliqué, and troubleshoot assembly. Easy Quilting Patterns did not design Milady’s Mural and does not claim ownership of the pattern, templates, diagrams, quilt photography, or Han e Mai fabric artwork.
Final Thoughts
Milady’s Mural is a thoughtful example of using patchwork to support, rather than overpower, a feature print. The mural remains intact as the visual subject, the gold inner border provides separation, and the repeated fans create an ornamental frame with movement and depth.
The project’s success depends on a few deliberate checks: audition the mural through a measured window, print templates at 100%, complete one fan before batch sewing, match the marked foundation points, and measure every border through the center. Those steps protect the fabric and keep small inaccuracies from multiplying across 84 blades.
When the original Han e Mai collection is unavailable, preserve the design’s relationships instead of chasing exact colors. Choose a strong vertical mural, a quiet contrasting background, three coordinated blade pairs, a narrow highlight, and a confident outer frame. The result can feel completely personal while still respecting Debbie Beaves’s original pattern and credits.