

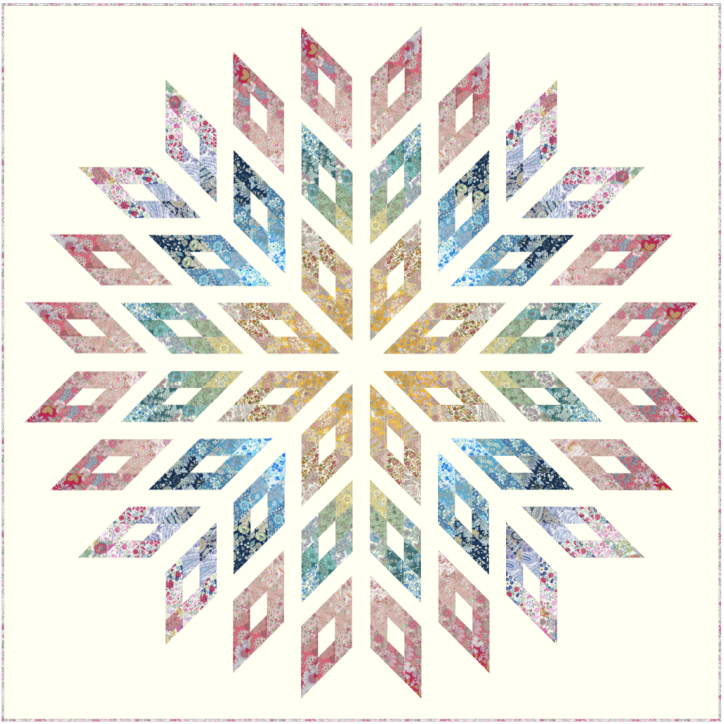
The Memoire a Paris Lone Star quilt pattern turns a traditional eight-pointed star into a light, airy composition filled with floral color. Designed by Lynne Goldsworthy for Lecien, the 2018 quilt uses the Memoire a Paris fabric collection, a white background, and carefully arranged strip-pieced diamonds. The finished quilt measures 83 inches square, large enough to become a dramatic bed quilt or a generous display quilt.
What makes this design memorable is not simply the size of the star. Broad white spaces separate groups of colored diamonds, so the star seems to open outward like a flower, snowflake, or firework. The open background also gives the small floral prints room to remain visible. Instead of one dense mass of patchwork, the eye sees color, rhythm, and negative space working together.
This is an intermediate to advanced project. It is achievable for a patient quilter who has already made accurate patchwork, but it is not a true beginner pattern. Long strips must be sewn consistently, sections are cut at 45 degrees, diamond points must meet cleanly, and half of the star units must mirror the other half. None of those skills is mysterious, but all of them reward preparation.
This guide explains how to plan the colors, control the bias edges, organize the 48 diamonds, recognize mirrored units, and assemble the quilt with less stress. It is a companion to an authorized copy of the original Lecien pattern, not a replacement for its cutting chart or diagrams.
Pattern at a Glance
| Detail | Information |
|---|---|
| Original pattern | The 2018 Memoire a Paris Lone Star Quilt |
| Designer | Lynne Goldsworthy for Lecien |
| Featured collection | Memoire a Paris 2018 |
| Finished size | 83 inches square |
| Main technique | Strip-pieced diamonds cut at a 45-degree angle |
| Diamond units | 48 in the complete star |
| Background | Lecien Snow White solid in the original |
| Suggested skill level | Intermediate to advanced |
| Best preparation skills | Accurate quarter-inch seams, rotary cutting, strip piecing, and point matching |
| Original quilting idea | A two-inch crosshatch |
The original fabric list calls for one fat-quarter bundle containing 25 Memoire a Paris prints. It also uses 4½ yards of Snow White solid for the background, 20 inches of a collection print for the binding, 5 yards for the backing, and a 91-inch-square piece of batting. Those quantities belong to the original pattern and should be checked against the authorized instructions before fabric is cut.
Why This Lone Star Looks Different
A classic Lone Star is often built from eight large diamond-shaped arms that meet in the center. Each arm contains rows of smaller diamonds, and the finished star may appear almost solid. The Memoire a Paris version keeps the eight-direction symmetry but opens the design with wide areas of white.
The colored units are arranged in separated clusters rather than forming one uninterrupted field. This creates several visual effects at once:
- The floral prints remain distinct instead of blending into a single busy surface.
- White channels lead the eye from the center toward the outer points.
- Repeated diamond groups form secondary shapes inside the main star.
- The outer edge of the star feels delicate even though the quilt is 83 inches square.
- The same palette appears in multiple directions, creating movement without sacrificing balance.
This negative space is part of the structure, not leftover background. Treat the white fabric as one of the most important fabrics in the quilt. Its value, texture, and consistency affect every colored section.
A solid or near-solid background gives the cleanest result. A subtle tonal can also work, but a strong print may compete with the floral diamonds and make the open channels less visible. If using a light print, view it from several feet away before committing. It should read as one calm field.
Is the Memoire a Paris Lone Star Quilt Beginner Friendly?
Calling this project beginner friendly would set unrealistic expectations. A confident beginner might complete it with guidance, but the construction includes several accuracy-sensitive steps:
- Long strips must be sewn without bowing.
- Strip sets are cut on a true 45-degree angle.
- Many newly cut edges are on or near the bias.
- Small seams must align across diamond units.
- Directional units must be made in both regular and mirrored orientations.
- Large triangular sections must remain flat and square.
- Multiple points converge near the center of the composition.
The good news is that the quilt is based on repeated operations. Once the first successful strip set and diamond are complete, the same habits can be used for the remaining units. The difficulty comes from maintaining consistency, not from learning dozens of unrelated techniques.
Before starting, it helps to be comfortable with a rotary cutter, a reliable quarter-inch seam, pressing without stretching, and sewing two patchwork units together while matching seam intersections. If those skills are new, make a small practice diamond from scrap strips first. A short rehearsal can reveal an inaccurate seam allowance or a cutting-angle problem before the feature fabrics are involved.
Understanding the Original Fabric Plan
The 2018 design was planned around 25 fat quarters arranged in a color spectrum. The collection includes the soft florals and varied hues associated with Memoire a Paris, while the white background separates and brightens them. The spectrum arrangement matters because a Lone Star magnifies color placement. A fabric that appears once in a strip set may repeat around the star and become a strong visual ring.
The original pattern also repeats some color positions more heavily than others. That repetition helps distribute the palette around the complete star. Do not assume that every fat quarter performs an identical job or that every print is cut in the same quantity. Use the original cutting chart for the exact allocation.
Here is the role of each fabric category:
| Fabric group | Role in the design | What to watch |
|---|---|---|
| Twenty-five feature prints | Build the colored diamond clusters and create the spectrum | Value changes and print scale |
| White background | Separates the clusters and forms the open star channels | Consistent dye lot and adequate yardage |
| Binding print | Frames the large square quilt | Contrast with the final border |
| Backing print | Completes the quilt sandwich | Extra width for quilting setup |
| Batting | Supports the 83-inch quilt | Loft, drape, and shrinkage |
If you own the original bundle, label the fat quarters in the same order used by the pattern before cutting anything. Color names such as pink, blue, or green are not precise enough when several neighboring prints are similar. Numbered removable labels are much safer.
How to Substitute Fabrics Successfully
The original Memoire a Paris collection may be difficult to find because it was released years ago. A substitute bundle can produce a beautiful quilt, but it should preserve the logic of the original palette rather than imitate every print literally.
Start with 25 coordinated fat quarters. A collection from one designer is convenient, but it is not required. A curated group from your stash can work if the fabrics share a visual language. For example, use small and medium florals with a similar softness, or combine low-contrast vintage prints across a controlled spectrum.
Build a visible gradient
Lay the fat quarters out in one long row. Move gradually through color families rather than jumping randomly between them. A possible sequence might travel from rose to coral, warm yellow, leaf green, aqua, blue, violet, and back toward rose. The exact route matters less than the smooth transitions.
Photograph the row and convert the image to grayscale. Color can distract from value, while a grayscale view shows whether all 25 fabrics are equally light or whether some are dramatically darker. A useful palette normally contains enough value variation for the individual diamonds to remain visible.
Control print scale
Very large motifs will be fragmented by the narrow strips and small diamond shapes. That can be attractive, but the recognizable flower or object may disappear. Small florals, dots, textures, and compact geometrics usually read more clearly. If including a large print, treat it as color and texture rather than expecting the full motif to survive.
Avoid isolated fabrics
One neon print in an otherwise muted bundle will repeat around the star and may dominate the quilt. The same is true of one nearly black fabric in a pastel group. An accent can be intentional, but it should connect to at least two or three other fabrics through hue, value, or print style.
Choose the background last
Take the full bundle to the store or place background candidates beside the complete row. Bright optic white creates a crisp contemporary look. Warm white or cream feels softer and may blend more naturally with vintage florals. Pale gray can modernize the star, while a very dark background creates a dramatic stained-glass effect.
Whatever color you choose, check the contrast against the lightest feature fabrics. If several diamonds disappear into the background, adjust either the background or those prints.
Buy the background in one piece
An 83-inch-square quilt uses a large continuous background. Buy enough yardage from one bolt and one dye lot whenever possible. Two whites with the same name can differ visibly once placed side by side. A slight difference that is difficult to see under store lighting may become obvious across a large quilt top.
Tools That Improve Accuracy
The project does not require exotic equipment, but a few reliable tools make repeated 45-degree work easier.
- A sharp 45 mm or 60 mm rotary cutter
- A long acrylic ruler with a clear 45-degree line
- A second ruler for checking width without disturbing the first alignment
- A large cutting mat in good condition
- A quarter-inch presser foot or seam guide
- Fine pins, fork pins, or washable fabric glue for matched intersections
- A dry iron and a stable pressing surface
- Starch or a light fabric stabilizing spray, if desired
- Removable labels or numbered clips
- A design wall, large piece of batting, or clean floor for layout
- A camera or phone for recording unit orientation
Replace a dull rotary blade before cutting the strip sets. A blade that skips threads encourages extra pressure, and extra pressure can shift the ruler. Clean, single-pass cuts are especially important when the ruler is positioned diagonally.
Test the quarter-inch seam before beginning. Sew three strips of known width side by side, press them, and measure the center strip from seam to seam. If the result is narrower than expected, the seam allowance is too wide. If it is wider, the seam allowance is too narrow. A small error multiplied across several strips changes the dimensions and angle of the finished diamond.
Prepare the Fabric Before Cutting
Decide whether to prewash based on how the finished quilt will be used and on your normal practice. The essential point is consistency: do not prewash only part of the fabric group. Mixing prewashed and unwashed fabrics can produce uneven shrinkage and texture later.
Press every fat quarter flat before measuring. Remove the center fold and any diagonal distortion, but do not pull the fabric across the ironing board. If using starch, apply it to all feature fabrics in a similar amount so they behave consistently.
The original instructions cut feature strips along the lengthwise grain, commonly abbreviated LOF. The lengthwise grain runs parallel to the selvage and is usually less stretchy than the crosswise grain. This extra stability is helpful because the strip sets will later be sliced at an angle.
Fat quarters may not all be perfectly square, and selvages can vary in width. Identify the lengthwise direction before trimming. If the prints are directional, mark the top edge with a small removable label. The finished diamonds rotate around the star, so a directional motif will not remain upright everywhere, but consistent cutting prevents accidental reversals within a strip set.
Do not cut the entire bundle until you understand the pattern’s fabric numbering and have confirmed the strip direction. A good sequence is:
- Arrange and number all 25 fat quarters.
- Compare the numbers with the original cutting chart.
- Cut one test group.
- Sew one strip set and verify its dimensions.
- Continue only after the test behaves as expected.
That pause protects both the fabric and the color sequence.
The Strip-Piecing Strategy
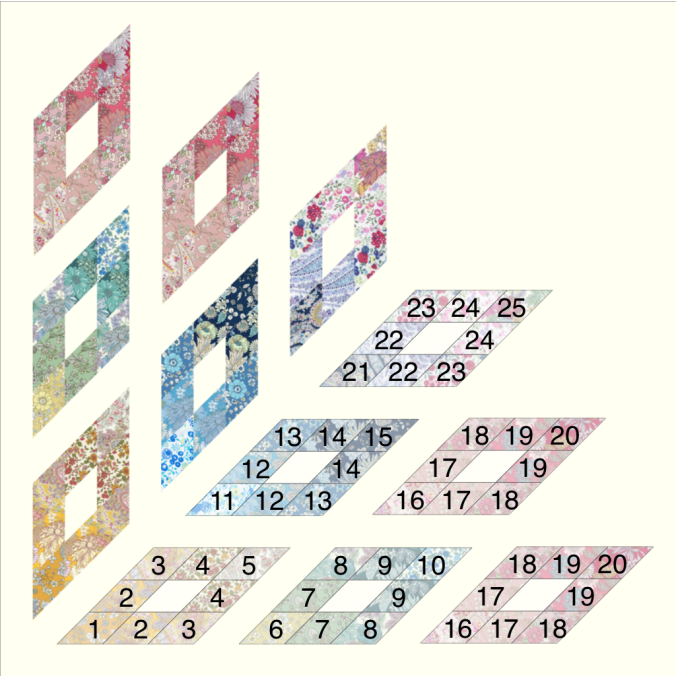
Strip piecing creates many small, aligned diamonds more efficiently than cutting every diamond individually. Long fabric strips are sewn into coordinated sets. The completed set is then crosscut at 45 degrees into angled sections. Several of those sections are joined to form each larger diamond unit.
The original pattern contains the exact fabric combinations, counts, strip staggering, and diagrams. Follow those details from an authorized copy. The goal here is to explain what the operations accomplish and how to keep them accurate.
Why the strips are staggered
When strips are joined for diagonal cutting, their ends are not always aligned in one straight vertical line. Staggering provides usable fabric across the angled cuts. Without sufficient offset, the first or last diagonal slice may run beyond the edge of one strip and create an incomplete section.
Use the printed diagram to determine the direction and amount of each offset. Do not improvise the staggering from a photograph of the finished quilt. The apparent direction changes when units are rotated or mirrored.
Sew long strips without bowing
Long seams can curve when the top and bottom layers feed at slightly different rates. To reduce bowing:
- Match the strip ends and place a few pins along the length.
- Let the machine feed the fabric without pulling from behind.
- Support the strip set so its weight does not drag off the table.
- Alternate the direction of stitching from one long seam to the next.
- Check that the set lies straight after each addition.
If a strip set begins to arc, correct the cause before adding more strips. Pressing cannot reliably fix a severely bowed seam.
Press for flatness and consistency
The original instructions allow seams to be pressed open or to one side. Either method can work, but consistency matters.
Pressing open reduces bulk where several seams meet and can make the strip set lie flatter. Pressing to one side may allow seams to nest when the diagonal sections are joined, but the correct direction must be planned. If you prefer nesting, study the diagram and make a test unit before pressing every set.
First set the seam by placing the iron briefly on the closed seam. Then open or turn the allowance and press vertically. Avoid sliding the iron along the strip, because a long damp or hot strip can distort.
Measure the strip set after pressing. The total width should match the sum expected from the strip widths and seam allowances. A discrepancy now will repeat in every section cut from that set.
Cutting Accurate 45-Degree Sections
Diagonal crosscuts are the point where a stable strip set gains bias edges. Slow, deliberate cutting is more productive than trying to recut distorted sections later.
Begin by creating a clean 45-degree reference edge. Align the ruler’s 45-degree line with a long seam or straight edge in the strip set, following the pattern’s direction. Make the trimming cut, then rotate or reposition the work as needed for comfortable repeated cuts.
For every section:
- Confirm that the 45-degree line still follows the same reliable reference.
- Measure the section width perpendicular to the cut edge.
- Keep the ruler fully supported on the fabric.
- Cut away from the body with even pressure.
- Lift the section instead of sliding it across the mat.
- Place it immediately on a labeled tray or design board.
The original pattern calls for 2½-inch-wide angled sections from the strip sets. Check that measurement in your authorized copy and use the same ruler line every time. Switching between ruler markings can introduce tiny variations.
Bias edges stretch easily, especially after repeated handling. Do not hang the cut sections over a chair, pile them loosely, or carry them by one point. Keep them flat. If you use spray starch, it should stabilize the fabric before cutting rather than being applied aggressively to exposed bias edges.
How to Join Angled Sections into Diamonds
Simply matching the raw edges of two diagonal sections does not guarantee that the internal seams will meet after stitching. The pieces usually need a small offset so the seam intersections cross at the quarter-inch stitching line.
Place two sections right sides together. Slide one slightly until the internal seams intersect where the new seam will be sewn, not necessarily at the raw edge. A pin placed directly through both seam lines can help find the correct position. Fine pins, fork pins, or a tiny amount of washable glue can hold the alignment.
Sew the seam without stretching. Before pressing, open the unit and check several intersections. If the seams are consistently displaced in the same direction, adjust the offset on the next pair. If only one intersection is wrong, check whether a strip width or seam allowance varied earlier.
The original construction joins three angled sections to form a larger diamond. Make one complete test diamond and compare it with the printed diagram. Check all of the following:
- The fabrics appear in the correct order.
- The diamond slants in the intended direction.
- The internal intersections meet cleanly.
- The unit lies flat.
- The outer edges are straight rather than scalloped.
- The overall size agrees with the pattern before trimming.
Do not trim an inaccurate unit merely to force it to the listed size. First identify whether the problem comes from strip width, seam allowance, pressing, cutting angle, or stretching. Trimming can remove the evidence while leaving the underlying error in all later units.

The Lone Star design works beautifully with gradients and coordinated fabric bundles.
Organizing All 48 Diamonds
The complete quilt uses 48 diamond units. With that many similar pieces, organization is part of the sewing technique.
Create a simple labeling system before chain piecing. Each label can contain three pieces of information:
- The strip-set or color-group number
- The diamond position within a star section
- The orientation, such as left-facing or right-facing
Store completed units in groups rather than one large stack. A shallow tray, sheet protector, or piece of batting works well. Add a printed thumbnail or hand-drawn orientation arrow to each group. The arrow is more useful than relying on a verbal description such as “pink at top,” because the unit may later be rotated.
Count at three stages: after cutting angled sections, after sewing complete diamonds, and before laying out the eight large star sections. The original design doubles certain groups, so do not assume that equal stacks are correct. Compare each quantity with the authorized pattern.
A design wall is invaluable. Build one large triangular section at a time, step back, and compare it with the diagram. Then photograph it. The photo becomes a reference if the units are removed for sewing.
Mirrored Units: The Most Important Orientation Check
Half of the large star sections are assembled in one direction and the other half are assembled as mirror images. Rotation and reflection are not the same.
Imagine writing the letter R on a transparent sheet. Turning the sheet around on the table rotates the R, but it never becomes a backward R. Flipping the sheet over creates the mirror image. Diamond groups behave the same way. A unit can point north, east, south, or west and still have the wrong internal direction.
To manage mirrored construction:
- Choose one completed section as the “A” master.
- Make a second physical layout as the “B” mirror.
- Photograph both with clear A and B labels.
- Keep the two groups on separate trays.
- Never chain-piece A and B units in one unlabeled pile.
- Compare the internal color flow, not only the outside triangle shape.
Before sewing a large section, trace the path of one distinctive fabric from the center outward. On the mirror section, that path should reverse. This single-fabric check is often faster than comparing every small diamond.
If the star refuses to form symmetrical open channels during final layout, suspect a mirrored unit before assuming that the cutting dimensions are wrong.
Background Triangles and White Sashing
The background pieces do more than fill gaps. They establish the separation between diamond clusters and determine whether the visual channels remain even.
Some background components include half-square triangles, while others form 45-degree sashing around or between colored units. Follow the pattern’s specific cutting directions because grain placement affects stability. A background piece with a bias edge can stretch just as easily as a colored diamond.
When sewing a long background strip to a pieced edge, compare their lengths before stitching. If one piece appears longer, do not stretch the shorter layer to fit. Check the diamond section for distortion and confirm that seam allowances have been pressed correctly.
Pin at the ends, the center, and intermediate points. Sew with the more bias-prone piece against the feed dogs only if that improves control on your machine; test the behavior on scraps first. A walking foot can help with long seams, although an accurate standard foot and gentle handling are often sufficient.
Press the white fabric with a clean iron and pressing surface. Bright solids reveal transferred dye, scorch marks, and residue easily. A pressing cloth is useful if the fabric is sensitive.
A Low-Stress Assembly Roadmap
The quilt is easier to understand as a hierarchy rather than as 48 independent diamonds. The broad sequence is:
- Prepare and label the feature fabrics.
- Sew the planned strip sets.
- Cut the strip sets into 45-degree sections.
- Join angled sections into diamond units.
- Combine diamonds with the required background pieces.
- Build large triangular star sections in A and mirrored B orientations.
- Join triangles into larger square units.
- Join the squares into two halves.
- Join the two halves and complete the surrounding background or border sections.
- Quilt, trim, and bind.
This roadmap is intentionally conceptual. The original pattern diagrams show the exact unit arrangement and should remain open at the sewing table.
Work in checkpoints
At the end of each stage, stop and inspect the work. A useful checkpoint routine is:
- Count the pieces.
- Confirm the orientation.
- Measure the key dimensions without stretching.
- Place units on the design wall.
- Photograph the layout.
- Correct errors before beginning the next stage.
Small inaccuracies are cumulative. One slightly narrow strip may be manageable; the same discrepancy repeated through several seams can change the width of a large section. Check early, when correction affects the fewest pieces.
Join from small units to large units
Avoid handling a nearly complete 83-inch top more than necessary. Keep the work in smaller sections, then join those sections according to the pattern. Support each large unit on the table so its weight does not pull on the seam passing under the presser foot.
When joining two large sections, pin the important intersections first: outer edges, the central point, and visible seam junctions. Then ease the fabric between them without stretching. If the edges differ significantly, return to the design wall and measure rather than forcing them together.
Matching Points Without Excess Bulk
Perfect points are not required for a useful, beautiful quilt, but consistent junctions strengthen the star illusion. Prioritize the intersections the eye notices most: the central meeting area, repeated color rings, and the edges of the white channels.
Use a pin-through method for key matches. Insert a fine pin through the seam intersection on the top unit, then through the corresponding point on the lower unit. Keep the pin perpendicular while adding a second pin or a small dab of glue nearby. Remove the perpendicular pin before the needle reaches it.
Shorten the stitch length slightly near bulky intersections if needed, but do not use stitches so tiny that corrections become impossible. Sew one or two inches past a critical match, stop, and inspect before completing the entire long seam.
If many allowances converge, press them in the direction that produces the flattest result. Pressing open may reduce bulk. In some junctions, carefully fanning the seam allowances can help, but only if the stitching remains secure. Do not clip deeply into a structural seam merely to make it lie flat.
Keeping the Quilt Center Flat
Eight-direction designs can develop a raised center or a small opening if the final intersections are pulled, stretched, or sewn beyond the intended stopping point.
To keep the center controlled:
- Verify each large triangle before assembly.
- Leave dog ears in place until the pattern directs trimming, since they can provide alignment references.
- Mark exact quarter-inch intersection points if needed.
- Stop and start seams precisely rather than sewing blindly through every point.
- Press the completed center on a large flat surface.
- Allow the top to cool before moving it.
If the center forms a little tent, inspect the seam allowances from the back. A bulky allowance may be folded in the wrong direction, or one seam may extend too far. If the area forms waves, bias edges may have stretched. Steam and forceful pressing are unlikely to provide a permanent repair; controlled resewing is safer.
Accuracy Checklist Before Final Assembly
Use this checklist when the diamond units are complete but before the large sections are permanently joined.
- All 48 diamonds are present in the quantities required by the pattern.
- Fabric order agrees with the original diagrams.
- A and B orientations are true mirrors.
- Internal intersections are reasonably aligned.
- Diamond edges are straight and units lie flat.
- White sashing widths look consistent.
- Eight major directions are visible on the design wall.
- The center arrangement is symmetrical.
- No unit has been rotated merely to disguise a reflection error.
- Large triangular sections match their expected dimensions.
- The background fabric shows no stains or transferred color.
View the layout through a phone camera or from across the room. A reversed cluster often becomes more obvious at a smaller scale. A grayscale photo can reveal a misplaced dark fabric that is difficult to notice among many colors.
Common Problems and Practical Fixes
The strip set curves
Likely causes: uneven feeding, pulling during sewing, inconsistent pressing, or all long seams sewn in the same direction.
What to do: check the latest seam first. If the curve is mild, remove and resew that seam while supporting the strips. Alternate sewing directions on later seams. If the full set is severely bowed, rebuilding it is more reliable than cutting distorted diagonal sections.
The angled sections are not identical
Likely causes: the 45-degree line drifted, the strip set moved under the ruler, or section width was measured along the wrong direction.
What to do: re-establish a clean 45-degree reference. Measure perpendicular to the cut edge. Replace the rotary blade if it requires excess pressure. Use the same ruler markings for every repeated cut.
Seams miss at diamond intersections
Likely causes: the sections were matched only at the raw edge, seam allowance varies, or one strip width is inaccurate.
What to do: align the seam intersection at the quarter-inch stitching line and use a controlled offset. Make a test seam, open it without pressing, and adjust. If every intersection is displaced differently, measure the original strip set.
A diamond is the wrong size
Likely causes: inaccurate strip widths, wide or narrow seam allowances, pressing distortion, or an incorrect diagonal slice width.
What to do: compare the component measurements in order. Do not trim until the cause is understood. If one unit alone is wrong, remake it. If every unit has the same small discrepancy, consult the pattern and decide on a consistent correction before assembly.
The star layout looks unbalanced
Likely causes: a mirrored section is incorrect, a color group is misplaced, or a large triangle has been rotated.
What to do: separate the layout into A and B sections. Follow one distinctive fabric from the center outward and compare its path in every direction. Use the pattern diagram and your labeled photos.
White channels vary in width
Likely causes: background sashing cut inconsistently, diamond points extending into the seam, or bias stretching.
What to do: measure the background components and verify the seam allowance. Pin at regular intervals. Correct the earliest inaccurate seam instead of trimming the entire section smaller.
The large section does not lie flat
Likely causes: stretched diagonal edges, bowed strip sets, excessive steam, or a forced seam.
What to do: place the section on a flat surface without pulling. Identify whether fullness follows one seam. Reseam that area if possible. Handle later pieces flat and press with an up-and-down motion.
Points disappear at the outer edge
Likely causes: there was no quarter-inch seam allowance beyond the point, or the unit was trimmed too closely.
What to do: check for a quarter-inch margin before joining the next section. Preserve dog ears and untrimmed edges until the construction stage calls for trimming.
Planning the Quilting
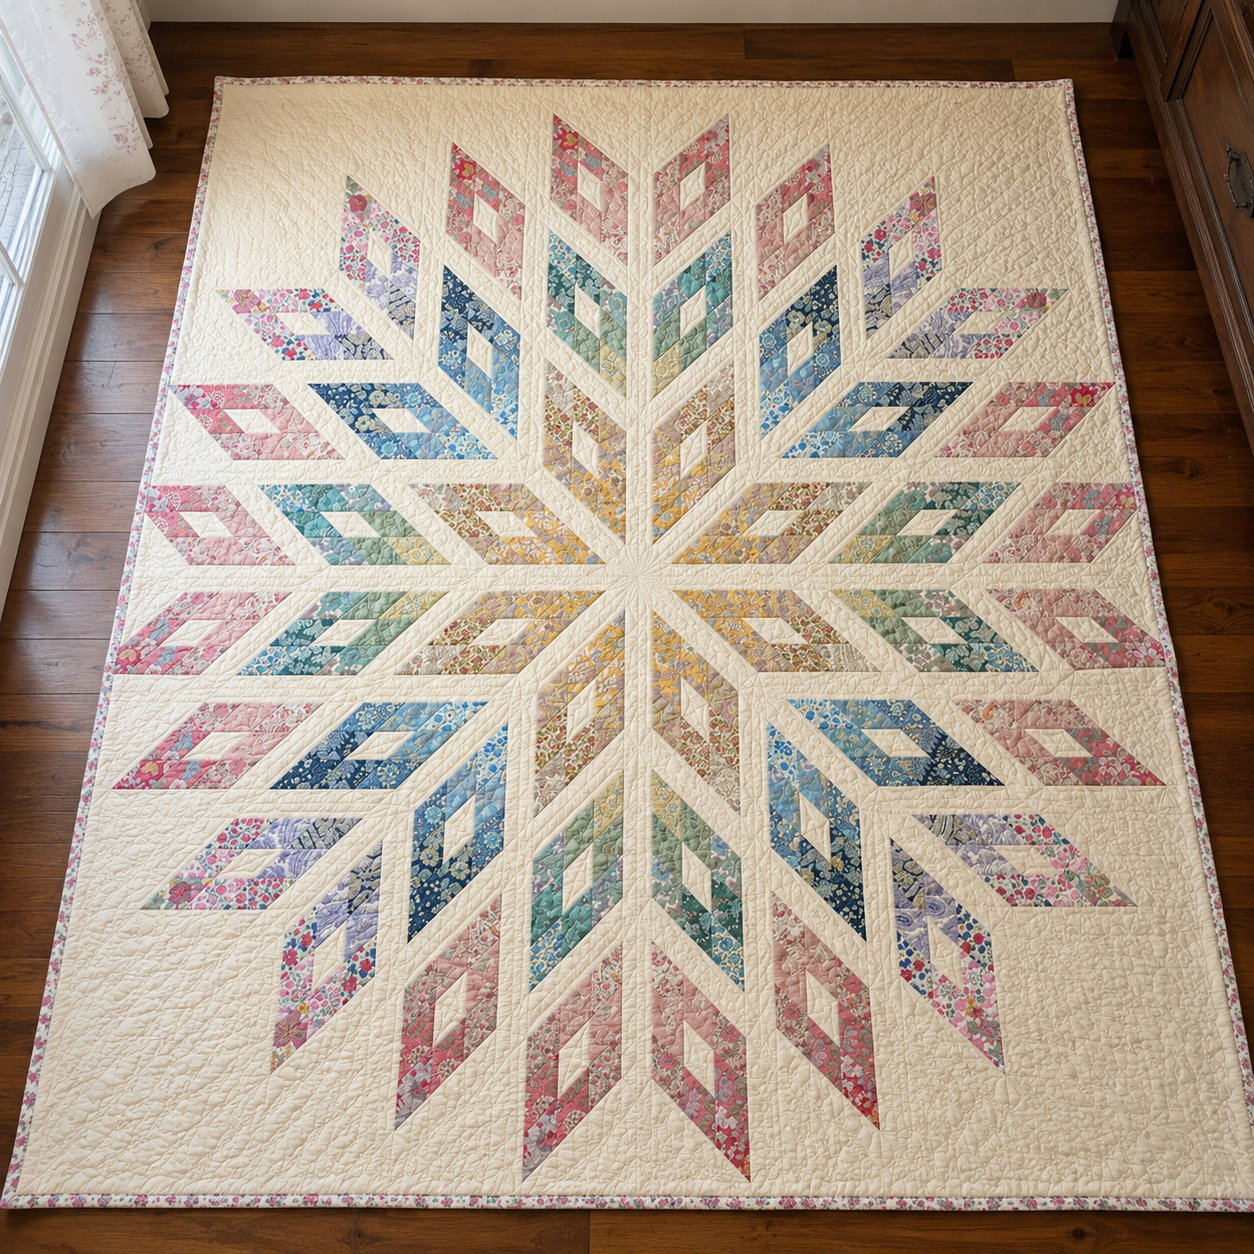
The original quilt was finished with a two-inch crosshatch. A crosshatch is a strong choice because diagonal lines echo the diamond piecing without competing with the floral prints. It also carries evenly through the broad white background.
Other quilting approaches can work:
- Straight-line echo quilting: Follow the edges of the diamond clusters and repeat lines into the background.
- Denser background quilting: Quilt the white areas more closely and leave the colored diamonds with lighter quilting so the star rises visually.
- Continuous curves: Add soft movement inside the patchwork while preserving the geometric outline.
- Custom motifs: Use feathers, florals, or Paris-inspired ornamental shapes in the large negative spaces.
- Edge-to-edge quilting: Choose an open design that does not obscure the many small prints.
Before deciding, photograph the completed top and sketch quilting lines over a printed copy or digital image. Pay attention to how quilting will travel across the eight mirrored sections. A design that works in one triangle should turn naturally around the center.
Stay-stitch the perimeter if the pattern and your quilting method permit it, especially where bias edges reach the outside. Use a thread color that blends with both the white and the multicolored prints, or use different thread colors in the two areas.
If sending the quilt to a longarm quilter, discuss backing and batting size before purchasing. The original pattern lists 5 yards of backing and notes that this provides a smaller margin than many longarm quilters require. Longarm professionals commonly need several extra inches on all four sides, but the exact requirement depends on the frame and service. Give the finished top dimensions to the quilter and follow their requested backing size rather than assuming the pattern quantity will be sufficient.
Backing, Batting, and Binding
The original batting recommendation is a 91-inch square, providing space beyond the 83-inch top. Choose batting according to the desired finish. Cotton or an 80/20 cotton-polyester blend produces a familiar quilt texture and manageable loft. Wool can emphasize custom quilting but may change the drape and care requirements.
Prepackage labels are not enough when mixing materials. Check shrinkage, washing instructions, maximum quilting distance, and whether the batting can be safely ironed or steamed.
For a pieced backing, remove selvages from the seam because they shrink and behave differently from the fabric body. Plan the seam position so it does not land exactly along a heavily quilted centerline if your quilter prefers another arrangement.
The original design uses eight 2½-inch width-of-fabric strips for double-fold binding. Confirm the exact requirement in the pattern, especially if the quilt top finishes at a different size after modification. Join binding strips with diagonal seams to distribute bulk, press the long strip in half wrong sides together, and miter the corners.
A collection print creates a soft coordinated frame. A darker binding makes the outer edge more defined, while a white binding lets the top appear to float but will show handling and wear more quickly.
Ways to Personalize the Design
The pattern’s structure is already visually rich, so personalization works best when one major decision changes at a time.
Use a controlled two-color palette
Replace the full spectrum with 25 prints in shades of blue and green, or rose and burgundy. Preserve value variation so the rings of diamonds remain visible.
Create a dark-background version
Navy, charcoal, or black can make floral diamonds glow. Test every feature fabric against the chosen dark background, and use a lint roller frequently during assembly. Dark solids can show pale thread and pressing residue.
Make it scrappy but organized
Choose fabrics from your stash, then sort them into 25 roles. Repeat the same role consistently around the star. “Scrappy” does not need to mean random; controlled repetition is what preserves the geometric pattern.
Emphasize the negative space
Use a pale tonal background and plan custom quilting as a secondary design. Keep the pieced star unchanged so the quilting has a calm area to develop.
Change the emotional tone
Vintage florals and cream create a romantic quilt. Saturated solids and white make the same geometry feel modern. Jewel tones on a dark ground look dramatic, while low-volume prints on warm white produce a quieter heirloom effect.
Avoid resizing the quilt by simply changing strip width unless you are prepared to recalculate all diamonds, background triangles, sashing, borders, backing, and binding. Forty-five-degree geometry magnifies small mathematical changes. Making the pattern as written once is the safest route before attempting a resized version.
Frequently Asked Questions
What size is the Memoire a Paris Lone Star quilt?
The original 2018 Lecien pattern gives a finished size of 83 inches square. Measure your own top before preparing the final backing and binding, since individual seam allowances and any design changes can affect the result.
Who designed the quilt?
The pattern credits Lynne Goldsworthy, who designed the quilt for Lecien using the 2018 Memoire a Paris collection.
How many fabrics are used in the star?
The original plan organizes 25 fat quarters for the colored patchwork. Additional yardage is required for the white background, binding, backing, and batting.
How many diamond units are needed?
The original construction makes 48 diamond units. Some fabric groups or strip-set combinations repeat more often than others, so use the original chart for the correct quantities.
Can I use jelly-roll strips?
The feature strips are 2½ inches wide, which may suggest precut strips, but a direct substitution is not automatic. The original uses lengthwise-grain strips cut from fat quarters, and the required color order, usable length, repetition, and stability may differ from a commercial precut roll. Compare every requirement before substituting. A curated fat-quarter group gives more control.
Do I need a specialty Lone Star ruler?
No specialty ruler is essential if you have a long acrylic ruler with an accurate 45-degree marking. A specialty tool may make repeated cuts easier, but its instructions must agree with the dimensions and construction method in the Lecien pattern.
Should I press seams open or to one side?
The original notes allow either approach. Pressing open can reduce bulk; pressing to one side may create nested intersections. Choose after making a test diamond, then stay consistent within matching units.
Why are my diamond points not matching?
The most common reason is aligning diagonal sections at the raw edges rather than at the future quarter-inch stitching line. Variable seam allowances, inaccurate strip width, or a drifting 45-degree cut can also cause mismatches. Diagnose the strip set and cutting before trimming the diamond.
Can I make the quilt with directional prints?
Yes, but motifs will rotate around the eight-pointed design. If consistent direction inside each unit matters, mark the top and wrong side of every strip and plan both regular and mirrored sections before sewing.
Is this a good first quilt?
It is better as a later project. A new quilter will have a more enjoyable experience after practicing rotary cutting, quarter-inch seams, strip piecing, and point matching on a smaller quilt or block. An adventurous beginner should make a scrap test diamond and expect to work slowly.
Can I make a smaller version?
Only with careful recalculation or a separately tested pattern. Changing strip width affects the diamond size and every surrounding background component. Cropping the layout may also remove part of the intended symmetry. Do not scale a PDF during printing and assume the fabric instructions will still work.
What background should I choose if Snow White is unavailable?
Use a high-quality solid or subtle tonal with clear contrast against all 25 feature fabrics. Buy enough from one dye lot. Bright white feels crisp, cream feels traditional, and a dark background creates a dramatic alternative.
How should I store the pieces between sewing sessions?
Keep diagonal sections and diamonds flat on trays, pieces of batting, or in labeled sheet protectors. Separate A and mirrored B orientations. Do not hang bias-edged units or combine every piece into one unlabeled bag.
Is the original backing quantity suitable for longarm quilting?
Not necessarily. The pattern itself warns that its 5-yard backing quantity leaves less extra margin than a longarm quilter may need. Ask the specific quilter for their required backing dimensions before piecing or trimming the back.
Finding the Original Pattern Responsibly
The original document is identified as The 2018 Memoire a Paris Lone Star Quilt, designed by Lynne Goldsworthy for Lecien. It carries a 2018 Lecien Corporation copyright notice. Although Lecien historically promoted the design as a free pattern, “free” does not automatically grant other websites permission to upload, sell, or redistribute the PDF.
At the time this guide was reviewed, the 2018 Lone Star PDF was not readily listed in Lecien’s current official free-pattern area. Do not pay a third-party marketplace seller for a file that was presented as a manufacturer pattern, and avoid unverified document-sharing copies. The safest options are to check Lecien’s official channels, ask the manufacturer whether an authorized archive is available, or use a legitimately obtained original copy.
This article intentionally does not reproduce the complete cutting chart, numbered diagrams, or page layout from the copyrighted PDF. Once you have an authorized copy, use the original document for exact quantities and unit placement, and use this guide for planning, accuracy, and troubleshooting.
A Final Preparation Checklist
Before the first feature strip is cut, confirm that you can answer yes to each question:
- Do I have an authorized copy of the original pattern?
- Have I read all five pages before beginning?
- Are the 25 feature fabrics arranged and numbered?
- Have I checked the spectrum in both color and grayscale?
- Is the background clearly different from the lightest prints?
- Is all background yardage from one dye lot?
- Do I understand which direction is lengthwise grain?
- Is my rotary blade sharp and my 45-degree ruler marking clear?
- Have I tested my quarter-inch seam?
- Do I have separate labels for regular and mirrored units?
- Is there enough flat space to store bias-edged sections?
- Have I made one test diamond before batch construction?
- Have I discussed backing size with my longarm quilter, if using one?
If one answer is no, solve it before continuing. The preparation may feel slow, but it is much faster than unpicking dozens of repeated units.
Pattern Credit
Pattern: The 2018 Memoire a Paris Lone Star Quilt
Designer: Lynne Goldsworthy for Lecien
Featured fabric collection: Memoire a Paris 2018
Original finished size: 83 inches square
Original publisher and copyright holder: Lecien Corporation, © 2018
All pattern rights, diagrams, and original instructions belong to their respective creator and publisher. Easy Quilting Patterns provides this independent planning and technique guide for educational commentary and does not claim ownership of the original pattern.
Final Thoughts
The Memoire a Paris Lone Star quilt succeeds because it balances precision with softness. Its geometry is disciplined, but the floral color and generous white space keep the finished quilt graceful. The project asks for more concentration than a beginner block, yet its repeated strip-piecing process becomes manageable when the work is divided into labeled stages.
Choose the fabrics slowly, verify the first strip set, protect every bias edge, and treat mirrored orientation as a separate construction step. Those habits do more than improve point matching. They make the entire project calmer and help the eight sections come together as one luminous star.