
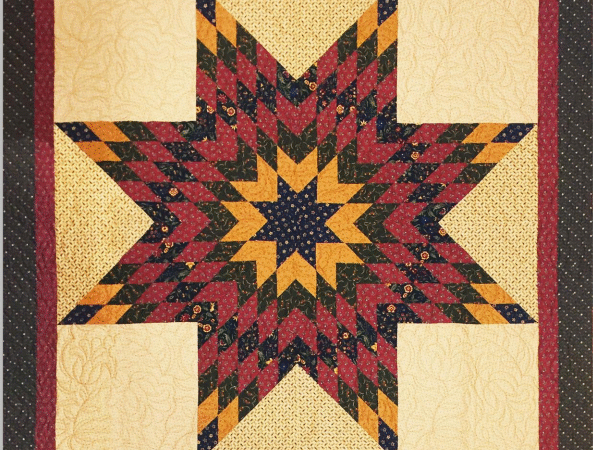
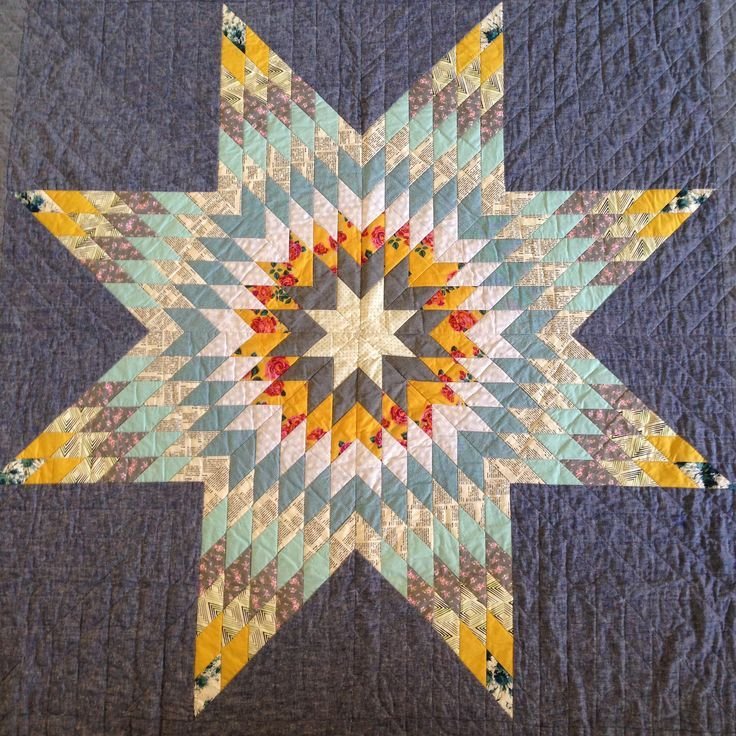
Few quilts command a room like a Lone Star. Eight large points radiate from the center, and rows of small diamonds create color that seems to move outward. Donna Jordan’s free Lone Star quilt pattern offers a practical way to make this traditional-looking design from individually cut diamonds, mirrored star sections, and large background triangles.
The completed quilt measures 74 × 84 inches when made with the sample borders shown in the pattern. The design can look warm and traditional in burgundy, gold, and dark green, as in the publisher’s sample, or completely modern in solids, batiks, low-volume prints, or a controlled rainbow.
This article is an independent companion to Donna Jordan’s instructions. It explains how the construction works, how to manage grain direction and bias edges, how to choose five effective star fabrics, and where accuracy matters most. Keep the official pattern and video open for the original diagrams, fabric placement, and demonstration.
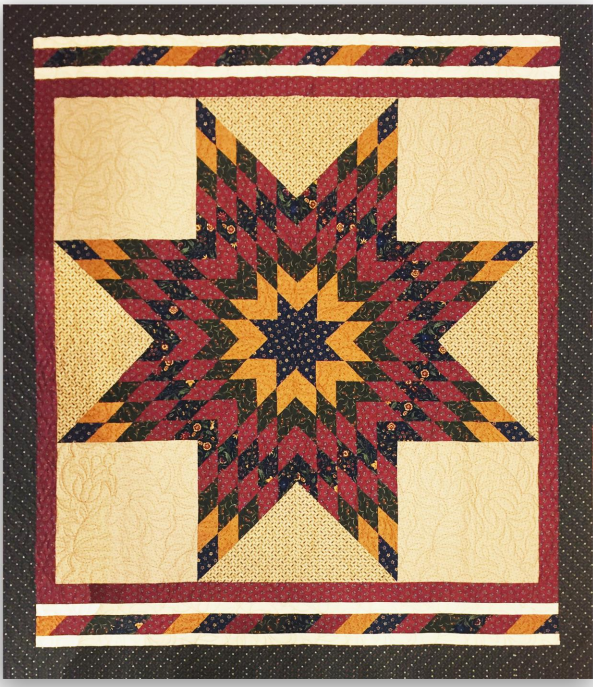
Project at a Glance
| Detail | Information |
|---|---|
| Pattern | Lone Star Quilt — Quick & Easy Method |
| Designer and instructor | Donna Jordan |
| Publisher | Jordan Fabrics |
| Finished size | 74 × 84 inches with the sample borders |
| Main patchwork | Eight 5 × 5 diamond sections |
| Diamond strip width | 3 inches before diamonds are cut |
| Background | Large triangles cut from 19 1/2-inch and 13 1/2-inch squares |
| Border | Optional sample arrangement with a pieced diamond accent |
| Recommended skill level | Confident intermediate |
Each of the eight major star sections contains a 5 × 5 arrangement, or 25 diamonds. That means the central star uses 200 individual diamond pieces. The number sounds intimidating, but repetition makes the work manageable: establish one accurate cutting and sewing process, then repeat it in controlled batches.
This version is different from many modern Lone Star patterns made from long strip sets. Donna Jordan’s method cuts individual diamonds from 3-inch strips and uses two mirrored fabric groups. Follow this project’s specific directions rather than combining measurements from an unrelated Lone Star tutorial.
Is the Lone Star Quilt Suitable for Beginners?
The official title calls this a quick and easy method, but the project is still best for a confident intermediate quilter. “Easy method” describes the streamlined approach to a complex-looking star; it does not make bias edges and 200 intersecting diamonds beginner-proof.
You should be comfortable with:
- accurate rotary cutting;
- maintaining a consistent quilting seam allowance;
- sewing angled pieces with offset tips;
- nesting multiple seam intersections;
- handling bias edges without stretching them;
- assembling large units while keeping a center flat.
If you are new to diamond piecing, make a practice strip of five diamonds from scrap fabric. Sew, press, and check whether the intersections align before cutting the full project. That small test will reveal whether your seam allowance, pinning method, or pressing needs adjustment.
The pattern does not require foundation paper piecing, appliqué, or a Y-seam in the center. Its difficulty comes from precision and fabric handling rather than specialty equipment.
A Brief and Respectful Note on Lone Star Traditions
The large radiating star has appeared under several names, including Mathematical Star, Star of Bethlehem, Morning Star, and Lone Star. A Daughters of the American Revolution museum record describes Mathematical Star as a design known on the East Coast and notes its later association with the single star of the Republic of Texas.
Star quilts also have an important and continuing place in Indigenous communities. The International Quilt Museum’s Native American Star Quilts exhibition explains the importance of the Morning Star in Lakota mythology and art. Star quilts became meaningful gifts and ceremonial objects in Lakota and other Plains traditions; that history should not be reduced to a decorative trend or a generic “early American” origin story.
Donna Jordan’s pattern is a contemporary instructional version of the radiating diamond-star format. When writing about or displaying a quilt, credit the specific pattern designer while recognizing that the broader form carries different names, histories, and cultural meanings.
Official Fabric Requirements
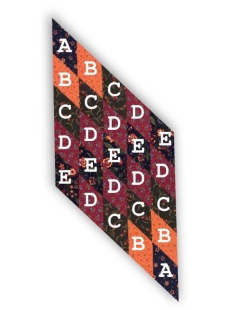
The five star fabrics are identified as A through E. The background and optional border materials are separate.
| Use | Amount in the pattern |
|---|---|
| Fabric A diamonds | 1/4 yard |
| Fabric B diamonds | 1/2 yard |
| Fabric C diamonds | 5/8 yard |
| Fabric D diamonds | 3/4 yard |
| Fabric E diamonds | 1/2 yard |
| Background | 2 yards |
| Alternative two-print background | 1 1/8 yards of one print and 7/8 yard of the other |
| Sample Border 1 | 3/4 yard |
| Sample Border 2 | 1/2 yard |
| Sample Border 3 | 1 1/4 yards |
| Binding | 1 yard |
| Backing | 5 1/2 yards |
The sample uses Moda Kansas Troubles prints for the borders, binding, and backing. Those exact fabrics are not required. The border yardages apply to the particular arrangement shown in the pattern: a red inner frame cut at 3 inches, top-and-bottom diamond accent bands framed with light strips cut at 2 inches, and a green outer frame cut at 5 inches.
Treat the five star yardages as minimum requirements. If a fabric has a strong one-way motif, needs fussy cutting, shrinks significantly, or has less usable width than standard quilting cotton, purchase extra. The pattern’s mirrored cutting method also means scraps must have suitable dimensions and orientation; a pile with enough total area may still be impractical.
The stated 5 1/2 yards of backing relates to the 74 × 84-inch bordered quilt. Confirm the required margin with your longarm quilter before cutting. Backing needs can change with fabric width, piecing direction, shrinkage, and the quilting setup.
Choosing Five Star Fabrics
The color sequence determines whether the star feels luminous, graphic, subtle, or busy. Arrange possible fabrics in the A-to-E order shown in the official placement diagram, then photograph the group in grayscale. Clear value changes remain visible in black and white; fabrics that merge into the same gray may lose the stepped geometry from a distance.
A reliable plan is to use a dark anchor, one or two medium colors, a bright accent, and a second dark or light contrast. The sequence matters more than matching the original red, navy, gold, and green palette.
For a glowing effect, move gradually from dark points through medium values toward a light center, or reverse the progression. For a bolder, pulsing star, alternate light and dark values. A monochromatic version can travel from pale blue to navy, while a scrappy version can assign many prints to five consistent value groups.
Small-scale prints are forgiving because each diamond shows a representative portion of the fabric. Large motifs may be cut into unrecognizable fragments. Stripes and directional prints create exciting motion but require careful mirrored cutting. If orientation matters, test four diamonds around a seam intersection before committing all the yardage.
The background must separate the eight points clearly. A solid, tone-on-tone, or restrained low-volume print is usually effective. A busy background may compete with the star, particularly where its value is close to the outer diamond row.
When using two background prints, make the division intentional. You might use one fabric for the smaller triangles and another for the larger setting areas, as directed in the pattern. Audition the combination around a completed star section so the secondary design does not create accidental dark wedges.
Why Grain Direction Matters
A diamond has angled edges, and angled cuts expose bias. Bias stretches more readily than lengthwise or crosswise grain. In a Lone Star, uncontrolled stretching can create rippled points, mismatched sections, or a center that refuses to lie flat.
Donna Jordan’s cutting method begins by dividing each star fabric along the fold. One half of every fabric remains right side up, while the other half is kept right side down. The two groups are cut and sewn separately. This produces four sections with one grain orientation and four mirrored sections with the other orientation, helping the completed quilt place straight grain strategically around the star.
Do not treat “right side up” and “right side down” as a casual styling choice. Label two trays or project boxes before cutting and never combine the pieces. If your fabrics look similar on both sides, place a small removable sticker on the wrong side of every strip.
Starch or a fabric-stabilizing spray can help, but use it before final cutting and apply it consistently. Soaking a partly sewn unit may change its dimensions. Whatever preparation method you choose, support long strips and sections instead of letting them hang from the table.
Cutting Accurate Diamonds
Press the fabrics flat without pulling them off grain. Divide the yardage as directed, create the right-side-up and right-side-down groups, and cut 3-inch-wide strips. The PDF then aligns the strips with a 45-degree line on the cutting mat so repeated cuts create whole diamonds.
Accuracy depends on both the angle and the spacing. A perfect 45-degree first cut followed by inconsistent 3-inch cuts still produces mismatched diamonds. Use a sharp rotary blade, a ruler with a clear 45-degree marking, and a mat whose printed lines are not worn or distorted.
The instructions allow stacking several strips, but more layers are not automatically faster. If the ruler rocks or the lower layers shift, every error is multiplied. Start with one or two layers. Increase the stack only after the cut remains clean from top to bottom.
Square the ruler to the cutting mat rather than to a slightly uneven fabric edge. Make the first 45-degree cut, move the ruler the required 3 inches, and repeat. According to the pattern, each prepared strip yields four diamonds. Keep the mirrored batches separated immediately after cutting.
Avoid trimming the pointed tips off in advance unless the official diagram or tutorial specifically demonstrates it. Those tips help identify alignment, and the correct offset becomes clear when two diamonds are placed right sides together.
Sewing a 5 × 5 Diamond Section
Lay out all 25 diamonds for one section before sewing. The labeled placement diagram is essential because colors repeat in a stepped sequence. Orient every diamond identically and compare the arrangement from the narrow A end to the opposite E edge.
Take a phone photo before moving pieces to the machine. Then sew the diamonds into diagonal rows, preserving the order. A small label at the first piece of each row prevents accidental reversal.
When placing two diamonds right sides together, their pointed ends extend beyond one another. The goal is for the 1/4-inch seam lines—not the raw tips—to intersect at the edges. Mark a dot 1/4 inch from the angled edges on practice pieces if the offset is unfamiliar.
The concise PDF does not foreground a seam-allowance statement in its written text. Use the seam allowance demonstrated by Donna in the official tutorial and keep it unchanged throughout the project. A scant 1/4-inch seam is common in rotary-cut patchwork, but testing a complete row is safer than assuming that every machine and foot produces the same result.
Press the seam allowances in alternating directions from one row to the next. When the rows are joined, those opposing allowances can nest at each intersection. Pin through the seam-line crossings, not merely at the raw edges. Sew across one junction, open the section, and check the point before chain piecing every row.
The official instructions call for four 5 × 5 sections from the right-side-up diamonds and four from the right-side-down diamonds. Label the completed groups “upper/left” and “lower/right,” following the PDF, so they do not become mixed later.
Pressing Without Distortion
Pressing is part of construction, not just a cosmetic final step. Set each seam gently, then press in the direction needed for nesting. Move the iron with the straight grain whenever possible and avoid sliding diagonally across the section.
Support the entire 5 × 5 unit on the ironing surface. If one point hangs over the edge, its weight can stretch the warm fabric. Let the pressed section cool flat before lifting it.
The official pattern uses a small amount of steam after joining mirrored sections to help settle minor stretching. Steam should not be used to force a badly distorted unit into shape. Hold the iron in place, lift it, and allow the fabric to cool. Repeatedly pushing a hot iron around the bias can make the problem worse.
Do not square a star section by cutting away its points. The outside edges and seam allowances are required for joining the background triangles and neighboring sections. Correct the source of a measurement problem before removing fabric.
Preparing the Background Triangles
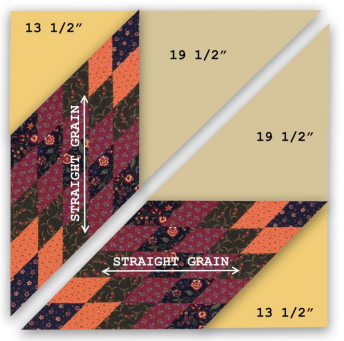
The pattern directs you to cut four 19 1/2-inch background squares and four 13 1/2-inch background squares. Each square is cut once diagonally to create eight large triangles of each size.
These numbers describe the squares before the diagonal cuts, not finished triangle side measurements. Label the two triangle sizes as soon as they are cut.
The new diagonal edge is bias. Move each triangle on a ruler or cutting mat rather than carrying it by one corner. If the pieces must wait before assembly, store them flat. Staystitching is not part of the official directions and may affect the seam, so use it only if you understand how it will interact with the construction.
For a directional background, remember that cutting a square diagonally creates two opposite triangles. Make a paper mockup first to determine whether all motifs can face the desired way with the stated yardage.
Assembling the Eight-Point Star
The four sections with straight grain running vertically form the upper/left portions described in the pattern. A 13 1/2-inch-square-derived triangle joins near the pointed A end, while a 19 1/2-inch-square-derived triangle joins near the E side. The mirrored four sections form the lower/right portions.
Follow the official diagrams for which triangle edge meets each diamond section. Both edges may be bias, so pin at the ends and center without stretching. Finger-press the first seam toward the background triangle as instructed.
Pair one upper/left section with one lower/right section. Sew from the star center toward the outside corner, matching patchwork intersections carefully. Working outward lets you prioritize the center and avoids pushing accumulated fullness into it.
Repeat to create four quarter-quilt units. Before joining them, arrange all four on a large flat surface. Check that colors travel around the center in the intended sequence and that no section has been rotated or mirrored incorrectly.
Join two quarters at a time, pinning at the star center and major intersections. Press according to the pattern, then join the two halves. If eight points cannot meet perfectly without creating a bulky knot, aim first for a flat center and a visually continuous color ring. A tiny discrepancy is less noticeable than a puckered center.
Optional Borders and Finished Size
The central quilt top can be finished without copying the sample border treatment. The pattern says to add borders if desired, then provides one layout that finishes at 74 × 84 inches.
The sample includes:
- a red inner frame cut from 3-inch width-of-fabric strips;
- optional pieced diamond bands at the top and bottom;
- light strips cut at 2 inches to frame and stabilize the long edges of the pieced bands;
- a green outer frame cut from 5-inch width-of-fabric strips;
- separate binding cut from the stated one-yard fabric.
Donna’s sample pieced accent uses diamonds sewn into a long strip, with 65 1/2 inches given as the length she used. The pattern adds 2-inch-cut light strips along the long edges of those bands. Do not automatically cut every border to the sample number. Measure your own quilt top through the center in three places, average the measurements, and cut paired borders to the same length. This keeps the outer edge square and prevents waves.
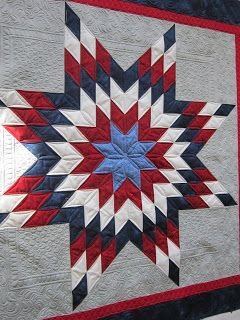
The pieced accent has bias edges and can stretch substantially. Measure it while relaxed on a flat surface. Pin it to the adjacent border at both ends, the midpoint, and evenly between those points before sewing.
If you omit or redesign borders, the official 74 × 84-inch finished measurement no longer applies. Recalculate backing, batting, binding, and quilting costs after measuring the actual top.
Get the Official Free Lone Star Pattern
Visit the official Lone Star Quilt Free Pattern page at Jordan Fabrics to obtain the pattern from its publisher.
Jordan Fabrics also provides Donna Jordan’s official Lone Star quilt video tutorial. The written pattern is concise, so watching the demonstration before cutting will make the mirrored fabric stacks, grain direction, and quarter-section assembly much easier to understand.
Please use the publisher’s page rather than a copied PDF hosted elsewhere. Jordan Fabrics states in its free-pattern FAQ that websites should direct visitors to Jordan Fabrics to download the patterns instead of reposting them.