
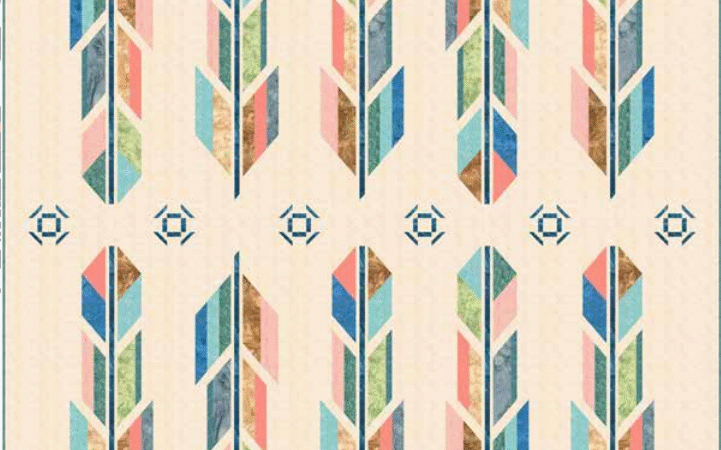
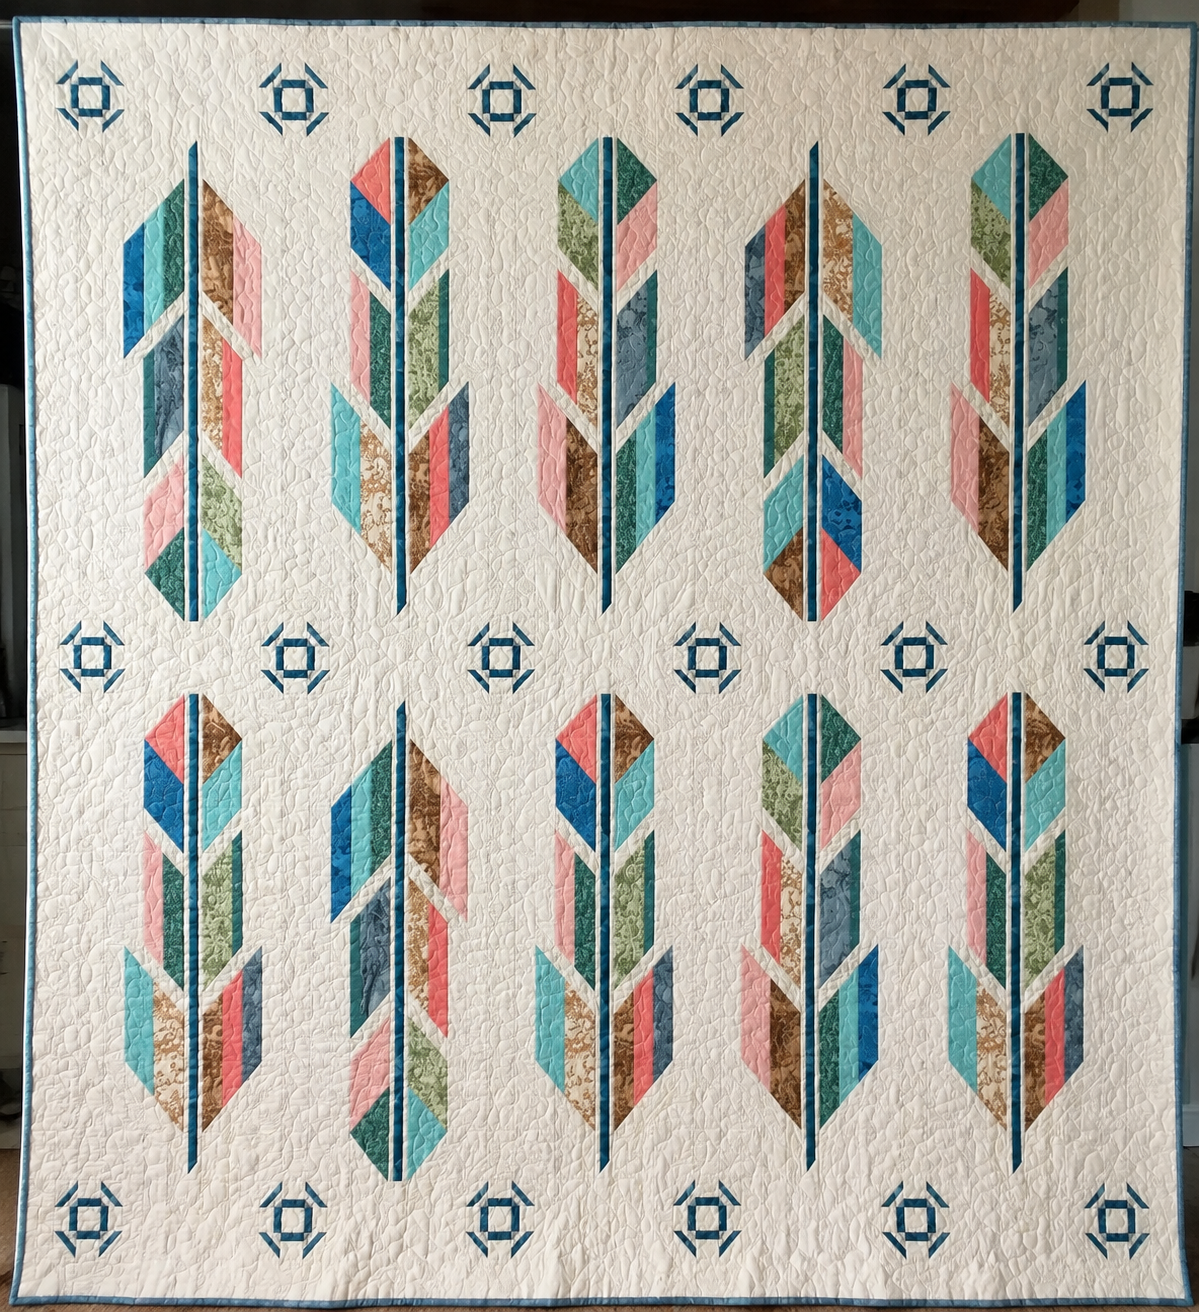
The Light as a Feather Quilt creates the impression of tall feathers floating across a softly colored background, but its graceful appearance comes entirely from straight seams. Designed exclusively for Hoffman Fabrics by Wendy Sheppard, the quilt features twelve shades from the 1895 Bali Watercolors collection and finishes at 77″ × 80 1/2″.
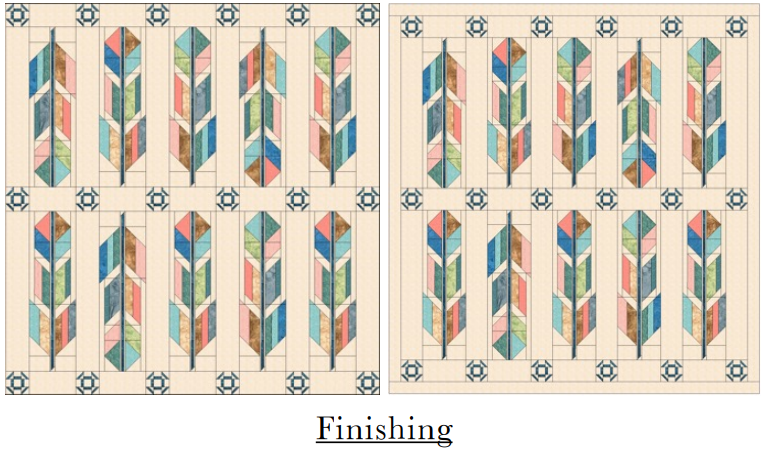
This is a generous bed or display quilt with more structure than the first glance suggests. Ten long feather blocks are divided between two colorways, framed by vertical sashing, and arranged in two horizontal rows. Three pieced sashing rows contain eighteen detailed cornerstone blocks, while a narrow outer border completes the composition.
There are no curved seams and no foundation paper piecing. The feather shapes are built with rectangles, squares, half-square triangles, narrow strip sets, and repeated stitch-and-flip corners. The challenge comes from keeping many fabrics and mirrored sections correctly labeled, not from using one unusually difficult technique.
This independent guide explains the pattern’s construction, fabric plan, organization, accuracy points, color substitutions, and finishing options. Use it alongside Hoffman’s official fifteen-page PDF, which contains the complete cutting chart, colorway diagrams, section measurements, and quilt layout.
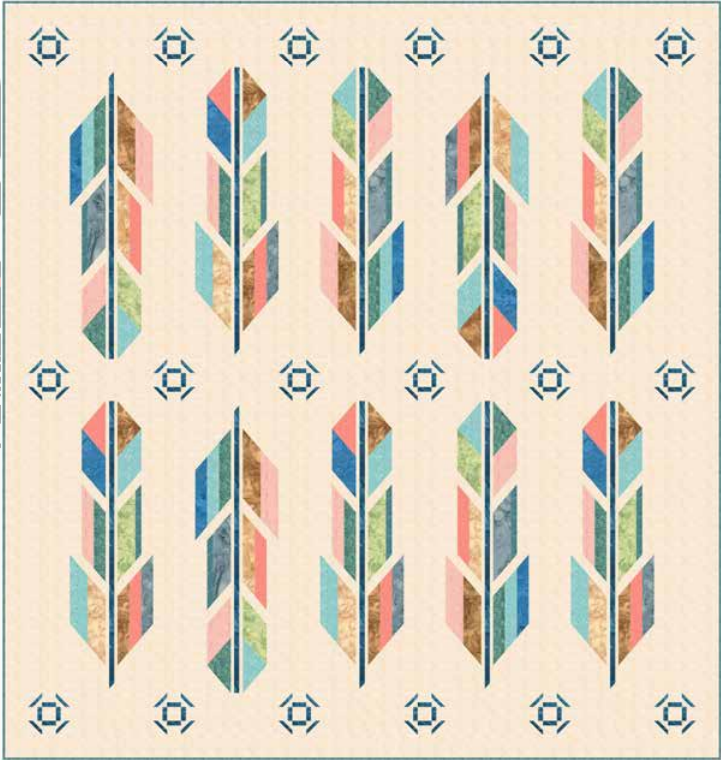
Light as a Feather Quilt at a Glance
| Project detail | Official information |
|---|---|
| Pattern name | Light as a Feather |
| Designer | Wendy Sheppard |
| Publisher | Hoffman Fabrics |
| Collection | 1895 Bali Watercolors |
| Collection program | Spring 2021 Palette of the Season |
| Finished size | 77″ × 80 1/2″ |
| Feather blocks | 10 total: 5 in each of 2 colorways |
| Feather block size | 9 1/2″ × 31 1/2″ unfinished |
| Cornerstone blocks | 18 |
| Main techniques | Section piecing, stitch-and-flip corners, mirrored units, HSTs, sashing, borders |
| Recommended level | Intermediate |
The official pattern does not display a formal skill rating. Intermediate is a reasonable recommendation because each feather block is assembled from multiple labeled sections, two versions must be kept separate, and several sections have mirrored orientations. A confident beginner could succeed by making one complete test block before beginning production sewing.
Download the Official Free Pattern
Hoffman Fabrics lists Light as a Feather in its official Palette of the Season archive. The free PDF includes fifteen pages of fabric requirements, cutting directions, section diagrams, block assembly, cornerstones, quilt-top layout, and finishing instructions.
Visit the official Hoffman Fabrics Palette of the Season page
Open the official Light as a Feather PDF
Download the file directly from Hoffman Fabrics so you are using the publisher’s current version. Read the full document before cutting. Page 11 is especially important because it shows the two complete feather blocks with the intended fabric placement, while the preceding diagrams use simplified colors to make individual pieces easier to distinguish.
Keep a printed working copy beside the sewing machine. Mark finished sections in pencil and write any personal pressing decisions on the corresponding page. This is safer than relying on memory when several units share the same dimensions but require different fabrics or orientations.
What Makes the Feather Design Work
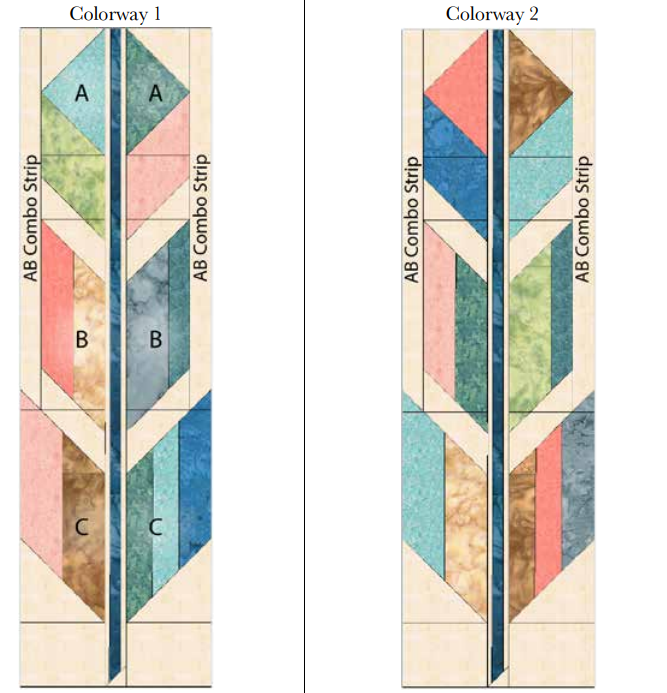
Each block has a narrow central spine surrounded by stepped sections that resemble the soft barbs of a feather. The left and right sides are not constructed as one continuous patchwork shape. Instead, they are divided into Sections A, B, and C, then combined around the spine.
The two colorways repeat the same construction while changing fabric placement. This creates variety without changing the overall block size. Five blocks of each colorway are used, giving the final quilt ten feathers that relate to one another without appearing identical.
The warm Tortilla background is responsible for much of the airy effect. It appears inside the feather blocks, between the blocks, in the cornerstone units, and around the quilt as a border. London provides the slim gray-blue spines and details in the cornerstones. The remaining batiks move through apricot, cream, blue, green, slate, and blue-violet.
Large quiet areas are part of the design. Avoid filling every background space with another print or color simply because the feather sections are colorful. The neutral fabric allows the long shapes to remain recognizable from across a room.
Verified Fabric Requirements
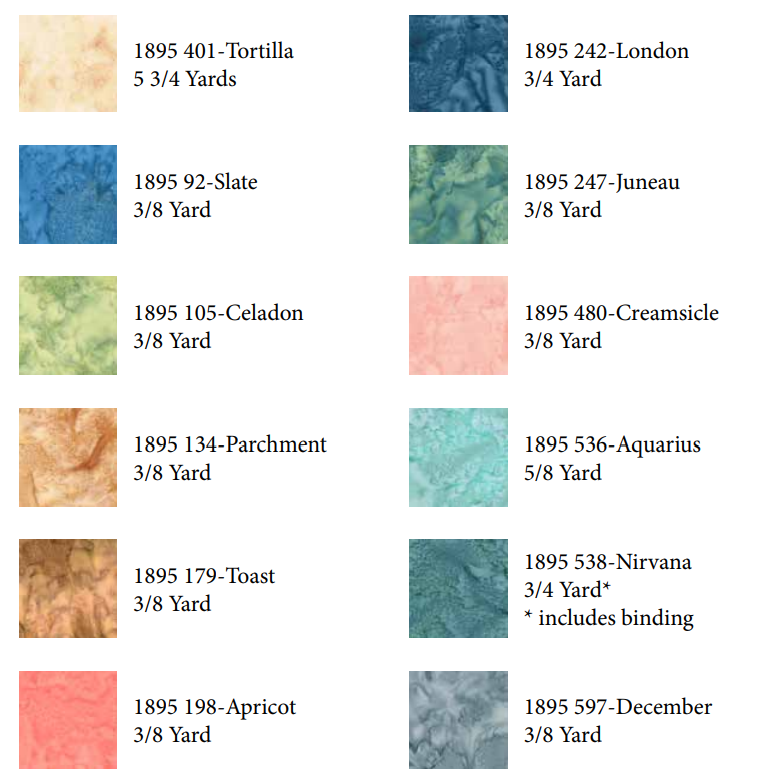
The original quilt uses Hoffman 1895 Bali Watercolors. Use the official chart as the final authority for purchasing and cutting.
| Fabric | Hoffman color | Amount |
|---|---|---|
| 1895-401 | Tortilla | 5 3/4 yards |
| 1895-242 | London | 3/4 yard |
| 1895-105 | Celadon | 3/8 yard |
| 1895-480 | Creamsicle | 3/8 yard |
| 1895-179 | Toast | 3/8 yard |
| 1895-538 | Nirvana | 3/4 yard, including binding |
| 1895-92 | Slate | 3/8 yard |
| 1895-247 | Juneau | 3/8 yard |
| 1895-134 | Parchment | 3/8 yard |
| 1895-536 | Aquarius | 5/8 yard |
| 1895-198 | Apricot | 3/8 yard |
| 1895-597 | December | 3/8 yard |
The PDF assigns eight 2 1/4″ width-of-fabric strips from Nirvana to the binding. Because the 3/4-yard requirement includes those strips as well as pieces used in the feather blocks, follow the cutting order carefully. Do not begin by cutting binding from the entire width without checking the project chart.
The official fifteen-page PDF does not list a separate backing amount in its fabric-requirements chart. The five-yard figure shown in the current website article should therefore not be presented as an official Hoffman requirement. Calculate backing from the actual completed top, usable fabric width, seam direction, and the overage requested by the chosen quilting method.
Choosing Substitute Fabrics
The exact Hoffman colors are not required, but their relationships should guide substitutions. The pattern needs one dominant light background, one narrow spine color, and a coordinated group of ten accents.
The background should contrast with nearly every feather fabric. A light neutral is the easiest choice, although a dark-background version can also work if the accents remain clearly lighter or brighter. The spine should be visible without becoming heavier than the colorful feather sections.
Possible palettes include:
- Coastal: ivory background with mist blue, sea glass, teal, denim, and navy accents;
- Garden: cream with blush, lavender, leaf green, plum, and soft gold;
- Autumn: oatmeal with apricot, rust, moss, brown, and deep burgundy;
- Modern: white with pale gray, charcoal, mustard, terracotta, and dusty blue;
- Dramatic: midnight background with pearl, silver, royal blue, turquoise, and violet.
Use solids, batiks, or small tonal prints for the easiest result. Large directional motifs can turn sideways or become partially hidden by stitch-and-flip corners. If using florals, stripes, or text, make one sample section before cutting the full quantity.
Take a grayscale photograph of the proposed palette. The background should separate from the feather colors, and the spine should remain visible against both. If several accents merge into one value, distribute them between the two colorways so neighboring segments still have enough contrast.
Organize Before Cutting
Organization is central to this pattern. Hoffman’s designer note recommends constructing the blocks by sections and arranging the fabrics for both colorways before sewing. That advice should be treated as part of the technique, not as an optional convenience.
Create a label for every combination of colorway, side, section, and fabric position. For example, “Colorway 1 – Section B Left – Fabric 2” is much safer than a bag marked only “B.” Use the actual color name as well, because a loose label can be returned to the correct group more easily when both identifiers are present.
A practical sorting system includes:
- one large container for Colorway 1;
- one large container for Colorway 2;
- separate envelopes for Sections A, B Left, B Right, C Left, and C Right;
- another envelope for feather spines;
- separate storage for cornerstone and sashing pieces.
Cut one fabric at a time and immediately distribute its pieces to the labeled envelopes. Check the total before moving to the next color. The background fabric produces many different squares, rectangles, strips, and border pieces, so never leave an unlabeled stack of Tortilla cuts on the table.
Press strong folds out of the yardage before measuring long pieces. Use a sharp rotary blade and a large ruler. Narrow strips running 31 1/2″ along the feather spine can distort if the fabric is pulled or the ruler shifts.
Make One Complete Test Block
The quilt uses five identical constructions in each colorway, making chain piecing efficient—but only after the method is confirmed. Make one complete feather block first and verify that it measures 9 1/2″ × 31 1/2″ unfinished.
The test block answers several questions:
- Is the quarter-inch seam accurate across long strips?
- Are the diagonal corners large enough after folding?
- Does the mirrored Section A face the correct direction?
- Do the section widths align without stretching?
- Does the narrow spine remain straight?
If the test block is too narrow, the accumulated seam allowance is probably too generous. If it is too long or short, measure Sections A, B, and C separately before unpicking the full block. Finding the first inaccurate section is more useful than forcing the outside edges to match.
Once the sample is correct, record the successful needle position, stitch length, pressing direction, and labeling method. Then chain piece the remaining units in groups that cannot be confused.
Stitch-and-Flip Corners Without Lost Points
The feather segments are shaped primarily with stitch-and-flip corners, sometimes called snowball corners. A square is placed on a larger rectangle, sewn diagonally, trimmed, and pressed open to replace the corner with a triangle.
Draw diagonal guidelines with a fine pencil, removable marker, or creasing tool. A thick line makes it difficult to sew consistently. Before trimming, fold the square along the stitched line and confirm that the new triangle reaches both raw edges of the base piece. If it falls short, resew before cutting away the original corner.
Many quilters obtain a more accurate finished corner by sewing a thread-width toward the corner that will be trimmed away. The fold then has enough room to cover the base fabric after the seam allowance is pressed underneath.
Press rather than stretch. Diagonal seams create bias edges, and repeated pulling can change the size of an entire section. Use minimal steam and let each unit cool on a flat surface.
Keep the trimmed triangles only if they are large enough for another intentional project. Saving every tiny offcut can interrupt the workflow and increase the risk of mixing scraps with required pieces.
Understanding the Mirrored Sections
Section A appears in a standard and a mirror-imaged form for each colorway. A mirror image is not simply the same unit turned over after sewing; the fabric must remain right side out while the diagonal placement reverses.
Place the official diagram upright beside the machine and add a removable label to the top edge of every finished section. Compare a standard unit and a mirrored unit side by side. Their slopes should lean toward opposite sides while their finished dimensions remain identical.
Do not chain piece standard and mirrored versions in the same stack. Complete one orientation, count it, place it in a labeled tray, and then reset the fabric arrangement for the opposite orientation.
If a section has been sewn backward, correct it before joining the block. Rotating the entire feather later will not fix a single reversed side because the neighboring B and C sections follow a specific visual progression.
Building the Feather Spine
Each spine uses one narrow London strip between two Tortilla strips. A small diagonal corner is added at one end, and the completed spine section should measure 1 1/2″ × 31 1/2″.
These strips are long and narrow, so they can bow if fed unevenly through the machine. Sew with the narrower strip on top where it can be watched, support the fabric behind the machine, and avoid pulling from the front.
If the first seam curves, sew the second seam from the opposite end. Alternating the sewing direction can reduce directional distortion. Press the strip set on a flat surface, lifting the iron instead of sliding it lengthwise.
Measure the spine at the top, middle, and bottom. A consistent 1 1/2″ width is essential because both feather halves are attached to it. A small difference at the center can make the completed block noticeably wider at one end.
Assembling Sections A, B, and C
The complete construction diagrams belong in the official PDF, but the assembly logic is useful to understand before sewing.
- Section A forms the upper part of the feather and includes both standard and mirrored versions.
- Sections B Left and B Right continue the angled color movement on opposite sides.
- Sections C Left and C Right form the wider lower areas and use slightly larger unfinished dimensions.
- Combo strips join the A and B areas and carry small corner accents.
- Background rectangles connect the C sections to the upper units before both feather halves meet the spine.
Measure each section before joining it to another. A and B units finish at the same unfinished height and width stated in the PDF, while C units use a different size. Do not trim all sections to one common measurement simply because they will eventually enter the same block.
Lay out the complete left half and right half before sewing. Confirm that the colored steps flow away from the center spine and that the two sides correspond to the correct colorway. A reference photo can protect the arrangement if the pieces must be moved.
Join the shorter seams first, press, then check the long edges with a ruler. Small corrections are easier before the halves are attached to the narrow spine.
Making the Cornerstone Blocks
The quilt contains eighteen pieced cornerstones. These small blocks echo the feather palette and add detail to the otherwise quiet horizontal sashing.
Their construction includes half-square triangles made from Tortilla and London. The PDF instructs the maker to trim the HST units to 2″ square before adding smaller stitch-and-flip corners and narrow strip units.
Use a ruler with a clear 45-degree line. Align that line with the diagonal seam, trim two sides, rotate the unit, and trim to the final 2″ size. If the HST is too small, review the initial seam position before making the remaining units.
Make one cornerstone completely and confirm that it lies flat before chain piecing the other seventeen. Because the pieces are small, a scant seam can affect the final size quickly. Pressing seams away from the most crowded intersections may reduce bulk, but use one consistent plan so identical units fit together.
Assembling the Quilt Center
The quilt center contains two feather rows and three pieced sashing rows.
Each feather row alternates five long feather blocks with six vertical Tortilla sashing rectangles. Follow the official quilt image for colorway placement and block orientation. The direction of each feather contributes to the feeling of motion across the finished top.
Each horizontal sashing row alternates six cornerstone blocks with five shorter Tortilla rectangles. Make three matching rows, then arrange the center in this order: sashing row, feather row, sashing row, feather row, sashing row.
Measure the long rows before joining them. They should match the expected length and one another. Pin the major intersections first, then distribute any tiny difference across the full seam. Do not stretch one narrow row to fit another.
Sew the center in smaller pairs or sections so the weight does not pull on one end. After every long seam, support the entire row on the ironing surface and let it cool flat.
Borders, Backing, and Binding
The pattern finishes the quilt with 3″-wide cut border strips from Tortilla. After sewing, these create a 2 1/2″ finished frame around the center. Measure the quilt center through the middle before attaching the side borders, then compare that measurement with the publisher’s cut length.
Borders should be pinned at the ends, center, and quarter points. Sewing an unchecked border strip directly to the outer edge can preserve a wave rather than correct it. If the center differs slightly from the intended measurement, ease the difference evenly.
Plan backing only after measuring the finished top. Add the margin required for domestic-machine basting or the specific longarm quilter. Standard-width fabric may need two or three panels depending on usable width and requested overage; wide-back fabric may eliminate a center seam.
The original binding uses eight 2 1/4″ width-of-fabric Nirvana strips. Join them with diagonal seams, press the joins open, and prepare a continuous double-fold binding. Recalculate if the top changed size or if a wider 2 1/2″ binding is preferred, because the original 3/4-yard Nirvana allowance also supplies pieces inside the quilt.
Quilting Ideas for a Feather Quilt
The piecing already creates strong vertical movement, so quilting can either reinforce that direction or soften it.
- Gentle wavy lines suggest air moving around the feathers.
- Long vertical lines emphasize their height and are manageable on a domestic machine.
- Echo quilting around each feather preserves the negative space.
- A loose all-over swirl creates texture without competing with the piecing.
- Subtle diagonal lines repeat the stitch-and-flip angles for a modern finish.
Avoid quilting so densely that a bed quilt becomes stiff unless that is the intended effect. The name and visual design suggest softness and drape. Test thread color across both the pale background and darkest accents. A warm cream, soft gray, or pale blue may blend more evenly than bright white.
Baste carefully through the large background areas, where shifting is easier to notice. Begin quilting near the center and work outward in balanced sections whenever the chosen method permits.
Light as a Feather achieves an elegant result with familiar patchwork methods. Its long, slender blocks look complex, yet the feather illusion grows from manageable sections, carefully placed diagonal corners, and a narrow contrasting spine.
Accuracy matters, but organization matters just as much. Label every piece, separate the two colorways, test the mirrored construction, and confirm each section before combining the full block. Those habits prevent the most expensive mistakes and make production piecing far more enjoyable.
Use Hoffman’s PDF for the complete cutting directions and diagrams, then personalize the project through color, quilting texture, and fabric style. In the original muted batiks or a new high-contrast palette, the design brings graceful movement to a generous quilt without requiring curved seams.