
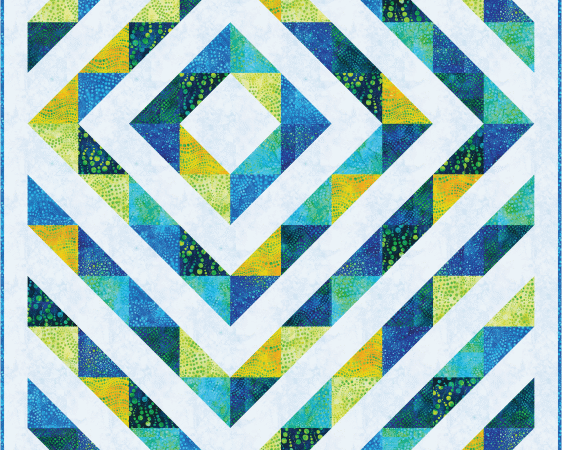
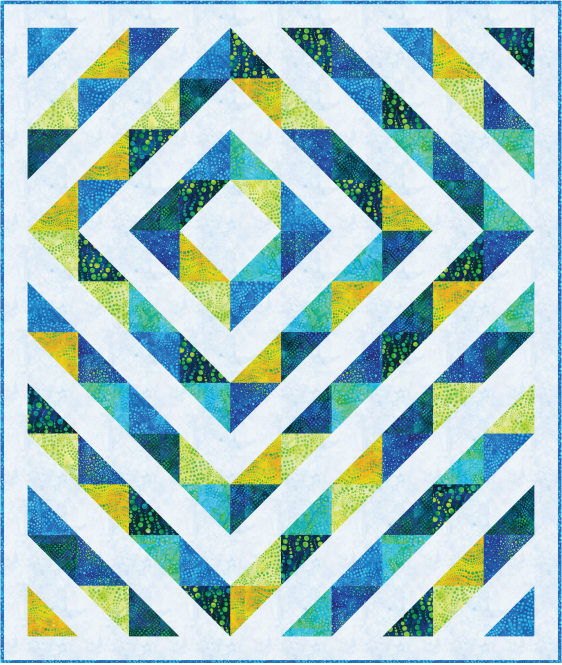
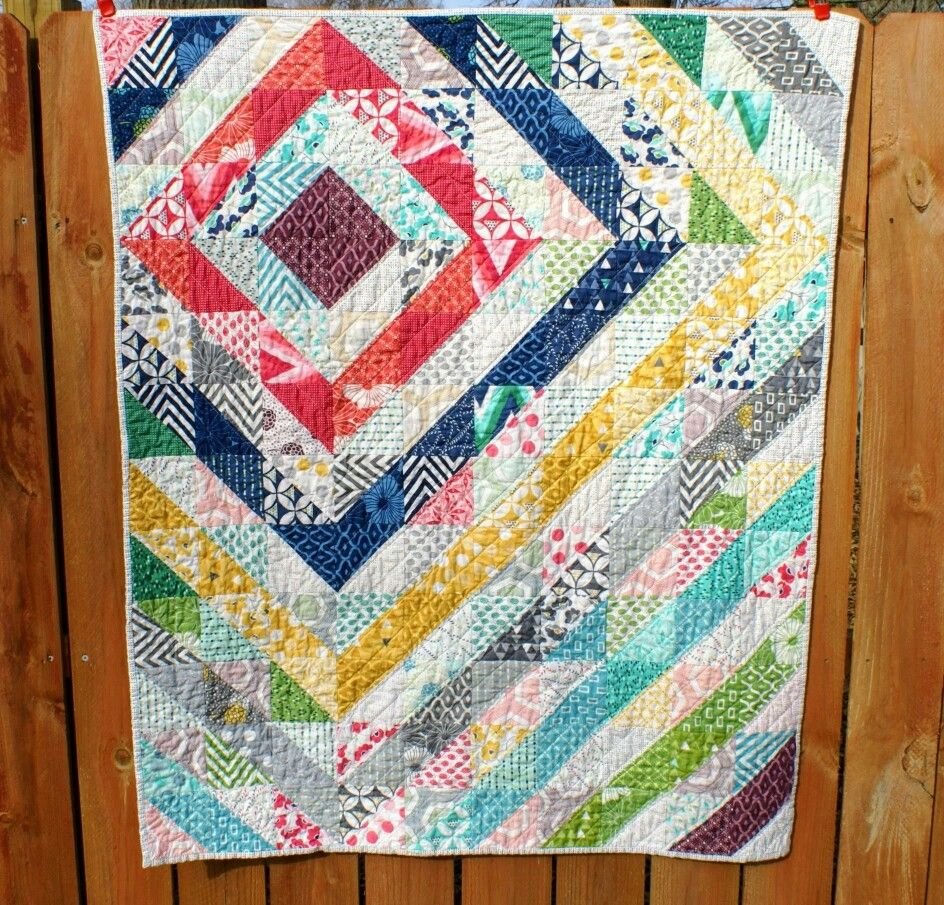
The Kingdom quilt pattern turns one simple unit – the half-square triangle – into a dramatic arrangement of diamonds, chevrons, and diagonal pathways. Designed by Ariga Wilson for Robert Kaufman Fabrics, the quilt finishes at 66 x 78 inches and is rated beginner. Its large 6-inch finished units make the construction approachable, while the directional layout gives a new quilter meaningful practice with accurate trimming and block orientation.
The featured quilt combines a pale Powder background with seven blue, green, and yellow batiks from the Artisan Batiks: Dottie group. Each accent fabric is paired only with the background, so there are no complicated multi-fabric blocks. The challenge is not making the individual units; it is keeping 120 half-square triangles turned correctly as the rows are assembled.
This independently written guide explains the measurements behind the design, corrects fabric-label errors in the previous article, and adds practical methods for cutting, labeling, trimming, arranging, and joining the quilt. Keep the official Robert Kaufman PDF beside you for the publisher’s cutting list and complete assembly diagram.
Kingdom quilt at a glance
| Detail | Official pattern information |
|---|---|
| Pattern name | Kingdom |
| Designer | Ariga Wilson for RK |
| Publisher | Robert Kaufman Fabrics |
| Featured fabrics | Artisan Batiks: Dottie and Prisma Dyes |
| Finished size | 66 x 78 inches |
| Difficulty | Beginner |
| Main unit | Two-at-a-time half-square triangle |
| HST trim size | 6 1/2 inches square |
| HST finished size | 6 inches square |
| Quilt-center layout | 12 rows of 10 HSTs |
| Outer borders | 3 1/2-inch cut width; 3-inch finished width |
| Pattern copyright | 2023 Robert Kaufman; personal use only, not for resale |
The official pattern name is Kingdom. Dottie is the featured batik collection, not part of the construction method or the designer’s name. “Kingdom Dottie quilt pattern” is useful descriptive wording for this particular colorway, but the project should still be credited as the Kingdom pattern.
Open the official Kingdom quilt pattern
Use the publisher’s pages rather than a copied file:
The four-page PDF includes the fabric chart, cutting information, HST method, and quilt-assembly diagram. Its copyright notice permits personal use but states that the pattern may not be reproduced without express permission and is not for resale. Download your working copy from Robert Kaufman and direct other quilters to the official project page.
Correct fabric requirements for the featured quilt
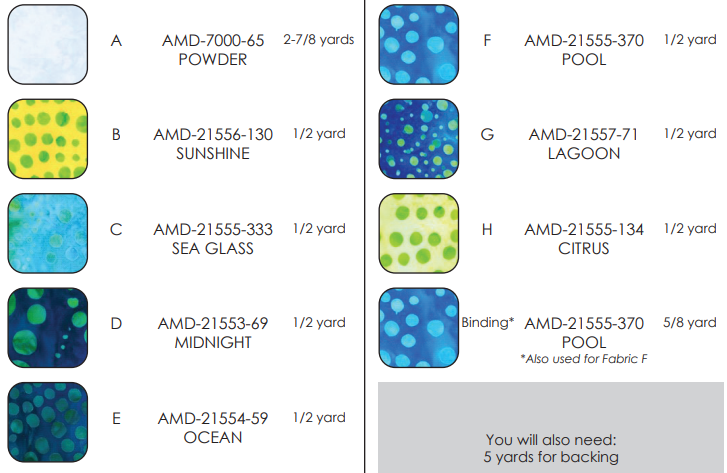
The letters matter because the previous version of this article attached several names to the wrong letters. Use the following assignments from the official PDF:
| Label | Fabric | Color | Amount |
|---|---|---|---|
| A | AMD-7000-65 | Powder | 2 7/8 yards |
| B | AMD-21556-130 | Sunshine | 1/2 yard |
| C | AMD-21555-333 | Sea Glass | 1/2 yard |
| D | AMD-21553-69 | Midnight | 1/2 yard |
| E | AMD-21554-59 | Ocean | 1/2 yard |
| F | AMD-21555-370 | Pool | 1/2 yard |
| G | AMD-21557-71 | Lagoon | 1/2 yard |
| H | AMD-21555-134 | Citrus | 1/2 yard |
| Binding | AMD-21555-370 | Pool | 5/8 yard |
| Backing | Quilter’s choice | – | 5 yards |
Fabric F and the binding use the same Pool batik. If purchasing one continuous cut for both jobs, their listed amounts total 1 1/8 yards. Keep the binding portion separate before cutting the 7-inch squares for Fabric F.
The amounts assume fabric with at least 42 inches of width. Batiks are often close to that useful width, but selvages, prewashing, or a skewed cut can reduce what is available. Measure your actual fabric before relying on the cutting plan, especially for Fabric A and the long outer borders.
What the pattern asks you to cut
Fabric A provides both the light halves of the HSTs and all four borders. The official plan starts with eleven 7-inch width-of-fabric strips for sixty-three 7-inch background squares. It also calls for seven 3 1/2-inch WOF strips that ultimately become:
- two 3 1/2 x 72 1/2-inch side borders;
- two 3 1/2 x 66 1/2-inch top and bottom borders.
Each of Fabrics B-H supplies nine 7-inch squares. Because the two-at-a-time method produces two HSTs from every pair of squares, each accent fabric creates eighteen HSTs. Seven accent fabrics multiplied by eighteen equals 126 HSTs.
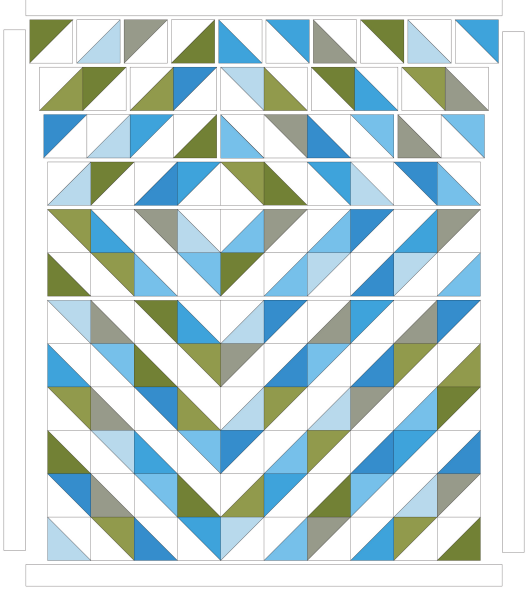
The quilt center contains twelve rows of ten units, so it uses 120 HSTs. The PDF explicitly notes that not every HST will be used. Six extra units remain available for testing quilting, making a label, or replacing a block that was cut too small. Do not force all 126 into the layout.
The binding is cut into eight 2 1/2-inch WOF strips. This is different from the Citrus yardage: Citrus needs 1/2 yard as Fabric H, while Pool needs an additional 5/8 yard for the binding.
The long borders must be pieced
A single WOF strip cannot produce a 72 1/2-inch or 66 1/2-inch border. Although the PDF lists seven border strips and then gives the four long measurements, it does not separately describe the joining step. Plan and join the WOF strips before trimming the four required lengths.
The total listed border length is 278 inches. Seven nominal 42-inch strips provide 294 inches before selvages and seam losses, which leaves only a modest margin. Measure the useful width of every strip and plan the joins on paper first. Straight joins consume less length than diagonal joins and are the safer choice when the fabric is narrow. If your usable WOF is substantially under 42 inches or the fabric has been prewashed, buy extra rather than hoping the final border will stretch.
Understand the measurement chain
Knowing the expected measurements makes troubleshooting far easier.
Each HST is trimmed to 6 1/2 inches unfinished and finishes at 6 inches after it is sewn into the quilt. Ten units across create a center that should measure about 60 1/2 inches unfinished. Twelve units down create a center about 72 1/2 inches unfinished.
The side borders are cut to 72 1/2 inches because they match the unfinished height of the center. Once the 3 1/2-inch side borders are attached, the new top width is approximately 66 1/2 inches. That is why the top and bottom borders are cut to 66 1/2 inches. Each border finishes at 3 inches wide, producing the published 66 x 78-inch quilt.
These checkpoints assume an accurate quarter-inch seam and properly trimmed HSTs. A difference of 1/16 inch in one block may seem insignificant, but repeated across ten or twelve units it can become visible. Measure early rather than discovering the accumulated error when a border no longer fits.
Choose fabrics without losing the Kingdom effect
The design needs one quiet background and seven clearly distinguishable accents. The featured pale Powder fabric lets the saturated Dottie batiks form the colored half of every unit. The resulting light triangles connect into wide geometric paths.
You can substitute prints, solids, or other batiks. Before buying, photograph the group in black and white. The background should sit apart in value from most of the accents. If the background and several prints share the same value, the large diamonds and chevrons will become less defined even if the colors are attractive.
The seven accent fabrics do not need to match the original blues, greens, and yellow. A sunset group could move from burgundy through coral and gold; a calm version could use dusty blue, sage, and gray; a high-contrast version could use black as the background and bright solids as the accents. Small- to medium-scale prints are easiest to read inside a 6-inch triangle. Very large motifs may be cut into unrecognizable fragments.
Purchase at least a half yard of each accent because nine 7-inch squares need two WOF strips. A fat quarter normally cannot supply nine 7-inch squares efficiently: a typical 18 x 21-inch fat quarter yields only six 7-inch squares. Fat quarters can still work if you use more than seven accent fabrics and recalculate the distribution, but that becomes a custom layout rather than a direct substitution.
Prepare an accurate HST workflow
The Kingdom quilt is beginner-friendly, but 126 units reward a production method that stays consistent.
Start by pressing the fabric without pulling it off grain. Square one end of each folded WOF strip, then cut the 7-inch segments with a sharp rotary blade and a ruler large enough to keep the cut stable. Confirm the first square with a second ruler before cutting the remainder.
Label the accent stacks B through H and keep the corresponding fabric name with each letter. The official assembly diagram allows a fabric placement of your choosing, but the labels still help you count and distribute the colors deliberately.
On the wrong side of each Fabric A square, draw a fine diagonal line from corner to corner. A mechanical pencil or removable fabric marker works well. Test any marker on a scrap, and do not use a line so thick that you cannot tell where to cut.
Pair each Fabric A square with one accent square, right sides together. Align all four edges without stretching the bias direction. Sew one quarter inch away from each side of the drawn line, then cut on the line to create two units. The official instructions say to press toward the darker fabric and trim each HST to 6 1/2 inches square.
Make one test pair before chain-piecing the whole group. If both test units can be squared to 6 1/2 inches with fabric extending beyond all four trimming lines, the cutting and seam allowance are working. If they are too small, check the starting-square size, drawn line, needle position, thread weight, and whether the pieces shifted while sewing.
Trim every HST before layout
Trimming is what turns a fast unit into a reliable block. Place the ruler’s 45-degree line directly on the diagonal seam. Trim the first two sides, rotate the unit, realign the diagonal, and trim the remaining sides to exactly 6 1/2 inches.
Avoid trimming only the dog ears. A unit can have clipped corners and still be too large, out of square, or have a diagonal that misses the corners. The seam must run precisely from corner to corner on the trimmed square so the colored and background shapes connect cleanly in the final layout.
Return each trimmed unit to its labeled stack. Count eighteen units in each of the seven groups before proceeding. This is the best moment to choose the six extras: keep the least accurate units out of the quilt while preserving a balanced selection of colors for the 120-unit top.
Piece and attach the outer borders
Remove selvages from the seven 3 1/2-inch Fabric A strips and calculate how to obtain two 72 1/2-inch lengths and two 66 1/2-inch lengths. Join the required segments with straight quarter-inch seams if length is tight. Press the joining seams open to reduce bulk, then trim the completed border strips to the published lengths.
Do not simply sew a long border to the quilt and cut off the excess at the end. A border used that way can preserve or even exaggerate a stretched edge. Instead, compare each prepared border with the corresponding quilt-center measurement.
Fold a side border in half and mark its midpoint. Mark quarter points as well. Do the same along the quilt-center side. Match the ends, midpoint, and quarter points, then distribute any small ease evenly. Sew one side border, repeat on the opposite side, and press toward the borders.
After both side borders are attached, the top should measure about 66 1/2 inches wide. Attach the two 66 1/2-inch top and bottom borders with the same measured method. Press toward the borders and check that the corners are square.
Backing, quilting, and binding ideas
The pattern lists 5 yards of backing. For a 66 x 78-inch quilt, a two-panel backing generally works with standard-width quilting cotton when the panels are cut long enough to provide the overage required by the quilter. Confirm the exact backing dimensions with your longarmer before cutting, because machine requirements vary.
The large geometric channels offer several beginner-friendly quilting options. A walking foot can follow long diagonal lines parallel to the HST seams. A soft crosshatch reinforces the geometry without competing with the colored dots. Gentle wavy lines add movement and avoid the need to stitch precisely in the ditch. Whatever design you choose, quilt densely enough for the batting manufacturer’s recommendation.
Use one of the six leftover HSTs to test thread color, tension, stitch length, and batting response. A blue or green thread may blend with the accents but become obvious on Powder. A soft neutral often travels across both areas with less contrast.
The binding requires eight 2 1/2-inch WOF strips from Pool. Join them, press the binding in half lengthwise, and attach them using your preferred machine or hand-finishing method. Eight strips provide a reasonable allowance for the quilt’s 288-inch perimeter, seams, corners, and joining overlap, assuming the WOF is at least 42 inches as specified.
If you’re looking for a fun, simple, and visually stunning project, the Kingdom Dottie Quilt Pattern is an excellent choice. It’s a great skill builder for beginners and a relaxing project for seasoned quilters. With the free PDF pattern, clear instructions, and room for creative color choices, this quilt is sure to become one of your favorites.