
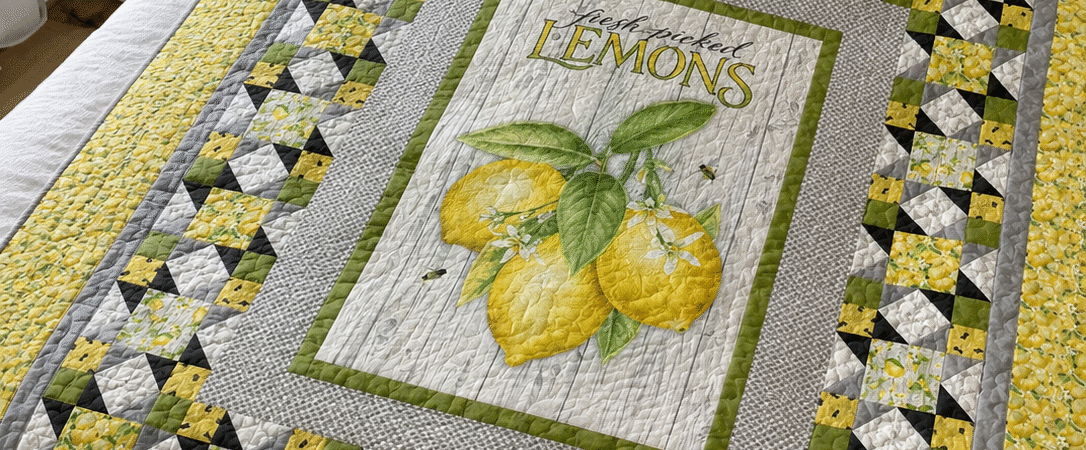
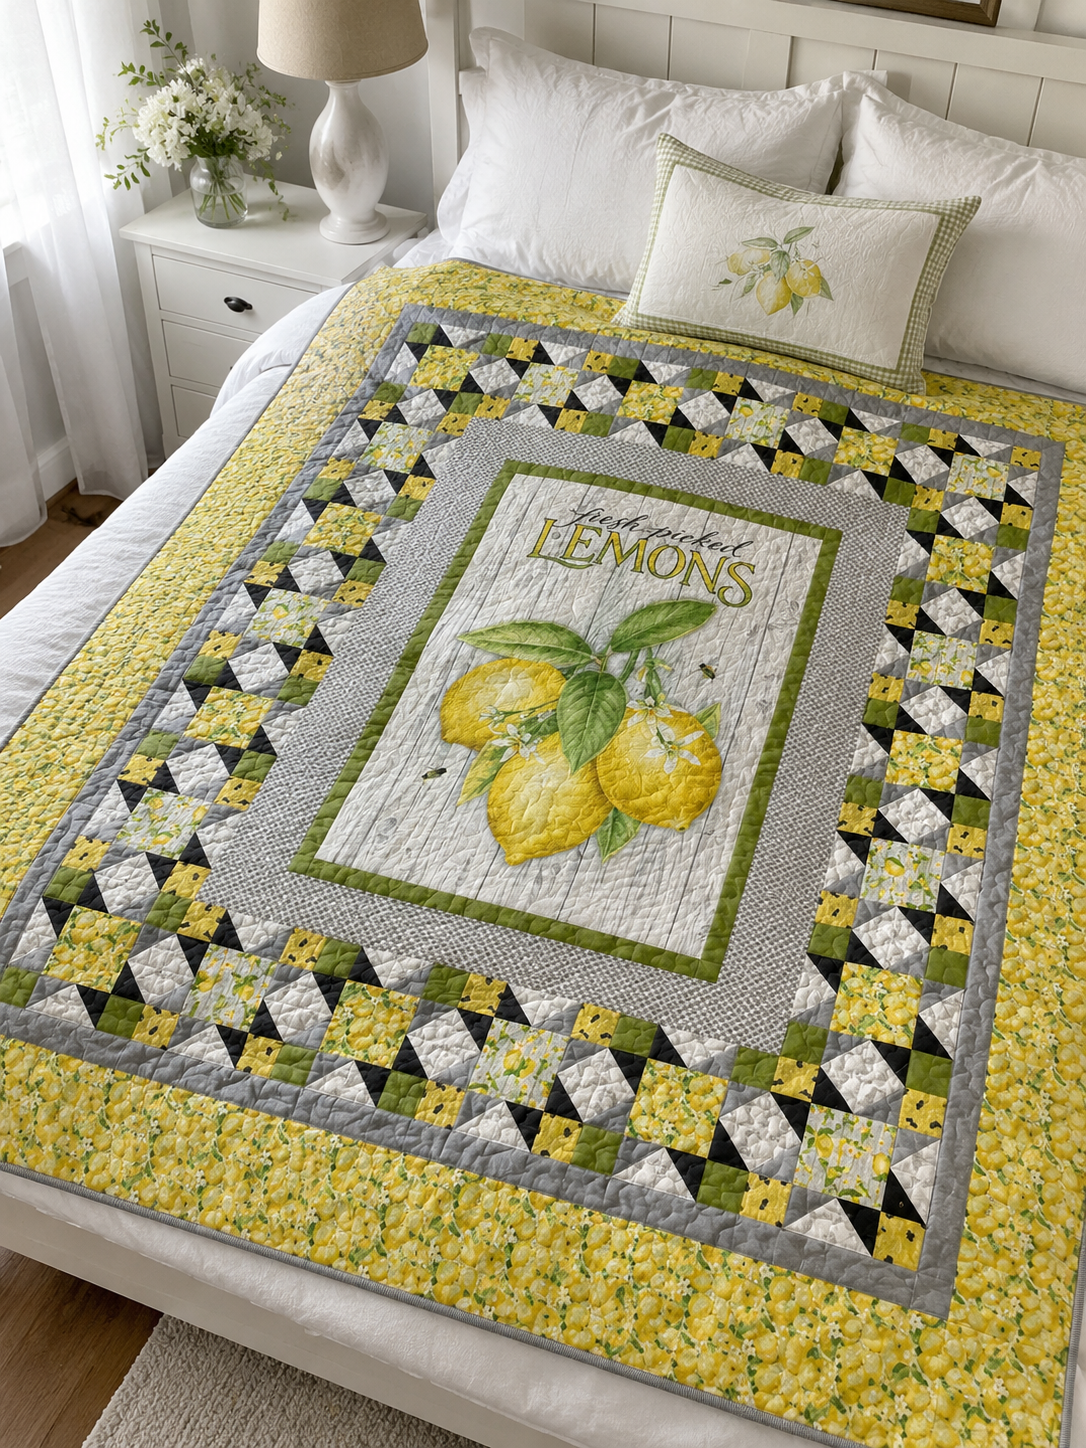
The Fresh Picked Lemons quilt pattern frames a large illustrated lemon panel with green, gray, and yellow patchwork before finishing the top with a sunny floral border. Designed by Heidi Pridemore for Henry Glass & Co., the quilt measures 61 x 69 inches and is officially rated Advanced Beginner.
This is not simply a panel surrounded by straight strips. The central image is trimmed and framed, then enclosed by twenty-two pieced blocks made from eighty-eight stitch-and-flip units. Directional prints, two different block designs, four block-border arrangements, and several measured borders make organization just as important as accurate sewing.
This independently written companion explains the structure behind the pattern, provides measurement checkpoints, and highlights the details most likely to cause confusion. Keep the official Henry Glass project sheet open for the full cutting list, diagrams, and fabric-orientation arrows.
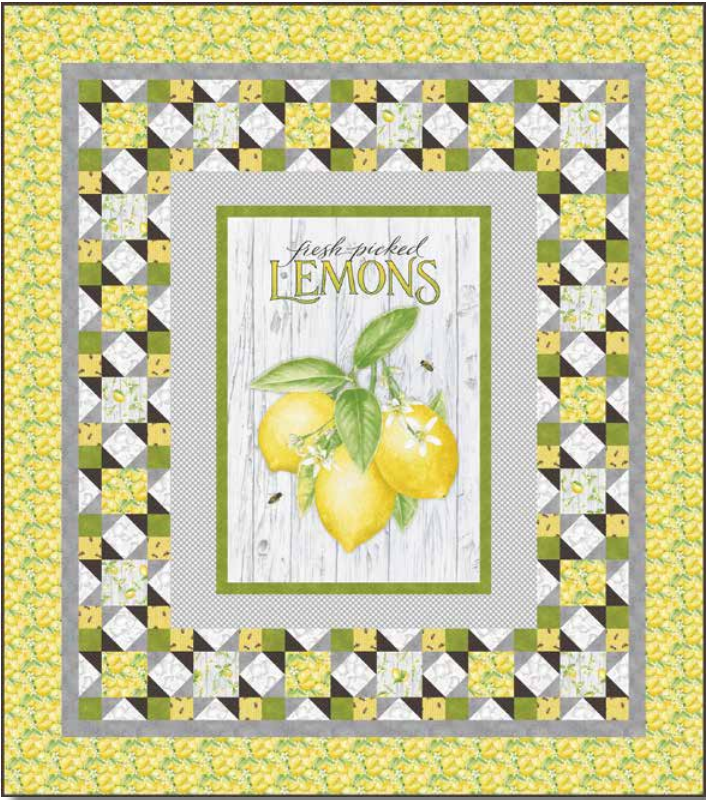
Fresh Picked Lemons quilt at a glance
| Detail | Official pattern information |
|---|---|
| Project name | Fresh Picked Lemons Quilt 1 |
| Quilt designer | Heidi Pridemore |
| Featured collection | Fresh Picked Lemons by Jane Shaskey |
| Publisher | Henry Glass & Co., Inc. |
| Finished size | 61 x 69 inches |
| Skill level | Advanced Beginner |
| Center | Fussy-cut 22 1/2 x 32 1/2-inch panel rectangle |
| Pieced blocks | Eleven Block One and eleven Block Two |
| Block size | 8 1/2 inches unfinished |
| Small units | Forty-four Unit 1 and forty-four Unit 2 |
| Binding | Seven 2 1/2-inch WOF strips |
| Project-sheet status | Free project; not for resale |
Jane Shaskey is credited for the Fresh Picked Lemons fabric artwork, while Heidi Pridemore is credited for the quilt design. Keeping those roles clear gives both creators accurate attribution.
Get the official free project sheet
Use the publisher’s current project page and file:
- Fresh Picked Lemons Quilt 1 project page at Henry Glass
- Open the official Fresh Picked Lemons Quilt 1 PDF
The official PDF is five pages and includes the fabric collection, complete cutting instructions, unit and block diagrams, border order, and final layout. Henry Glass asks makers to check its website for pattern updates before starting. The project is marked not for resale, and the publisher states that its free projects are intended to remain free.
Linking to the project page ensures that readers can reach the version Henry Glass currently provides. It also avoids presenting the publisher’s work as if the PDF belonged to this site.
Materials for the featured version
| Label | Fabric | SKU | Amount |
|---|---|---|---|
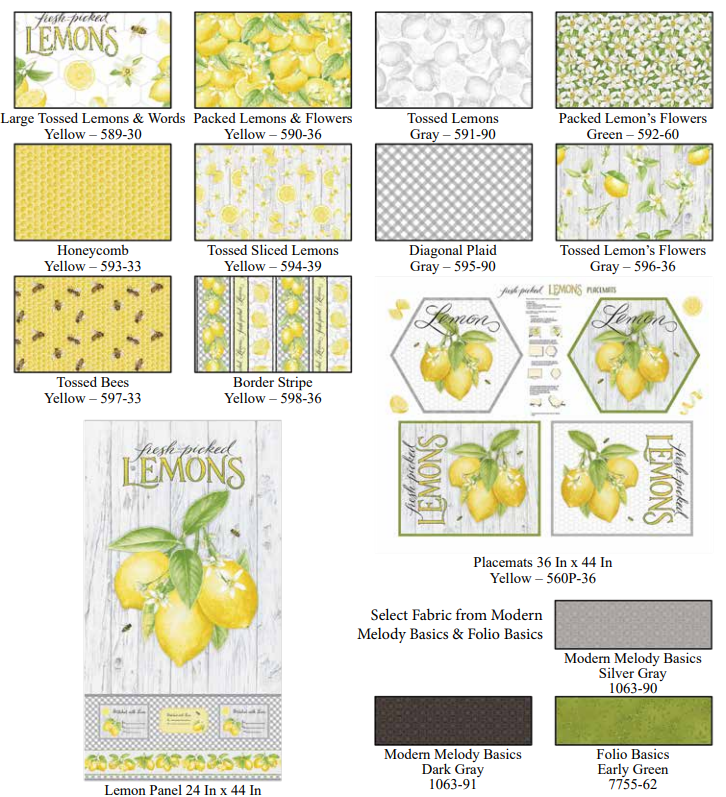
| A | Lemon Panel 24 In x 44 In – Yellow | 599P-36 | 1 panel |
| B | Folio Basics – Early Green | 7755-62 | 1/2 yard |
| C | Diagonal Plaid – Gray | 595-90 | 1/2 yard |
| D | Packed Lemons & Flowers – Yellow | 590-36 | 1 3/4 yards |
| E | Modern Melody Basics – Dark Gray | 1063-91 | 1 yard, including binding |
| F | Tossed Lemons – Gray | 591-90 | 7/8 yard |
| G | Modern Melody Basics – Silver Gray | 1063-90 | 7/8 yard |
| H | Tossed Bees – Yellow | 597-33 | 1/3 yard |
| I | Tossed Lemon’s Flowers – Gray | 596-36 | 3/8 yard |
| Backing | Large Tossed Lemons & Words – Yellow | 589-30 | 4 1/3 yards |
The one-yard Fabric E allowance includes the seven binding strips. Separate the binding portion before using Dark Gray for the stitch-and-flip squares. The outer Fabric D border also needs special planning: two long side strips are cut lengthwise, while the top and bottom strips are pieced as needed from WOF cuts.
The pattern does not list batting in the material table. Batting should be larger than the 61 x 69-inch finished top. A practical minimum corresponding to the published backing size is about 69 x 77 inches, which allows roughly four inches beyond each quilt edge. Ask your longarm quilter before cutting because some machines require more.
Why the pattern is Advanced Beginner
The straight seams are manageable, and no traditional half-square triangles or templates are required. The extra skill level comes from coordination:
- fussy cutting a specific section of a panel;
- observing directional-print arrows;
- making eighty-eight consistent stitch-and-flip units;
- rotating those units correctly in two different 8 1/2-inch blocks;
- arranging twenty-two blocks into four border sections;
- joining long border strips and attaching them in a precise order.
A confident beginner can complete the project by making one sample unit and one sample block before chain-piecing the full quantities. An experienced quilter will find the repetition efficient but should still label every fabric and unit.
Read the cutting plan before touching Fabric D
Most strips are cut across the width of fabric from selvage to selvage. Fabric D is the important exception. The official instructions call for two 5 1/2 x 59 1/2-inch length-of-fabric strips for the outer side borders. From the remaining Fabric D, the maker cuts or pieces two 5 1/2 x 61 1/2-inch top and bottom borders and prepares eleven 4 1/2-inch squares for Block Two.
Do not automatically cut the 1 3/4 yards into ordinary WOF strips. Doing so may destroy the continuous 59 1/2-inch length needed for the sides. Mark the two long side-border cuts on a simple fabric diagram first, then confirm that enough material remains for the top, bottom, and eleven squares.
The pattern also uses diagonal seams when joining the narrow Silver Gray borders and the Dark Gray binding. For the wide Fabric D top and bottom borders, choose joins that preserve the print attractively and still deliver the exact required length.
Make the fussy-cut center accurately
Fabric A is a 24 x 44-inch panel containing the main lemon illustration and additional printed sections. The project uses a 22 1/2 x 32 1/2-inch rectangle centered on the featured image.
Do not cut by measuring only from the panel’s printed or selvage edges. Printed panels can be slightly skewed or differ from the nominal dimensions. First press the panel from the wrong side, place it flat, and identify the visual center of the main artwork. A large square ruler, masking-tape window, or transparent template helps preview the final crop.
Check that the lettering, lemon cluster, and important details have comfortable space around them. Then mark the rectangle and measure it a second time before cutting. If the design is not perfectly square to the grain, prioritize a visually level image while keeping the full required size.
Fabric B frames the panel. The two 2 x 32 1/2-inch strips go on the sides, and the two 2 x 25 1/2-inch strips go across the top and bottom. Adding these strips mathematically creates a piece larger than the required checkpoint; the instructions then say to trim the framed Center Block to 24 1/2 x 34 1/2 inches. Center the artwork again while trimming so the green frame appears even.
Understand Unit 1 and Unit 2
Both small units begin with a 2 1/2 x 4 1/2-inch Fabric F rectangle. Two 2 1/2-inch squares are sewn to its ends using stitch-and-flip corners. Fabric E is Dark Gray and Fabric G is Silver Gray.
In Unit 1, Silver Gray appears at the left end and Dark Gray at the right when the unit is shown horizontally in the official diagram. In Unit 2, the positions are reversed. The diagonal sewing directions also mirror one another. You need forty-four of each unit.
Draw the diagonal on the wrong side of the squares or use a clearly aligned corner-sewing guide. Sew on the marked line, fold the corner open, and verify that it covers the end of the rectangle without pulling before trimming the excess layers to a quarter-inch seam allowance. If the new corner falls short of the rectangle’s edges, resew it before cutting away the fabric underneath.
Make one Unit 1 and one Unit 2, press them, and place them beside the diagrams. Each should still measure 2 1/2 x 4 1/2 inches unfinished. Label two trays or resealable bags so the mirrored units are never mixed during chain piecing.
Respect the directional-print arrows
The project sheet uses arrows to show print direction in several components. This matters for the panel and for fabrics whose lemons, words, or motifs have an obvious top. Before mass production, place a small arrow label on the wrong side of every directional piece.
Stitch-and-flip placement can change the direction in which a motif appears. Test one complete block right side up, not just a loose unit. If using nondirectional substitutes, the construction is unchanged and the arrow tracking becomes less demanding.
Build Block One and Block Two
Both blocks finish as 8-inch squares and should measure 8 1/2 inches unfinished.
Block One uses four Unit 1/Unit 2 pieces, four Fabric H bee squares, and one 4 1/2-inch Fabric I square. The top and bottom rows each place a Unit 1 between two H squares. The middle row places the Fabric I square between two vertically oriented Unit 2 pieces. Join the three rows according to the official orientation diagram.
Block Two follows the same structure but uses four Fabric B green squares in the outer positions and one 4 1/2-inch Fabric D square in the center. The unit orientations remain important because the dark and silver corners create the pinwheel-like frame around the center square.
Make one Block One and one Block Two before continuing. Check the direction of every unit, confirm the block lies flat, and trim only if it can remain 8 1/2 inches without cutting off important points. Once the samples are correct, chain-piece the remaining components to make eleven of each block.
Keep the two block types in separate stacks. A large “1” or “2” card is more reliable than trying to identify them quickly by color after a long sewing session.
Assemble the four pieced block borders
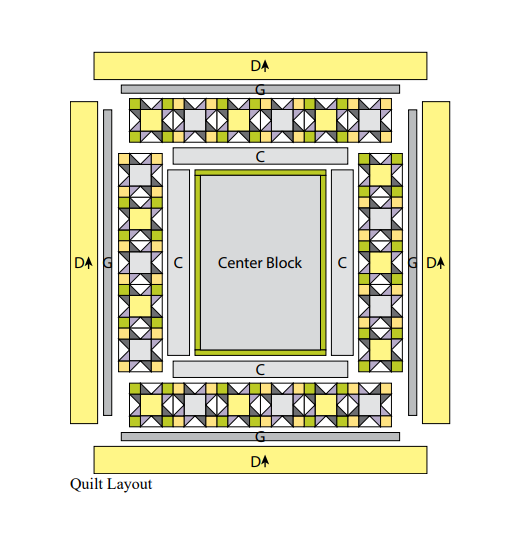
The twenty-two blocks are divided into four borders around the center:
- Left border: three Block One and two Block Two, alternating from top to bottom.
- Right border: three Block Two and two Block One, alternating from top to bottom.
- Top border: three Block Two and three Block One, alternating from left to right.
- Bottom border: the same six-block sequence as the top border.
Five finished 8-inch blocks create a 40-inch side border; its unfinished measurement should be about 8 1/2 x 40 1/2 inches. Six blocks create a 48-inch top or bottom border; its unfinished measurement should be about 48 1/2 x 8 1/2 inches.
Lay out all four borders around the framed panel before sewing them. This catches swapped block types, upside-down directional prints, and mirrored unit errors. Number each border and mark the edge that faces the center.
Follow the border order and measurement chain
The project grows in several stages. Measuring after each stage helps you find an error before another border hides it.
First, attach the two 4 1/2 x 34 1/2-inch Fabric C strips to the sides of the 24 1/2 x 34 1/2-inch Center Block. Then add the two 3 1/2 x 32 1/2-inch Fabric C strips to the top and bottom. This stage should measure approximately 32 1/2 x 40 1/2 inches unfinished.
Next, add the five-block pieced borders to the sides and the six-block borders to the top and bottom. The resulting patchwork-framed center should be approximately 48 1/2 x 56 1/2 inches unfinished.
Fabric G forms the next narrow frame. Attach the two 2 x 56 1/2-inch side strips, followed by the two 2 x 51 1/2-inch top and bottom strips. The piece should now measure approximately 51 1/2 x 59 1/2 inches unfinished.
Finally, attach the two 5 1/2 x 59 1/2-inch Fabric D length-of-fabric strips to the sides. Add the two 5 1/2 x 61 1/2-inch Fabric D strips to the top and bottom. The top should measure approximately 61 1/2 x 69 1/2 inches unfinished, which becomes the published 61 x 69-inch quilt after binding.
These dimensions are calculated checkpoints based on the published cuts and quarter-inch seams. Do not aggressively trim a section simply because it varies slightly. First check seam allowance, block size, and pressing. Preserve points and keep opposite sides equal.
Attach borders without creating waves
Measure the quilt center through its middle rather than cutting borders from the longest outer edge. Fold each border and the corresponding quilt edge to mark midpoints and quarter points. Match those marks, pin, and distribute any small difference evenly.
Support the weight of the quilt while sewing. If a long border hangs from the table, gravity can pull the top layer and create a ripple. Press each new border in the direction shown or in the direction that keeps the area flat, using an up-and-down motion instead of sliding along the fabric.
Prepare the backing and batting
The backing plan uses two 77-inch WOF strips from the Large Tossed Lemons & Words fabric. Join the panels and trim the backing to 69 x 77 inches. This gives about four inches of extra backing on each side of the 61 x 69-inch top.
Pay attention to the direction of the words and lemons before joining the panels. If the repeat is obvious, decide whether pattern matching is worth the extra fabric. A centered seam is simple, but an offset seam may keep a join away from the most visible center of the back.
Cut batting to at least the backing size, not the finished-quilt size. The old article’s 61 x 69-inch batting recommendation would leave no margin and is therefore unsuitable for normal basting or longarm quilting. Confirm the required overage with the person or service quilting the top.
Quilting and binding suggestions
The panel is the visual focus, so quilting can support it without covering the illustration. Outline quilting around the lemons and lettering keeps the artwork readable. Gentle background texture can flatten the pale wood-look areas while allowing the fruit to stand forward.
In the pieced border, diagonal quilting can echo the small corner units. Straight lines around the rectangular frames emphasize the layered construction. A meandering design across the yellow floral outer border is forgiving and helps the busy print hide small changes in stitch direction.
Test thread on a leftover fabric sandwich. Gray blends through the middle borders, while pale yellow is quiet on the outer floral. A neutral cream may cross both areas without becoming too strong. Follow the batting manufacturer’s maximum spacing recommendation.
For binding, join the seven 2 1/2-inch WOF Fabric E strips with diagonal seams. Press the long strip in half lengthwise, wrong sides together. The finished quilt perimeter is 260 inches, so seven standard WOF strips provide practical room for joins, corners, and overlap.
Substituting fabrics or a different panel
The pattern is strongly connected to its 24 x 44-inch Fresh Picked Lemons panel, but a substitution is possible when the central usable image can be cut to exactly 22 1/2 x 32 1/2 inches. A different panel with a smaller image will leave awkward blank space; a larger image may lose important motifs during trimming.
Assign replacements by function:
- Fabric A: the focal panel.
- Fabric B: a narrow accent that frames the panel and appears in Block Two corners.
- Fabric C: a calm inner frame behind the pieced blocks.
- Fabric D: a bold feature print used in Block Two centers and the wide outer border.
- Fabrics E and G: two contrasting grays that form mirrored corners.
- Fabric F: a medium-value rectangle beneath the stitch-and-flip corners.
- Fabrics H and I: small feature prints for Block One.
Keep Fabrics E, F, and G distinguishable. If all three have the same value, the small geometric units merge into one area. Also verify whether substitute prints are directional before cutting eighty-eight rectangles or squares.
If the Fabric D print is not directional, you may have more flexibility in planning the long outer strips. Still preserve the published dimensions and make sure the 1 3/4-yard amount works with the actual usable width.