
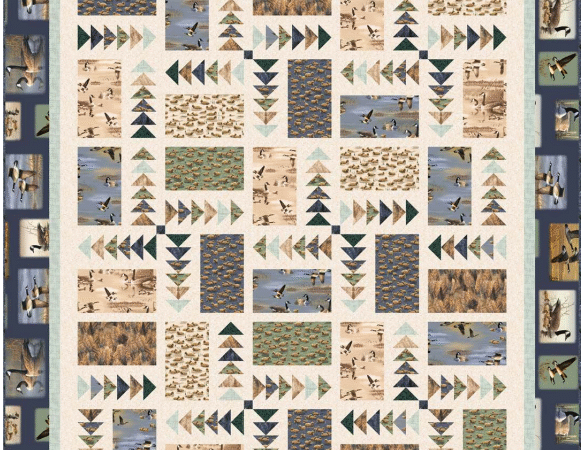
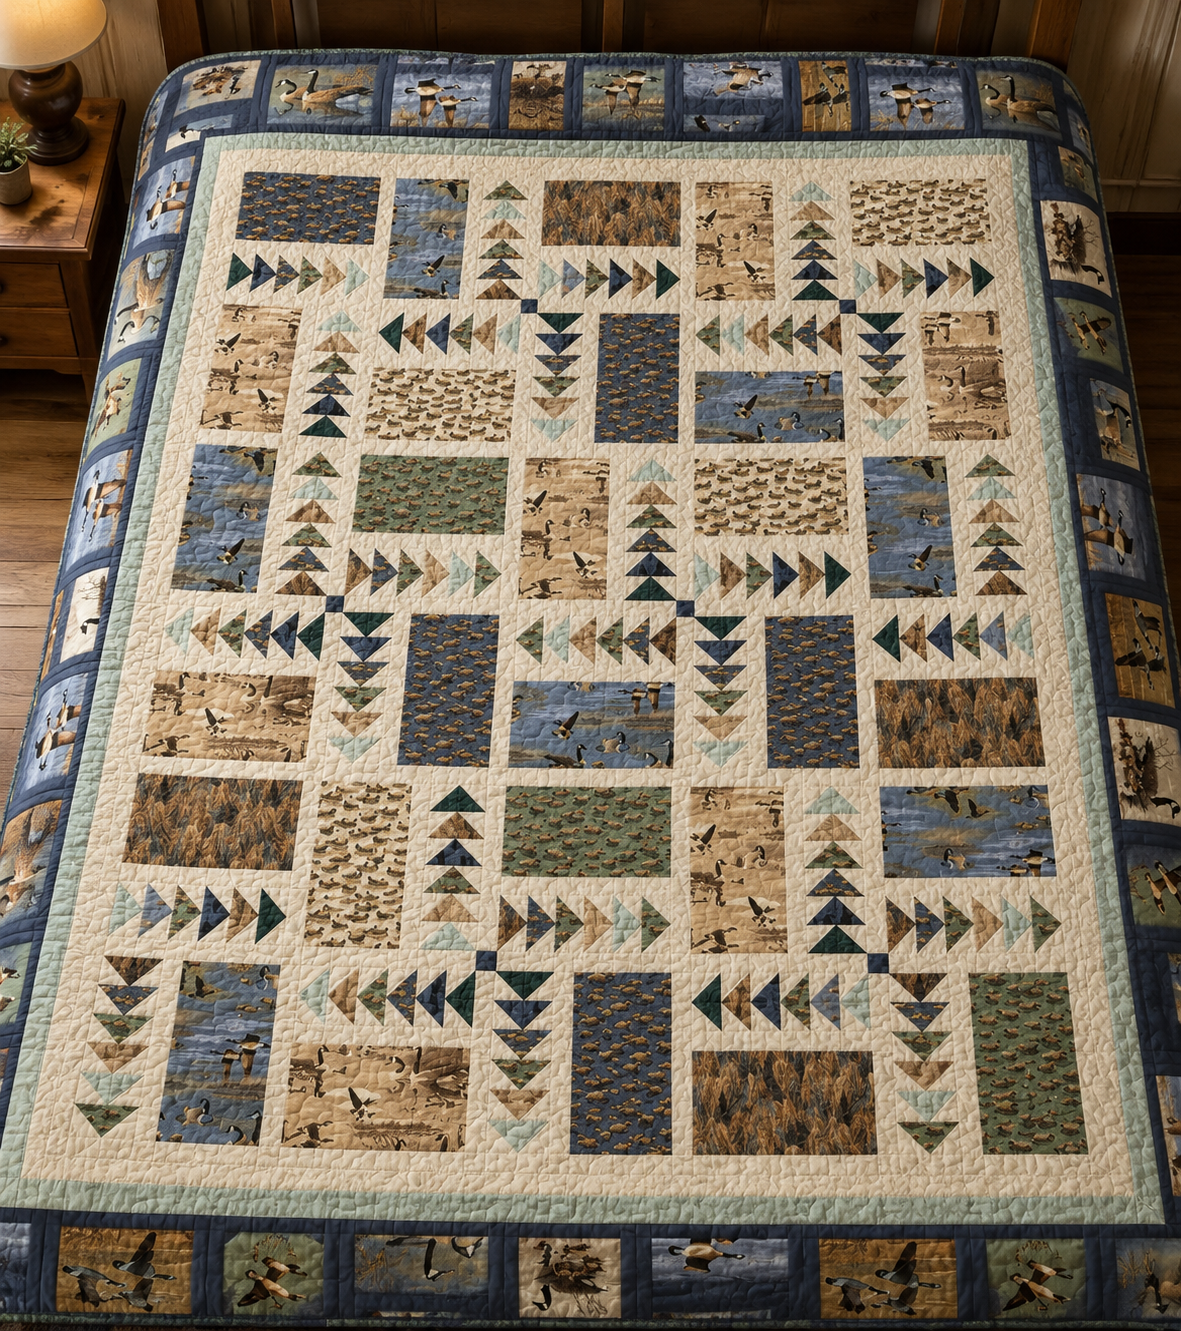
The Flying Geese quilt pattern designed by Wendy Sheppard for QT Fabrics combines two kinds of movement in one generous throw: small pieced geese travel in changing directions, while scenic rectangles show flocks, feathers, water, and woodland colors. The result is more varied than a quilt made from identical rows. Every 9½-inch block pairs a strip of six Flying Geese units with a narrow neutral divider and a feature-print rectangle, and the blocks rotate across the quilt center.
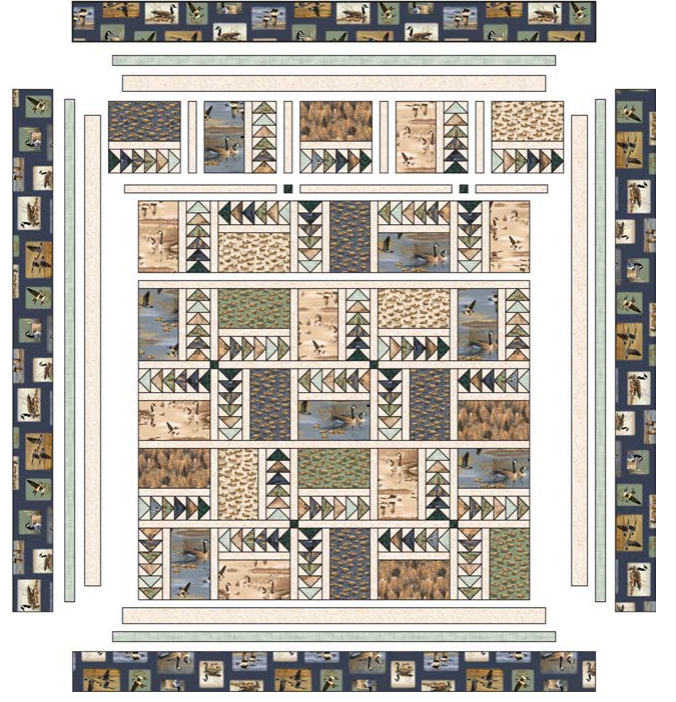
The original project finishes at 66 × 76 inches. It contains 180 Flying Geese units, grouped into 30 six-unit strips. Those strips become 30 composite blocks, which are arranged as six rows of five blocks. Narrow sashing, tiny cornerstones, two inner borders, and a directional outer border complete the top.
This is an independent planning and technique guide. It explains the quilt’s structure, the fabric roles, efficient construction, directional-print control, accuracy checks, border math, substitution ideas, quilting options, and solutions to common problems. It is intended to help a quilter understand and successfully organize the project. It does not replace the publisher’s cutting chart, block diagrams, or assembly illustration.
The original PDF identifies Wendy Sheppard as the pattern designer and QT Fabrics as the publisher and copyright holder. The cover also carries the Hautman Brothers Collection branding. Those credits should remain attached to every discussion of the project.
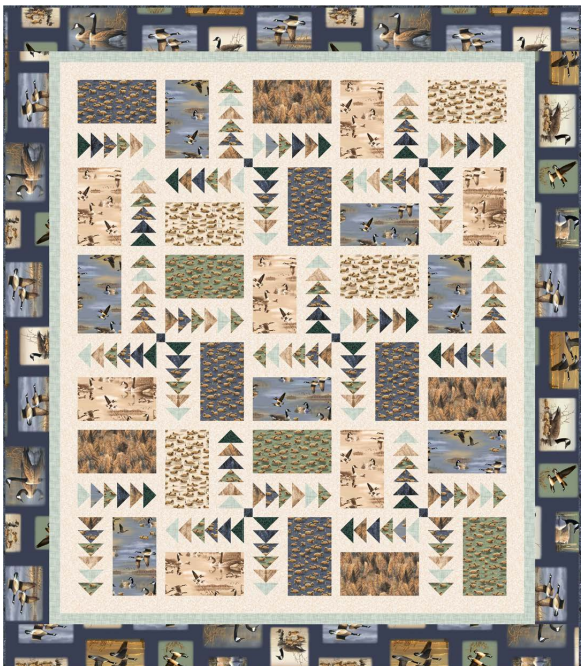
Flying Geese Quilt at a Glance
| Detail | Original pattern information |
|---|---|
| Pattern name | Flying Geese Quilt |
| Pattern designer | Wendy Sheppard |
| Original publisher | QT Fabrics |
| Featured collection branding | Hautman Brothers Collection |
| Finished size | 66″ × 76″ |
| Quilt-center size before borders | 49½″ × 59½″ |
| Composite block size before joining | 9½″ × 9½″ |
| Block arrangement | 6 rows of 5 blocks |
| Total composite blocks | 30 |
| Total Flying Geese units | 180 |
| Units in each pieced geese strip | 6 |
| Flying Geese strip types | FG1, FG2, FG3, and FG4 |
| Main construction method | Stitch-and-flip Flying Geese |
| Original unfinished Flying Geese size | 2″ × 3½″ |
| Recommended experience | Confident advanced beginner to intermediate |
| Main challenges | Repetition, small-unit accuracy, directional prints, labeling, and border alignment |
| Original batting suggestion | 74″ × 84″ |
The quilt is not technically difficult because of unusual seams. It uses straight stitching and familiar rectangular units. Its challenge comes from scale and organization: 360 marked background squares create 180 geese, the geese must be sorted into four sequences, and 30 feature blocks must retain the correct orientation through six long rows.
What Makes This Flying Geese Quilt Different?
Many Flying Geese quilts repeat one unit in a single direction. This design uses the unit more like a visual pathway. A six-geese strip may point left, right, up, or down depending on how its composite block is rotated. The scenic rectangles interrupt those pathways, so the eye alternates between crisp geometry and pictorial fabric.
The quilt center can be understood as a five-column by six-row grid. Every grid position is a 9½-inch unfinished block made from three parts:
- A 5½ × 9½-inch feature-print rectangle, oriented horizontally or vertically.
- A 1½ × 9½-inch neutral divider.
- A 3½ × 9½-inch strip made from six small Flying Geese units.
The three pieces finish together as a 9-inch block after it is sewn into the quilt. Some blocks place the geese above or below a horizontal feature rectangle. Others place them beside a vertical rectangle. This rotation prevents the center from looking like a simple stack of repeated panels.
The neutral background performs several jobs. It forms the side triangles of every goose, separates the geese from the pictorial rectangles, creates sashing between blocks and rows, and becomes the first inner border. Repeating the same light fabric in all those positions gives the complicated center room to breathe.
Small dark cornerstones appear in selected horizontal sashing rows. They are subtle, but they echo the darkest geese and stop the long pale bands from looking empty. A narrow green-toned second border softens the transition from the light center to the wide dark feature border.
Is This Pattern Beginner Friendly?
A new quilter who has already completed a few accurate blocks could make this project, but it should not be described as effortless. The individual technique is approachable; the quantity and precision make the full quilt a more substantial undertaking.
You should be comfortable with:
- Rotary cutting repeated small squares and rectangles
- Sewing a consistent ¼-inch seam
- Marking diagonals accurately
- Stitching on or immediately beside a marked line
- Trimming without cutting into the seam
- Pressing small triangles without stretching them
- Chain piecing
- Labeling several unit variations
- Matching points when joining repeated units
- Managing directional fabric
- Measuring rows before joining them
- Attaching borders without stretching the quilt
The 180 units are small. Each one is 2 × 3½ inches before it is joined to another piece and finishes at 1½ × 3 inches in the quilt. A seam that is only slightly too wide can make a six-unit strip noticeably short. A diagonal seam that bows away from the corner can blunt the point. One imperfect goose is rarely distracting, but repeated inconsistency can prevent blocks and rows from matching.
Treat the first four units as a test rather than production pieces. Make one goose from scraps, measure it, and sew several into a short sample strip. This reveals whether your marked line, needle position, thread, and pressing method produce the required unfinished size.
Understanding the Quilt Math
The design becomes much easier to organize when the arithmetic is clear.
Flying Geese count
The pattern uses four strip sequences:
| Strip type | Number of strips | Geese per strip | Total geese |
|---|---|---|---|
| FG1 | 12 | 6 | 72 |
| FG2 | 10 | 6 | 60 |
| FG3 | 4 | 6 | 24 |
| FG4 | 4 | 6 | 24 |
| Total | 30 | 180 |
The four sequences use different color orders. FG1 and FG2 appear most often because they are paired with more feature rectangles. FG3 and FG4 provide smaller accents in selected positions.
Composite block count
The lettered feature blocks also total 30:
| Feature family | Block variations | Total blocks |
|---|---|---|
| B | B1, B2, B3 | 7 |
| C | C1, C2, C3, C4 | 7 |
| D | D1, D2, D3 | 4 |
| E | E1, E2 | 3 |
| F | F1, F2 | 5 |
| H | H1, H2 | 4 |
| Total | 30 |
Those 30 blocks form six rows containing five blocks each. Four narrow vertical sashing pieces separate the five blocks in every row.
Center dimensions
Each composite block measures 9½ inches unfinished. A row contains five blocks and four 1½-inch sashing strips. After seam allowances are removed, the completed row should measure 9½ × 49½ inches.
Six block rows are separated by five horizontal sashing rows. Three are pieced with dark cornerstones, while two are plain 1½ × 49½-inch strips. After all rows and sashings are joined, the quilt center should measure 49½ × 59½ inches.
These measurements are not just descriptive. They are checkpoints. If a row is significantly longer or shorter than 49½ inches, correct it before attaching it to other rows. Forcing mismatched rows together can create waves that the borders will not fix.
Original Fabric Roles and Yardage
The original pattern uses prints from the Flying Geese collection together with QT blenders. The exact collection may be difficult to locate now, so it is more useful to understand what every fabric does than to search indefinitely for every original stock number.
| Fabric role | Original description | Yardage | Main use |
|---|---|---|---|
| A | Geese Vignette Patches, Navy | 1¼ yd for piecing | Wide directional outer border |
| A backing | Geese Vignette Patches, Navy | 4¾ yd | Pieced backing |
| B | Geese Lake Scenic, Tan | ½ yd | Seven feature rectangles |
| C | Geese Lake Scenic, Chambray | ½ yd | Seven feature rectangles and 4 geese centers |
| D | Baby Geese, Cream | ⅜ yd | Four feature rectangles |
| E | Baby Geese, Green | ⅝ yd | Three feature rectangles and 40 geese centers |
| F | Baby Geese, Denim | ⅝ yd | Five feature rectangles and 22 geese centers |
| G | Feathers, Dark Tan | ¼ yd | 26 geese centers |
| H | Feathers, Rust | ⅜ yd | Four feature rectangles and 18 geese centers |
| I | Feathers, Navy | ⅞ yd | 20 geese centers, cornerstones, and binding |
| J | Color Blends, Oatmeal | 2⅝ yd | Geese sides, block dividers, sashing, and first border |
| K | Color Blends, Fir | ¼ yd | 20 geese centers |
| L | Harmony Woven, Frosted Pine | ¾ yd | 30 geese centers and second border |
The original yardage table contains bolt quantities intended for shops preparing 12 kits. Home quilters should use the yardage column, not the numbers shown in the gray bolt boxes.
If replacing the collection, preserve the functions rather than the printed names. Fabric A needs enough visual structure to make a strong outer frame. Fabrics B, C, D, E, F, and H need motifs that still look attractive when cut into 5½ × 9½-inch rectangles. Fabrics C, E, F, G, H, I, K, and L supply the colored center rectangles for the geese. Fabric J must contrast clearly with all of them.
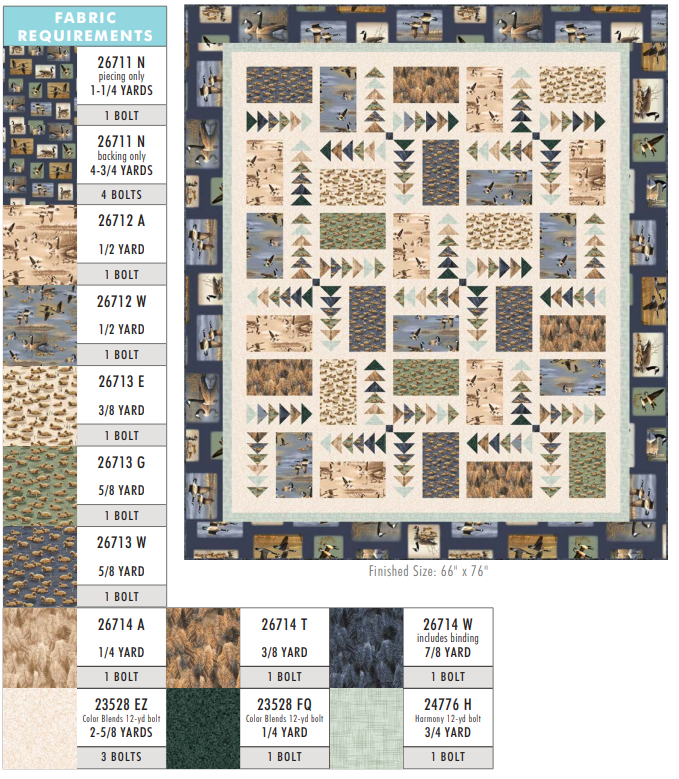
REQUIREMENTS
Choosing Substitute Fabrics
The design can work with wildlife prints, florals, coastal scenes, novelty fabrics, batiks, or modern geometrics. Successful substitutions share three qualities: readable contrast, compatible scale, and intentional repetition.
Begin with the feature rectangles
Choose six related prints for the 30 pictorial rectangles. They do not need to come from one collection, but they should share a visual story. A group of woodland animals, botanical drawings, Japanese landscapes, vintage travel motifs, or tonal abstracts can all work.
Hold a 5½ × 9½-inch paper window over each print. This shows what the fabric will look like after cutting. A large motif that seems beautiful across a yard may become an unrecognizable fragment inside the window. A medium-scale repeat often gives more reliable results.
At least some feature prints should work in both horizontal and vertical orientations. If every motif has an obvious upright direction, the original block rotations may turn birds, trees, words, or buildings sideways. Decide before buying whether that rotation is acceptable.
Build a geese palette from the features
Pull six to eight colors from the feature prints. The original design uses cream, pale aqua, tan, rust, green, and navy. A replacement palette can be completely different, but it needs enough value separation for adjacent geese to remain visible.
Include:
- Two or three light-to-medium colors
- Two or three medium colors
- One or two dark anchors
- One quiet transition color
- A background that contrasts with nearly all the geese centers
The colored rectangle forms the large center triangle of each goose, while the background squares form its side triangles. If the values are too similar, the goose disappears.
Choose the background last
Pure white is not required. Cream, oatmeal, mist gray, pale blue, or a very quiet tonal can work. Place every geese-center fabric on top of the proposed background and photograph the group in grayscale. Every center should remain distinguishable.
Because the background also becomes sashing and an inner border, its value controls the overall openness of the quilt. A light background produces an airy center. A charcoal background creates a dramatic stained-glass effect, but the geese colors must then be light enough to show.
Select a border that supports the center
The original wide outer border is a directional vignette print. A border stripe, panel coordinate, or orderly scenic print makes a strong substitute. An allover print can also work, but it will create a softer frame.
Before purchasing, determine the repeat and usable motif width. The original border strips are 5½ inches wide. If your chosen motif requires a wider cut, additional yardage and revised border dimensions will be necessary.
Four possible color stories
Coastal: Use sand as the background, sea-glass green and blue geese, lighthouse or shore feature prints, and a navy wave border.
Autumn woodland: Combine cream, moss, ochre, rust, brown, and charcoal with leaves, deer, mushrooms, or trees. A dark forest border gives the center a grounded finish.
Modern rainbow: Use black-and-white feature prints, a pale gray background, and geese that move through a controlled rainbow. Frame the top with a black geometric print.
Soft botanical: Pair ivory sashing with sage, blush, lavender, dusty blue, and muted gold. Use florals for the rectangles and a narrow stripe or leafy border.
Directional Prints: Plan Before Cutting
Directional cutting is one of the most important parts of this project. The original pattern specifically warns that the 5½ × 9½-inch rectangles from the feature fabrics need attention. Some must read horizontally and others vertically.
Do not begin by cutting all required rectangles in whichever direction fits most efficiently. First make a worksheet for each fabric:
| Fabric family | Horizontal rectangles | Vertical rectangles | Geese rectangles |
|---|---|---|---|
| B | 2 | 5 | 0 |
| C | 3 | 4 | 4 |
| D | 3 | 1 | 0 |
| E | 2 | 1 | 40 |
| F | 1 | 4 | 22 |
| H | 4 | 0 | 18 |
Here, “horizontal” means the 9½-inch dimension runs across the motif and the 5½-inch dimension runs vertically. “Vertical” means the 5½-inch dimension runs across the motif and the 9½-inch dimension runs vertically.
If the repeat is large, place transparent template plastic or a paper window over the fabric and mark each rectangle individually. Leave extra space around important birds, faces, words, or horizon lines. Fussy cutting may require more yardage than the original efficient cutting plan.
Mark the top edge of every directional rectangle with a small removable label placed within the seam allowance. The label should include both the block code and an arrow. For example, “C2 ↑” is more useful than “blue scenic.”
The small geese-center rectangles are not treated as directional in the original cutting plan. If your replacement fabrics contain obvious arrows, text, or one-way animals, decide whether random direction is acceptable. Making all 180 small motifs point identically would require more planning and possibly more fabric.
Tools and Supplies
Standard quilting tools are sufficient, but a few choices improve accuracy during repetitive work:
- Sewing machine with a reliable straight stitch
- Quarter-inch presser foot or seam guide
- Sharp 45 mm rotary cutter
- Fresh rotary blade
- Large cutting mat
- 6 × 24-inch ruler
- Small ruler for trimming corners
- Fine mechanical pencil, chalk pencil, or removable fabric marker
- Thin marking ruler
- Dry iron
- Firm pressing surface
- Neutral 50-weight cotton thread
- Fine pins or small fabric clips
- Stackable trays or labeled bags
- Design wall
- Camera or phone for recording the layout
- Seam ripper
- Optional seam roller
- Optional diagonal seam tape on the machine bed
Test every marker on scrap fabric. The lines must remain visible during chain piecing but should not leave a permanent mark or reappear after pressing.
Calibrate the Quarter-Inch Seam
The geese are made by sewing diagonally across small pieces, but the strips, blocks, rows, and borders all depend on an accurate ¼-inch seam.
Cut three 1½ × 3-inch rectangles from scrap. Sew them together along the long edges, press, and measure the center strip from seam to seam. It should finish at exactly 1 inch, and the complete sample should measure 3½ inches wide.
If it is too narrow, the seam allowance is too wide. If it is too wide, the seam allowance is too scant. Move the needle or adjust the guide and repeat the test.
Use the same thread and pressing method planned for the quilt. Thick thread and aggressive pressing can change the final measurement more than expected across many seams.
Organize the Cutting
Cutting every fabric in one uninterrupted session can produce mistakes. Divide the work into functional groups.
Group 1: feature rectangles
Cut and label the 30 large rectangles first. Keep each family in its own envelope or tray. Separate horizontal and vertical cuts with clearly printed cards.
Group 2: colored geese rectangles
The pattern uses 180 rectangles measuring 2 × 3½ inches. Count each color separately before combining anything. Place a card in every stack showing the original fabric letter or your substitute name and the required quantity.
Group 3: background squares
The 180 geese require 360 background squares, two per unit. Cut them from straight, accurately sized strips. After every group of 40 or 50, square the strip end again so ruler drift does not accumulate.
Group 4: dividers and sashing
The design uses several 1½-inch-wide background pieces with different lengths. Keep the 9½-inch block dividers separate from the 9½-inch between-block sashings, even though their dimensions match, because they are counted for different assembly stages.
Group 5: borders, cornerstones, binding, and backing
Do not cut the directional outer border until the center is assembled and measured. The published dimensions provide a goal, but measuring the actual center prevents a border from being eased onto an inaccurate edge.
Binding strips may be cut early and stored, but protect them from accidental use. Backing lengths can wait until the top is complete.
Marking 360 Diagonal Lines Efficiently
The pattern’s stitch-and-flip method uses two marked background squares for each goose. Consistent marking is essential because the line becomes the sewing guide.
Work in manageable batches of 20 to 40 squares:
- Place each square wrong side up.
- Align a fine ruler exactly from corner to corner.
- Draw a thin line without stretching the fabric.
- Stack the marked squares with all lines running in the same visual direction.
- Count the batch before moving it to the machine.
A thick line creates uncertainty about which edge to follow. A bowed line produces a curved seam. Use a sharp pencil and light pressure.
Diagonal seam tape can replace drawn lines only if it is calibrated carefully and you can keep both corners aligned with the guide. With 2-inch squares, even a small drift is visible. Many quilters find drawn lines more dependable for the first several batches.
Making One Accurate Flying Geese Unit
The original construction places one 2-inch background square on one end of a 2 × 3½-inch colored rectangle, right sides together.
- Check that the marked diagonal runs from the upper outside corner toward the lower center of the rectangle.
- Sew on the marked line or a thread-width toward the corner that will be trimmed away.
- Fold the square toward the corner before trimming. Its edges should cover the colored rectangle cleanly.
- If the fold reaches the rectangle edges, unfold it and trim the excess fabric ¼ inch beyond the seam.
- Press the triangle toward the corner.
- Repeat on the opposite end with a second background square.
- Measure the finished unit. It should be 2 × 3½ inches unfinished.
The second diagonal must mirror the first. If it runs in the same direction, the two side triangles will not form the familiar goose shape.
The point of the colored triangle should stop ¼ inch from the raw edge. That margin is not wasted space; it becomes the seam allowance when the goose is joined into its strip. If the point touches the raw edge, it is likely to be cut off later.
Sew Beside the Line or Directly on It?
Fabric folds over the thread and occupies a tiny amount of space. For that reason, some machines produce a more accurate corner when the seam is sewn a thread-width toward the portion that will be discarded. Other combinations of fine thread and thin fabric work perfectly when sewn directly on the line.
Test both on scraps:
- Sew one sample directly on the line.
- Sew a second sample one thread-width toward the outside corner.
- Press both using the same method.
- Place them on top of a 2 × 3½-inch rectangle.
Choose the method whose folded triangle reaches the edges without pulling the unit out of shape. Consistency matters more than a universal rule.
Trimming Without Losing Accuracy
Do not automatically trim before checking the fold. The fold test is a simple quality-control step.
When the folded corner falls short:
- The seam may be too far toward the center.
- The marked line may not reach both corners.
- The square may have shifted during sewing.
- The fabric may have been stretched while pressing.
If it extends far beyond the rectangle:
- The seam may be too far toward the trimmed corner.
- The square or rectangle may have been cut oversize.
- The unit may not have been pressed fully open.
Once the triangle covers the base accurately, trim the hidden layers to a ¼-inch seam allowance. Avoid trimming all three layers. The pressed triangle must remain intact.
The offcuts from 360 corners are small but usable. If desired, sew a second line about ½ inch outside the primary seam before cutting. The trimmed pair can become a tiny half-square triangle after it is opened and squared. This is optional and should not slow the main project unless you already have a plan for the bonus units.
Pressing the Geese
The original instructions direct the background triangles toward the corners. A dry iron and a lift-and-lower motion help retain the rectangle’s dimensions.
Set the seam briefly before opening the triangle. Finger-press or roll the triangle into position, then press from the front. Do not drag the iron along the diagonal edge.
Check for a small ridge at the seam. If the fabric has not opened completely, the goose will be narrow. If the seam has been stretched, the long edge may curve.
Press all units in the same orientation and stack them flat. A pile of warm, bent geese can set with distorted edges. Let each batch cool on the pressing surface before sorting.
Chain Piecing 180 Units
The project becomes efficient when it is treated as a production line, but speed should follow accuracy.
A reliable batch sequence is:
- Select 20 colored rectangles and 20 first-corner squares.
- Position all squares.
- Chain piece the first corners.
- Clip the chain into individual units.
- Fold-test every seam.
- Trim and press.
- Add the second 20 squares.
- Chain piece, fold-test, trim, and press again.
- Count and label the completed batch.
Do not combine every color at the machine unless you have a clear sorting system. The four FG strip types require exact sequences. Color stacks that look distinct on the cutting table may look similar under the machine light.
Stop every few batches and measure several units chosen from the beginning, middle, and end. A loose screw, changing posture, or fabric buildup against the seam guide can gradually alter accuracy.
Sorting the Four FG Sequences
After all 180 individual units are made, the next task is not sewing. It is sorting.
Create four large labels: FG1, FG2, FG3, and FG4. Under each, draw six empty positions. Use the publisher’s diagram to place the correct fabric in each position and confirm the direction of every goose.
Prepare one strip of each type as a master:
- Lay out the six units.
- Photograph the order.
- Sew the strip.
- Compare it with the diagram.
- Measure it.
- Pin the approved master above the corresponding tray.
Only then prepare the remaining sets. Stack complete six-unit groups rather than loose colors. This prevents the last few strips from being short one fabric because of an early sorting error.
FG1 needs 12 groups, FG2 needs 10, FG3 needs 4, and FG4 needs 4. Use numbered cards such as “FG1 1/12” through “FG1 12/12.” The count may feel excessive, but it makes the later block stage almost mechanical.
Joining Six Geese into a Strip
The small units are sewn end to end so that six geese create a 3½ × 9½-inch unfinished strip.
The critical point is the tip of each colored triangle. The seam should pass exactly through the intersection of the diagonal seams, or a thread-width outside it, leaving the point visible on the front.
Before sewing:
- Align the raw edges.
- Place a fine pin through the point intersection.
- Check that the neighboring unit is not rotated.
- Confirm the color order against the master strip.
After joining the first two units, open the seam and inspect the point before adding a third. If the point is cut off, adjust the next seam slightly. If the point floats too far from the seam, the allowance may be too scant.
Pressing direction can alternate from strip to strip if that helps later seams nest, but keep each completed strip flat. If bulky intersections resist pressing, press the joining seams open using a short stitch length. Do not change pressing style halfway through a matched group without testing how it affects width.
The completed strip should measure approximately 3½ × 9½ inches. Do not trim through the colored tips to force the measurement. Diagnose the seam allowance first.
Building the 30 Composite Blocks
Each composite block combines one geese strip, one neutral divider, and one feature rectangle. The block codes indicate both the fabric family and the arrangement.
Set up a block station with:
- The approved block diagram
- One correctly labeled feature rectangle
- The required FG strip
- One 1½ × 9½-inch background divider
- A block label
Lay out all three pieces before sewing. The divider must remain between the geese and the feature print. The feature motif must be upright in the final block orientation. The geese must point in the direction shown for that block variation.
Join the divider to one component first. Press the seam toward the divider only if the fabric is dark enough not to shadow through; otherwise press toward the darker component or press open. Add the remaining component and measure the block.
Every block should be 9½ inches square. Check:
- All four edges are straight.
- The feature motif is correctly oriented.
- The geese match the required direction and sequence.
- The divider remains a consistent 1-inch finished width.
- The geese tips retain a ¼-inch seam allowance.
Attach the label immediately. A correct B1 block can look surprisingly similar to an incorrectly rotated B2 once it is carried to the design wall.
A Practical Block-Making Order
Rather than constructing blocks in alphabetical order without context, make one complete block from each family first. This gives you a visual reference for B, C, D, E, F, and H.
Then work in groups:
- Finish all blocks that use FG1.
- Count the remaining FG1 strips.
- Finish all blocks that use FG2.
- Count the remaining FG2 strips.
- Complete the smaller FG3 and FG4 groups.
- Lay all 30 labeled blocks on the design wall.
This method detects a misallocated geese strip before the final block. If you use the wrong strip in an early block, the count will fail while there is still time to compare a small group.
Arranging the Six Rows
The center uses six rows of five blocks. This stage is where the design’s movement appears, and it is also where a rotated block is easiest to catch.
Clear enough design-wall space for the entire 5 × 6 grid. Place block labels facing outward until the arrangement is confirmed. Add temporary paper strips between blocks to represent sashing.
Stand several feet away and compare:
- Direction of each geese strip
- Orientation of every scenic motif
- Distribution of light and dark rectangles
- Placement of the four FG sequences
- Location of dark cornerstones in the horizontal sashing
Photograph the complete layout. Take a second grayscale photo. The grayscale view makes an accidentally concentrated dark area easier to see, while the color photo preserves the exact block orientation.
Stack one row at a time from left to right. Place a large row number on top and a smaller position number on each block. Never rely on the stack direction alone; it can be reversed while moving from the design wall to the machine.
Sewing Each Block Row
Four background sashing rectangles separate the five blocks in each row. Sew the row in pairs or add one component at a time, checking the photograph frequently.
To prevent bowing:
- Pin at both ends and the center of every long join.
- Do not stretch the sashing to match the block.
- Alternate the direction in which rows are fed through the machine.
- Press from the center outward.
Each completed row should measure 9½ × 49½ inches. Measure the top, center, and bottom length. If one edge is longer, examine the pressing and seam allowances before trimming.
Rows that are slightly different can sometimes be matched by pinning both ends, then centers, then quarter points. A large difference should not be eased away. Correct the block or sashing responsible.
Making the Horizontal Sashing
Five horizontal separators sit between the six block rows. The design uses two kinds:
- Three pieced sashing rows containing pale rectangles and small dark cornerstones
- Two plain 1½ × 49½-inch background strips
The pieced sashing rows include two long background sections, one shorter background section, and two 1½-inch dark squares. Their exact order matters because the cornerstones align with selected vertical divisions in the block rows.
Lay a pieced sashing row beneath the quilt blocks before sewing it. Confirm that the dark squares land where the assembly diagram shows. A reversed sashing row changes the rhythm of the center.
Measure each completed pieced sashing row against a 49½-inch block row. They should match without stretching.
Important Clarification in the Original PDF
The text for the third block row lists the correct sequence of blocks but ends by saying the pieces make “Row 2.” The heading and position make it clear that this is a labeling typo: the instruction is for Row 3.
Use the row heading, the sequence of blocks, and the final assembly diagram together. Do not make a second copy of Row 2.
This appears to be a minor text error rather than a cutting or measurement change. When working from any older pattern, it is wise to compare written steps with the diagram before sewing a long row.
Joining the Quilt Center
The quilt center alternates six block rows with five sashing rows. Keep the full order visible on the design wall.
Join sections in pairs:
- Block Row 1 to the first pieced sashing row.
- Block Row 2 to that section.
- Join Block Rows 3 and 4 with their intervening sashing.
- Join Block Rows 5 and 6 with their intervening sashing.
- Add the remaining plain or pieced separators in the published order.
- Join the larger sections.
Pin at every vertical sashing intersection and cornerstone. Where seams can nest, use that advantage. Where they cannot, place a pin through the exact seam line.
Press after each addition and support the growing weight of the top. Letting the quilt hang from the ironing board can stretch the long seams.
The completed center should measure 49½ × 59½ inches. Measure both sides, both ends, and through the middle. Also measure both diagonals. A small difference can be corrected through careful border preparation; a major difference should be resolved before borders are added.
Understanding the Three Borders
The borders add 16½ inches to the width and 16½ inches to the height in total, taking the center from 49½ × 59½ inches to 66 × 76 inches.
First inner border
The first border uses the oatmeal background and is cut 2½ inches wide. It finishes at 2 inches on each side.
After the side borders are attached, the top grows from 49½ to 53½ inches wide. After the top and bottom borders are attached, it grows from 59½ to 63½ inches high.
Second inner border
The second border uses the frosted-pine coordinate and is cut 1¾ inches wide. It finishes at 1¼ inches on each side.
After this border, the top should measure approximately 56 × 66 inches.
Outer border
The outer border is cut 5½ inches wide and finishes at 5 inches on each side. Adding it to the 56 × 66-inch top produces the final 66 × 76-inch measurement.
The original print is directional, so the side borders and top-and-bottom borders must be oriented intentionally. A feature rectangle should not suddenly turn sideways at a corner unless that is the planned effect.
Measure Borders Instead of Stretching Them
Never sew a long border strip to the quilt and cut off the excess afterward. That method transfers any stretched edge into the border and often creates waves.
For each pair of borders:
- Measure the quilt through the center.
- Measure again near both parallel edges.
- Average the three measurements if the difference is small.
- Cut two opposite border strips to exactly the same length.
- Mark centers and quarter points on both the quilt and border.
- Pin the border at those marks.
- Distribute any tiny fullness evenly.
- Sew with the border strip against the feed dogs if the quilt edge is slightly fuller.
Attach side borders first, then top and bottom, following the published plan. Press and measure before cutting the next border pair.
For a directional print, piece long strips so the motif continues as gracefully as possible. Place joins away from the most prominent vignette. A diagonal join may be less visible in an allover print, but a straight join can be easier to match in a stripe or scenic repeat.
Backing, Batting, and Binding
The original pattern calls for a 74 × 84-inch batting piece. That provides about 4 inches beyond the 66 × 76-inch top on every side.
The backing uses 4¾ yards of 42-to-44-inch-wide fabric, cut into two 84-inch lengths and joined lengthwise. The seam runs vertically behind the quilt.
Before cutting your backing, ask the longarm quilter how much extra fabric is required. Many longarmers prefer at least 4 inches on all sides, and some request more. If the actual top finishes larger or if the backing fabric is narrower than expected, 4¾ yards may not be sufficient.
Press the backing seam to one side or open according to the quilting method. Remove selvages from the joined edges because tightly woven selvages can pucker. Check for directional motifs before joining the lengths.
The original binding uses eight strips cut 2¼ inches wide. Join them with diagonal seams, trim the joins to ¼ inch, press the seams open, and fold the long strip wrong sides together.
Eight width-of-fabric strips provide comfortable coverage for a perimeter of 284 inches, allowing for joins and overlap. If your fabric is narrow or the top size changes, calculate the perimeter again before cutting.
Quilting Ideas
The quilt already contains strong directional movement, so quilting can either reinforce the flight paths or calm the surface.
Echo the geese
Quilt a line ¼ inch inside each colored triangle and continue through the six-unit strips. This highlights the geometry without adding a competing motif.
Use wind-like curves
Gentle horizontal curves can travel behind the geese and across the neutral sashing. Keep the curve scale consistent so the quilting connects separate blocks.
Outline scenic motifs
On feature rectangles, quilt around the most important birds, feathers, flowers, or landscape shapes. Add a quiet fill in the background. Avoid outlining every small printed detail, which can make the rectangles stiff.
Create border channels
Straight lines in the two inner borders emphasize the frame. The wide outer border can receive a continuous feather, leaf, wave, or simple meander depending on the print.
Edge-to-edge quilting
An open pantograph with flowing leaves, clouds, or loops is practical for a heavily pieced throw. Choose a medium scale so the design crosses both geese and feature rectangles without overwhelming them.
Test thread on every dark and light fabric. A medium neutral such as warm gray, taupe, or muted blue often crosses the varied palette more quietly than white or navy.
Troubleshooting Flying Geese
The colored point is cut off
The joining seam crossed inside the point intersection. Sew the seam a thread-width toward the raw edge when joining the next units. Also confirm that the original goose retained a full ¼ inch beyond its point.
The point floats too far from the seam
The joining seam is too scant or the diagonal seams did not meet at the correct location. A slight floating point is less damaging than a severed one, but repeated large gaps change the strip’s rhythm.
The corner triangle does not cover the base
The diagonal seam is too far toward the center, the marked line is inaccurate, or the square shifted. Fold-test before trimming so the seam can be resewn.
The unfinished unit is too small
Check the 2-inch squares and 2 × 3½-inch rectangles first. Then check whether the fold is fully opened and whether the diagonal seam consistently steals width. Do not trim surrounding units smaller to match one inaccurate batch.
The unit bows
The diagonal edge was stretched while sewing or pressing. Reduce pressure, support the fabric, and press by lifting the iron. Replace badly distorted units rather than trying to force them into a strip.
Six-unit strips are short
The seams joining the geese are too wide. Measure a two-unit sample to identify the problem. Six units contain five joins, so a 1/16-inch error at every join can shorten a strip by more than ¼ inch.
Six-unit strips curve
The units were stretched, the seam allowances were pushed unevenly, or the strip was pressed with a sliding motion. Press from both ends toward the center and allow the strip to cool flat.
A feature motif is sideways
Compare the block to the layout before unpicking. Some blocks are deliberately rotated. If the motif is incorrect according to the diagram, correct the block before adding row sashing.
The row is longer than 49½ inches
Check the four sashing pieces and eight joining seams. Do not trim the row ends until you know whether a block is oversized. Trimming can remove necessary seam allowance from the outer feature blocks.
The center is not square
Measure rows and horizontal sashings separately. A diamond-shaped center often indicates stretched long seams. A center with unequal sides may contain one incorrect sashing length or a row assembled with a seam too narrow.
The border ripples
The border was cut from the quilt-edge measurement or stretched during sewing. Remove it, measure through the center, cut both opposite strips to the same length, and pin at eighths before resewing.
A Manageable Project Schedule
This quilt rewards short, repeatable sessions. A sample schedule might be:
Session 1: palette and pattern map
Read the complete source pattern, assign replacement fabrics, check values in grayscale, and make directional-cutting notes.
Session 2: feature rectangles
Fussy cut and label the 30 scenic rectangles. Stop before cutting geese if concentration is fading.
Session 3: geese pieces
Cut and count 180 colored rectangles and 360 background squares. Recount by fabric role.
Session 4: remaining pieces
Cut dividers, sashing, cornerstones, and binding. Reserve border fabric until the center is measured.
Sessions 5 through 8: Flying Geese
Make 40 to 50 units per session. Measure several from every batch and update the count.
Session 9: sequence masters
Build one approved FG1, FG2, FG3, and FG4 strip. Photograph and label them.
Sessions 10 and 11: geese strips
Complete all 30 strips and measure each one.
Sessions 12 through 14: composite blocks
Build the lettered blocks in families. Label every block and place it on the design wall.
Sessions 15 and 16: rows and sashing
Arrange the full center, sew six block rows, make the horizontal sashing, and verify lengths.
Session 17: center assembly
Join the rows and sashing. Press and measure the 49½ × 59½-inch center.
Session 18: borders
Cut measured border pairs, manage the directional outer print, and verify the 66 × 76-inch top.
Final sessions
Prepare backing, baste or send to a longarmer, quilt, trim, bind, label, and photograph.
The schedule can be condensed, but separate counting from late-night sewing. Most errors in a repetitive quilt are organizational rather than technical.
Ways to Personalize the Design
Replace wildlife with family photographs printed on fabric
Use professionally printed fabric or a tested home-printing product for the feature rectangles. Preserve the original 5½ × 9½-inch cut size and keep important faces at least ½ inch from every edge.
Create an “around the world” version
Use six travel prints or map-inspired fabrics and assign geese colors by region. Keep the background quiet so the feature rectangles remain readable.
Make the geese scrappy
The 180 centers can come from scraps, but organize them into value families before building the FG sequences. Random color is most successful when the background is consistent and the darks are distributed evenly.
Use ombré fabric
Cut geese centers from different points across an ombré. Label the value zones and construct the six-unit strips from light to dark. Because the original sequences are color-specific, make a complete replacement map before cutting.
Simplify the outer border
If no suitable directional print is available, use a solid or tonal 5½-inch border. The center remains the focal point, and corner matching becomes easier.
Add a pieced backing
Use leftover feature prints in a vertical strip between two backing lengths. Calculate the final width and length carefully, and keep every seam at least several inches from the edge required by the longarm frame.
Accuracy Checkpoints
| Stage | Check before continuing |
|---|---|
| Fabric selection | Clear contrast between background and all geese centers |
| Directional plan | Horizontal and vertical feature rectangles counted separately |
| Cutting | 180 colored rectangles and 360 background squares |
| First goose | Exactly 2″ × 3½″ unfinished |
| Each batch | Correct color count and consistent dimensions |
| FG master strips | Four verified six-color sequences |
| Each FG strip | Approximately 3½″ × 9½″ unfinished |
| Composite blocks | 30 blocks, each 9½″ square |
| Block rows | Six rows, each 9½″ × 49½″ |
| Horizontal sashing | Three pieced and two plain rows in correct order |
| Quilt center | Approximately 49½″ × 59½″ |
| After first border | Approximately 53½″ × 63½″ |
| After second border | Approximately 56″ × 66″ |
| Completed top | Approximately 66″ × 76″ |
| Backing and batting | Meet the quilter’s required margin |
Original Photos That Would Add Editorial Value
Replace screenshots of the publisher’s PDF with photographs of your own process. Useful subjects include:
- The complete substitute palette with fabric-role labels
- A 5½ × 9½-inch paper window over a directional feature print
- Horizontal and vertical feature rectangles in separate labeled stacks
- The 180 colored rectangles sorted by value
- A batch of 360 marked background squares
- The fold test before trimming a diagonal corner
- One correct and one incorrect Flying Geese unit
- Four master strips labeled FG1 through FG4
- A fine pin passing through a geese point
- One completed 9½-inch composite block
- All 30 labeled blocks on a design wall
- A pieced sashing row with dark cornerstones
- The center measured through three positions
- A directional outer-border motif being auditioned
- Finished quilting across a six-geese strip
These images show genuine testing and decision-making. They are more useful to readers than a cropped cover, fabric chart, or assembly diagram taken from the copyrighted PDF.
Where can I obtain the original pattern?
QT Fabrics previously distributed the project as a free pattern. At the time this guide was updated, the specific PDF was not listed as an active download in the current QT Fabrics project area. Use the publisher links below to check for availability or request an authorized source.
Final Preparation Checklist
- I understand that this is a 66 × 76-inch project.
- I have identified the six feature-print roles.
- I checked every feature print through a 5½ × 9½-inch window.
- I counted horizontal and vertical rectangles separately.
- My background contrasts with all geese centers.
- My ¼-inch seam has been tested.
- I cut and counted 180 colored rectangles.
- I cut and marked 360 background squares.
- My test goose measures 2 × 3½ inches unfinished.
- I will fold-test every diagonal seam before trimming.
- I have labels for FG1, FG2, FG3, and FG4.
- My approved master strips match the source diagram.
- Every six-geese strip measures approximately 3½ × 9½ inches.
- I will label all 30 composite blocks immediately.
- I will photograph the full six-row layout.
- Every block row measures approximately 9½ × 49½ inches.
- I understand that the Row 3 “Row 2” wording is a minor label typo.
- My center measures approximately 49½ × 59½ inches before borders.
- I will measure through the quilt center before cutting each border pair.
- My backing and batting meet the quilter’s requirements.
- I will use an authorized source for the original pattern.
Pattern Credit
Pattern: Flying Geese Quilt
Pattern designer: Wendy Sheppard
Original publisher and copyright holder: QT Fabrics
Featured collection branding: Hautman Brothers Collection
Original finished size: 66″ × 76″
Original construction: 180 stitch-and-flip Flying Geese units in 30 composite blocks
The original pattern, cutting chart, fabric artwork, diagrams, quilt rendering, and PDF layout remain the property of their respective creators and rights holders. Easy Quilting Patterns provides this independent planning and technique guide for educational commentary and does not claim authorship or ownership of the original design.
Final Thoughts
This Flying Geese quilt succeeds because it balances repetition with variety. The same small unit appears 180 times, but four color sequences, changing directions, six families of feature prints, cornerstones, and a strong frame prevent the design from feeling mechanical.
The most effective strategy is to replace one enormous task with a series of measured batches. Test one goose. Approve four master strips. Build and label 30 blocks. Measure six rows. Confirm the center before adding borders. Every checkpoint protects the work already completed.
The design is also highly adaptable. Wildlife prints can become florals, travel scenes, modern black-and-white graphics, or family photographs printed on fabric. The original collection establishes the structure, while value, scale, and direction allow a new maker to create an individual version.
With careful marking, controlled pressing, clear labels, and measured borders, the finished quilt will retain sharp movement without sacrificing the scenic prints that make it distinctive.