
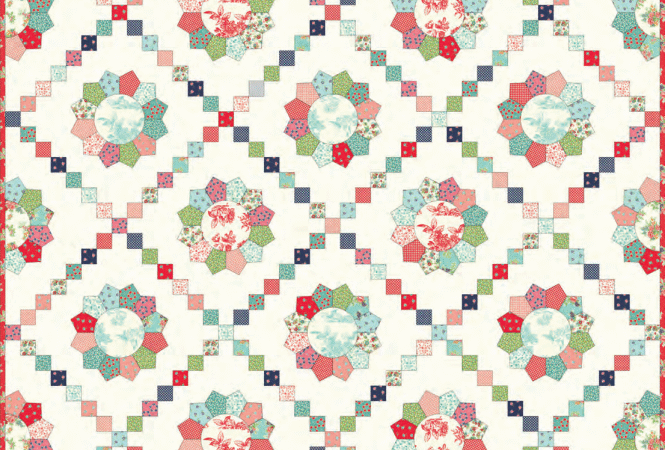
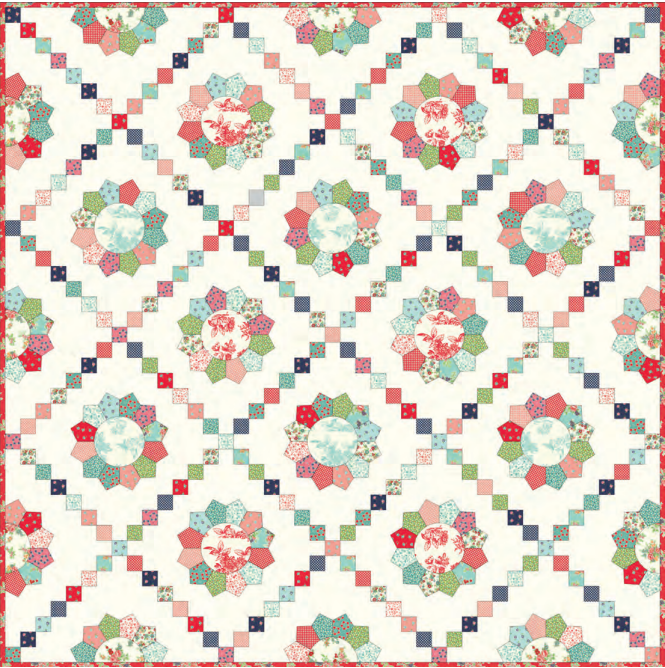
The Katie Jane Dresden Plate quilt pattern gives a traditional floral block a lively, structured setting. Instead of arranging identical Dresden Plates in a simple grid, designer Lynne Goldsworthy combines full and half Dresden units with strip-pieced chain blocks. The result is a 65-inch-square quilt with flowers, diagonal movement, and enough open background to keep the detailed prints from feeling crowded.
This article is a companion guide to the original pattern. It explains what makes the design work, how to plan a successful fabric substitution, which skills deserve a practice sample, and how to avoid the accuracy problems that can accumulate across 216 Dresden blades. For the designer’s templates, exact cutting chart, diagrams, and row layout, use the authorized pattern link near the end of the article.
Katie Jane Quilt at a Glance
| Project detail | Verified information |
|---|---|
| Pattern name | Katie Jane |
| Designer | Lynne Goldsworthy |
| Original fabric collection | Katie Jane by Makower UK |
| Finished quilt size | 65″ × 65″ (approximately 1.65 m × 1.65 m) |
| Suggested skill level | Confident beginner to intermediate |
| Main techniques | Dresden blade piecing, strip piecing, appliqué, accurate quarter-inch seams, quilt assembly, binding |
| Dresden units | 12 full Dresden blocks and 12 half Dresden blocks |
| Dresden blades | 216 total |
| Blade arrangement | 12 blades in each full Dresden and 6 in each half Dresden |
| Chain units | 13 full blocks, 8 half blocks, and 4 quarter blocks |
| Overall layout | Seven rows of seven units |
| Original quilting idea | Diagonal crosshatching approximately 2″ apart |
The finished quilt is a generous throw or square bed topper. Although the blocks repeat, this is not a quick one-afternoon project. The number of blades, the appliqué, and the different edge units make it most enjoyable when the work is divided into batches.
What Makes This Dresden Plate Quilt Different?
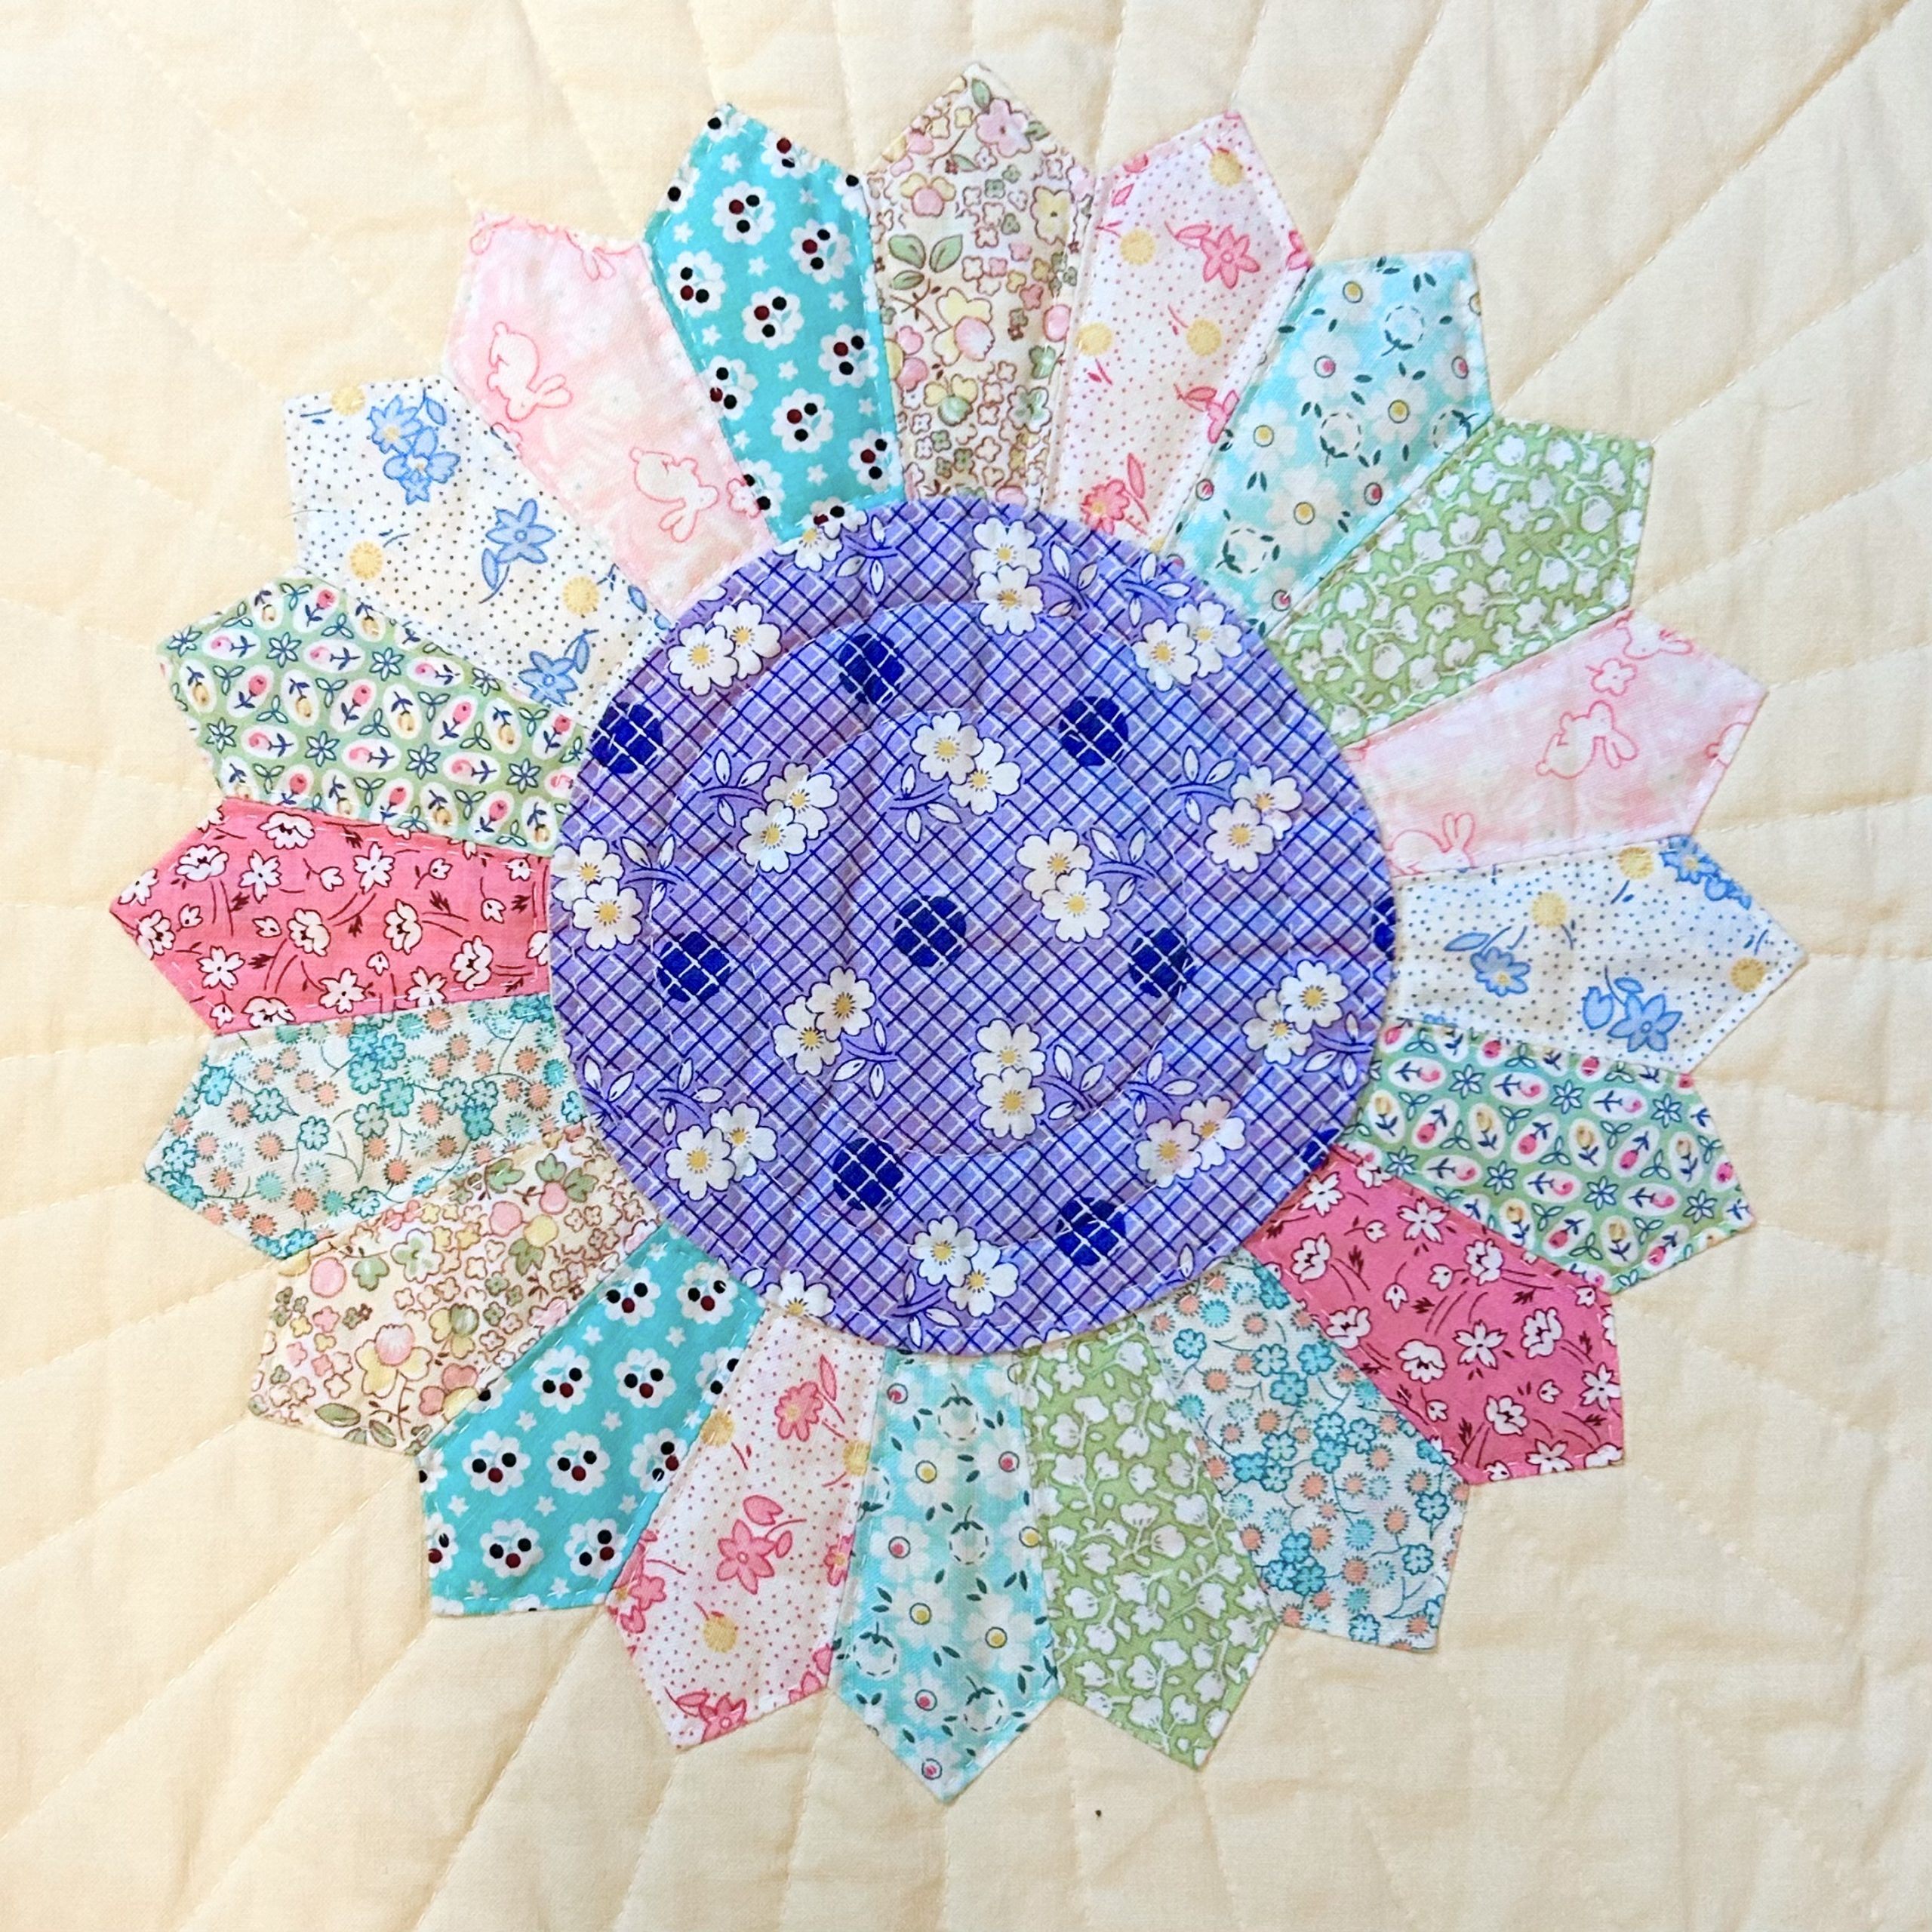
A classic Dresden Plate is usually built from wedge-shaped pieces called blades, petals, or leaves. The blades are joined in a ring, placed on a background, and finished with an appliquéd center circle. Katie Jane uses that familiar construction, but its setting changes the visual effect.
The full Dresden blocks appear inside the quilt, while half Dresdens reach the outer edges. The chain blocks fill the spaces between them. Narrow printed strips within those chain units connect from block to block and create diagonal paths across the top. From a distance, the quilt reads as a repeating floral lattice. Up close, every blade and small strip provides another opportunity to enjoy the prints.
This relationship between curved-looking flowers and straight pieced chains is the design’s strongest feature. The Dresden shapes provide softness; the chain blocks provide order. If the quilt contained only the florals, the many prints could compete. If it contained only the chain units, the composition would be more rigid. Together, the two block families balance one another.
The pattern also solves the problem of cropped motifs at the perimeter in an intentional way. Half Dresden blocks continue the flower rhythm to the top, bottom, and side edges, while partial chain blocks complete the secondary design at the corners and sides. Those units are part of the planned layout, not leftover fragments.
Is the Katie Jane Pattern Beginner-Friendly?
The individual sewing skills are approachable, but the project rewards organization and consistent seam allowances. A quilter who has completed a few accurately pieced blocks should be comfortable with the pattern after making one test Dresden and one test strip set.
The most important skills are:
- sewing a reliable ¼″ seam;
- handling bias edges without stretching them;
- turning and centering the pointed ends of Dresden blades;
- joining multiple wedges without creating a dome or a ruffled ring;
- appliquéing curved edges by hand or machine;
- strip piecing and subcutting accurately;
- keeping several similar-looking block types labeled;
- assembling long rows without losing the intended orientation.
Newer quilters do not need to master all these skills before starting. A small sample is more useful than waiting for perfect confidence. Cut enough scrap fabric for a few blades, test the fold-and-turn method, join them, and check how the unit lies. Then test the appliqué method on a separate background square. These samples reveal whether the machine’s quarter-inch setting, thread, needle, stabilizer, and pressing method work together.
The project becomes frustrating mainly when all 216 blades are cut and sewn before the first unit is checked. A test block allows corrections while they are still inexpensive.
Understanding the Original Fabric Plan
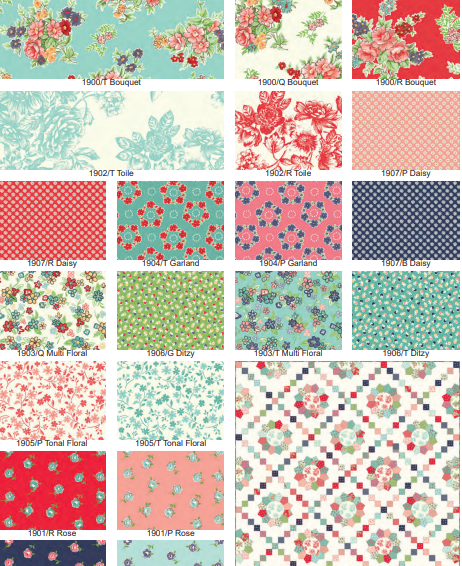
The published quilt uses the Katie Jane collection by Makower UK, a group of florals and coordinating small-scale prints. The pattern distributes those fabrics across both the Dresden blades and the chain blocks, giving the quilt a controlled scrappy appearance.
The original requirements call for a broad group of fat quarters, several fat eighths, a light background, separate binding and backing fabrics, batting, and thread. The background is especially important: it surrounds the appliquéd shapes, forms much of the chain blocks, and gives the eye a place to rest.
Because Katie Jane is an older collection, finding every original print is unnecessary. This design is an excellent candidate for substitution as long as the replacement group preserves the original value structure.

Before Cutting: Make a Project Map
Katie Jane contains full, half, and quarter units, so labeling is more than a convenience. It protects the layout.
Create separate containers or labeled stacks for:
- full Dresden blades;
- half Dresden blades;
- Dresden center circles and half circles;
- full chain units;
- half chain units;
- quarter chain units;
- background squares and rectangles;
- binding and backing.
Keep a printed layout nearby, but do not mark or republish the designer’s chart online. A private working copy can be covered with a sheet protector and checked with a dry-erase marker as each unit is completed.
Prewashing is optional for high-quality quilting cotton, but consistency matters. If some fabrics are prewashed and others are not, shrinkage and texture may differ. When using older stash fabrics or combining manufacturers, washing everything can reveal unstable dyes and remove storage dust. After washing, press the fabric without pulling it off grain.
If you choose not to prewash, test saturated reds, blues, and dark greens for color transfer. A white scrap dampened with hot water is a simple first check. Follow the fabric manufacturer’s care guidance when available.
Cutting Dresden Blades Accurately
Wedge shapes often include long bias edges. Those edges can stretch, so handle them with more care than straight-of-grain rectangles.
Cut with a sharp rotary blade and use enough pressure to complete the cut once. Repeated passes can nudge the template. If using a paper template, transfer it to template plastic so all 216 blades are consistent. Place fine-grit adhesive dots or a small amount of removable grip material on the underside if the template slides.
Stack-cut only as many layers as you can control. Two to four layers are usually safer than a tall stack, especially with a small wedge. After each batch, compare a blade with the master template. A tiny cutting drift repeated hundreds of times can affect every Dresden unit.
Preserve the intended print variety while cutting. One simple method is to make one stack per fabric, then deal blades into groups as though dealing cards. Review each group before sewing so the same print is not accidentally repeated side by side unless that repetition is part of the plan.
How the Pointed Dresden Blades Are Formed
The Katie Jane blades use a familiar pointed-top Dresden method. The wide end of each wedge is folded with right sides together, stitched across, turned, and pressed to form the point. The blades are then joined along their long sides.
Several small habits improve the result:
Start and stop cleanly
Use a short stitch length that secures the seam without perforating the fabric. A leader-and-ender scrap helps prevent the machine from pulling the narrow beginning of the seam into the needle plate.
Trim only when instructed
Excess bulk at a point can make turning difficult, but aggressive trimming may weaken the seam. Follow the pattern and preserve enough seam allowance for strength. If a point is bulky, grade the allowance carefully rather than cutting close to the stitches.
Center the seam before pressing
After turning the top, use a blunt point turner to shape the tip gently. Align the seam with the center of the wedge and finger-press first. Then press with the iron. If the seam rolls to one side, the final points will appear to lean around the ring.
Use the iron as a press, not a broom
Lift and lower the iron rather than sliding it along the bias sides. Steam can help set a stubborn seam, but too much steam combined with side-to-side movement can distort the wedge.
Inspect every batch
Place completed blades on top of the master template. Check the point position, overall width, and side edges. Correct the technique before continuing if the first group begins to vary.
Joining Blades Without Ripples or Dishes
A full Katie Jane Dresden uses 12 blades; a half Dresden uses 6. The quality of each quarter-inch seam determines whether the assembly lies flat.
Join blades first in pairs, then combine the pairs into larger groups. This batch approach is easier to control than continually adding one blade to a growing ring. Match the upper points and lower edges consistently. A small mismatch near the outer point is visible; a mismatch at the center may be covered by the appliquéd circle, but it can still change the ring’s geometry.
After joining a small group, place it on a flat surface without stretching it.
- If the unit begins to form a bowl, the combined seam allowances may be too wide, or the wedges may be too narrow.
- If it waves or ruffles, the seams may be too scant, the blades may be too wide, or the bias edges may have stretched.
- If the points spiral in one direction, the folded top seams may not be centered.
Do not try to press a serious geometry problem into submission. Measure the seam allowance and compare the blades with the template. It is quicker to correct a few seams than to appliqué a distorted plate and discover puckers later.
Press the joining seams in the direction recommended by the pattern or use a consistent alternative that minimizes bulk. If pressing to one side, consider alternating direction in adjacent seams where possible. If pressing open, reduce stitch length slightly so the seam remains secure. Whichever method you choose, use it consistently across all units.

Choosing an Appliqué Method
The Dresden units and their centers must be secured to background pieces. The PDF accommodates different approaches by providing cutting lines suited to raw-edge work and to turned-edge appliqué with seam allowance.
Raw-edge machine appliqué
Raw-edge appliqué is usually the fastest option. A lightweight fusible web holds the shape while a narrow zigzag, blanket stitch, or straight stitch secures the edge.
Advantages include speed, easy positioning, and a crisp result. The tradeoff is that the exposed edge may soften or fray slightly with washing, depending on the stitch and fusible product. Test the combination on scraps; a stiff web applied to every blade can make the quilt top less flexible.
Turned-edge machine appliqué
For a clean traditional edge without hand stitching, turn the allowance under using a prepared-edge method, fabric glue, or another appliqué technique, then sew close to the fold with matching or decorative thread.
This method creates a polished finish but requires patient preparation around the center circles. Use the correct template line that includes the chosen turn-under allowance.
Hand appliqué
Needle-turn appliqué produces a soft edge and nearly invisible stitches. It is portable and does not require fusible products. It is also slower, particularly across 24 Dresden units and their centers.
A hybrid approach is perfectly reasonable: machine-appliqué the Dresden blades and hand-appliqué the circles, or use turned edges for the large shapes and raw edges for the centers. What matters is that the technique is tested and applied consistently.
Centering the Dresden Units
A technically neat Dresden can still look wrong if it is noticeably off-center. Fold the background square or rectangle lightly in half both ways and finger-press just enough to identify the center. Mark the center of the Dresden unit as well.
Place the full ring on its background and compare the distance from several outer points to the background edges. For half units, align the straight edge exactly as the designer’s diagram shows because that edge must later enter a seam. The half circle at the center also needs the correct alignment so it does not become clipped or float away from the edge.
Secure the unit from the center outward. If using glue, apply small dots within the seam area rather than saturating the fabric. If using pins, keep them away from the machine’s stitching path and avoid distorting the bias edges.
Appliqué slowly around each point. Stop with the needle down to pivot, especially with a blanket or zigzag stitch. On inside valleys, take an extra anchoring stitch if needed. Consistent thread tension matters more than speed.
Building the Chain Blocks
The chain units are strip-pieced: long background and print strips are sewn into sets, then subcut and rearranged into full, half, and quarter blocks. This is efficient, but inaccurate strip width or seam allowance repeats across every subunit cut from the set.
Before making all the sets:
- Sew one representative strip set.
- Press it using the planned direction.
- Measure its width in several places.
- Make a test subcut.
- Confirm that the pieces form the expected block size.
If the test is too narrow, check both seam allowance and pressing. A seam that is only slightly too wide can remove noticeable width when repeated. If the strip set bows, the strips may have been stretched, the feed may have been uneven, or pressing may have pushed the set into a curve.
To prevent bowing, alternate the direction in which long seams are sewn when practical. Match strip centers and ends before sewing, then allow the feed dogs to move the layers rather than pulling from behind the machine.
When subcutting, square one end of the strip set, cut the required units, and re-square periodically. Do not rely on the original fabric edge after several cuts. Place finished subunits in labeled groups immediately; the full, half, and quarter versions have distinct positions in the quilt.
Planning the Seven-by-Seven Layout
The quilt is assembled in seven rows of seven units, but the rows do not all contain the same combination. Some include full Dresden blocks and full chain blocks. Others include half Dresden or partial chain units at the edges. The exact arrangement is what keeps the chain continuous and the flowers balanced.
Use the designer’s layout diagram as the authority. Before sewing:
- clear enough floor, table, or design-wall space for the entire top;
- place every unit in position;
- check that the print chains connect across block boundaries;
- confirm that the half Dresden units face inward as shown;
- photograph the complete layout;
- label rows from top to bottom and mark the left edge of each row.
Stack each row in sewing order. A numbered pin, removable label, or small paper note can prevent a unit from rotating on the trip to the machine.
Sew units into rows, then compare the row with the reference photo before joining the next one. Press adjacent row seams in opposite directions when the construction permits nesting. Otherwise, pin carefully at intersections and press open to reduce bulk.
Measure the top after a few rows. If one row is longer, identify whether a block is oversized or whether vertical seams have become scant. Ease only very small differences. Large differences signal an earlier accuracy problem that should be corrected.
Accuracy Checkpoints That Save Time
This quilt benefits from planned inspections. Add these checkpoints to the project:
After the first blade
Compare it with the template. Verify the point and the centered top seam.
After the first six blades are joined
Check whether the half unit lies flat and whether its ends align as the diagram requires.
After the first full Dresden
Place it on the background without forcing it. Confirm that the center opening will be covered by the specified circle.
After the first appliqué sample
Inspect the back for tension problems, tunneling, stiffness, and puckers. Wash the sample if the finished quilt will be washed often.
After the first chain strip set
Measure the total width and make one test subcut.
After the first full chain block
Verify its unfinished size and the position of the print path.
Before joining rows
Photograph and audit the full layout. Rotation errors are easier to fix while blocks are separate.
These pauses feel slow, but they reduce unpicking and protect the project’s materials.
Troubleshooting Common Problems
The Dresden ring forms a bowl
First check that the template printed at 100%. Then measure the long joining seams. Seams that are too wide make the inner circumference too small. Correct the quarter-inch setting and resew the affected seams. Avoid stretching the outer edge in an attempt to flatten the ring.
The Dresden ring looks wavy
Confirm that the seam allowance is not too scant and that the blades match the template. Bias edges may also have stretched during cutting, chain piecing, or pressing. Let the unit relax on a flat surface before diagnosing it; then correct seams rather than shrinking the ring aggressively with steam.
The outer points are uneven
The seam across each folded blade may not be centered after turning, or the blade-to-blade joins may start at inconsistent positions. Make a paper or acrylic alignment guide for the first pressing step and compare points before joining blades.
The center circle does not cover the opening
Check that the right template line was used for the selected appliqué method. Also confirm the printer scale. Do not stretch a too-small circle. Recut the center at the correct size or choose a deliberately larger circle that covers the opening evenly.
The background puckers during appliqué
Reduce top-thread tension if appropriate, use stabilizer, and avoid pulling the block as it moves. Dense zigzag settings can draw the edge inward. A slightly longer stitch or narrower width may produce a smoother line. Always test on a layered scrap.
Strip sets curve after pressing
Use a lighter touch, press rather than slide, and alternate sewing directions on long seams. If one strip was cut off grain, replace it before multiplying the problem across several blocks.
Chain lines do not meet between blocks
Verify block size and orientation first. If sizes are correct, pin at the printed-chain intersections before sewing the block seam. Small differences can sometimes be distributed; a rotated unit must be corrected.
The final top is not square
Measure both diagonals and several widths before adding borders or quilting. Check for a single stretched row or an oversized block. Correct construction issues where possible instead of trimming away Dresden points or narrowing edge units.
Quilting Ideas for Katie Jane
The original sample was finished with diagonal crosshatch lines about two inches apart. That choice complements the diagonal movement in the chain blocks and gives the appliqué even support without competing with the prints.
Other suitable approaches include:
- a gentle allover meander for a soft, usable throw;
- diagonal lines in both directions for a denser grid;
- straight-line quilting through the chain blocks with echoed curves around the Dresdens;
- free-motion petals or loops in the open background areas;
- outline quilting just outside the Dresden blades, followed by a restrained background fill.
Avoid leaving large appliquéd areas completely unquilted unless the batting permits that spacing. The quilt should be supported consistently across pieced and appliquéd sections.
If quilting on a domestic machine, stabilize the quilt first by sewing the main vertical and horizontal divisions or a widely spaced grid. Then return to add detail. Roll or accordion-fold the excess and support the quilt’s weight so it does not drag against the needle.
Choose thread after testing it across both light background and multicolored prints. A soft cream, light gray, or other quiet neutral often blends well. A contrasting thread can emphasize the quilting but will also reveal every wobble around the Dresden points.
Backing, Basting, and Binding
The published plan uses a backing and batting approximately 73 inches square, providing working margin around the 65-inch top. Longarm quilters may request a particular amount of extra backing and batting on every side, so ask before piecing the back.
A simple two-panel backing is efficient, but a scrappy pieced backing can use remaining Katie Jane-style prints. If piecing the back, avoid placing a bulky seam exactly where the quilt will be folded most often. Press backing seams open and use a slightly shorter stitch length than for ordinary garment sewing.
Baste on a clean, flat surface and smooth from the center outward. The appliqué introduces small changes in thickness, so inspect for folds near Dresden centers and blade edges. Pin, spray, or thread baste according to the chosen quilting method and product instructions.
The pattern finishes with double-fold binding and mitered corners. Seven strips are specified in the original cutting plan. Before joining the binding, measure the actual quilt perimeter and confirm that the prepared length includes enough extra for joining the ends. Attach the binding without pulling it tight; tension can make a square quilt curl at the edges.
Ways to Personalize the Quilt Without Changing Its Structure
The existing block and row plan already has strong movement, so fabric is the safest place to personalize it.
Modern high contrast
Use bright solids or graphic prints against charcoal, navy, or white. Keep the centers consistent to give the varied blades a visual anchor.
Vintage floral
Choose reproduction florals, dusty pinks, faded blues, and warm cream. Mix in tiny checks or dots so the floral motifs do not merge.
Controlled rainbow
Arrange blades by color family inside each Dresden, then repeat the color order across the top. Use a low-volume background and a single dark print for the chain paths.
Scrap-led version
Pull from the scrap bin but impose two rules: every print must contrast with the background, and each Dresden must contain a balanced range of light, medium, and dark fabrics. Repeating a few prints across the quilt will make the scraps look intentional.
Two-color interpretation
Use one color family in many values against a consistent neutral. The narrow chain paths should use the strongest values so they remain visible from across the room.
Changing the wedge angle, number of blades, or block size is a different kind of redesign and affects every template and partial unit. For a first version, preserve the pattern’s geometry and explore color instead.
Frequently Asked Questions
Is this a traditional Dresden Plate pattern?
It uses the recognizable pointed Dresden blade and appliquéd center, but the complete quilt is Lynne Goldsworthy’s Katie Jane design. Its combination of full and half Dresden units with full, half, and quarter chain blocks is specific to this pattern.
What is the finished size?
The published finished size is 65″ × 65″, approximately 1.65 m square.
How many Dresden blades are required?
The pattern uses 216 blades. Twelve form each full Dresden, and six form each half Dresden.
Can I use scraps instead of the Katie Jane collection?
Yes. The design suits a controlled scrappy fabric pull. Preserve clear contrast between the prints and background, include a mixture of print scales, and use the official requirements to confirm total yardage.
Do I need a specialty Dresden ruler?
No specialty ruler is required if you use the supplied template accurately. If you prefer a commercial ruler, compare its angle and dimensions with the pattern template before cutting. A ruler that is merely similar can change the size or prevent 12 blades from forming a flat circle.
Can the appliqué be done by machine?
Yes. The pattern accommodates raw-edge and turned-edge approaches, and the shapes can be secured by machine or hand. Choose the correct circle-template line for the intended edge treatment.
Why must the template page be printed at 100%?
Scaling changes both the blade geometry and circle sizes. Measure the included one-inch test square before cutting any fabric.
Is this a quick weekend quilt?
Probably not for most makers. The repeated blade preparation, 24 Dresden units, multiple chain-unit types, appliqué, and seven-row layout make it a substantial project. Batch sewing makes the work manageable.
Can I make the quilt larger?
Adding another repeat is not as simple as attaching one extra block because the alternating design and partial edge units must remain coherent. The safest enlargement is to finish the 65-inch top as designed and add thoughtfully proportioned borders, then recalculate backing, batting, and binding.
What should I do if the original Katie Jane fabrics are unavailable?
Substitute a coordinated fat-quarter bundle or build a collection from stash. Use the fabric roles—not exact SKU numbers—as the guide: assorted contrasting prints, a restful background, clear accents, binding, and backing.
Get the Authorized Katie Jane Pattern
The templates, exact cutting chart, construction figures, and row diagram belong in the designer’s pattern. Download the Katie Jane Quilt Pattern from a source that identifies the designer and manufacturer:
Get the free Katie Jane pattern from Keepsake Quilting
Keepsake Quilting lists the download as an Andover Fabrics pattern by Lynne Goldsworthy. You can also browse the official Makower UK free-pattern library for currently available Makower projects.
Save the pattern for personal project reference, print its template page at 100%, and follow any terms provided by the publisher or download source. A free download is still copyrighted; “free” describes its price, not unrestricted permission to copy, host, alter, or redistribute the file.
Pattern Credit
- Pattern: Katie Jane
- Designer: Lynne Goldsworthy
- Original collection: Katie Jane by Makower UK
- Manufacturer/publisher: Makower UK / Andover Fabrics
- Finished size: 65″ × 65″ (approximately 1.65 m × 1.65 m)
- Reference date shown in the PDF: January 11, 2018
This independent companion article was written by Easy Quilting Patterns to help readers prepare for the project, choose fabrics, select an appliqué method, and troubleshoot construction. Easy Quilting Patterns did not design the Katie Jane quilt and does not claim ownership of the pattern, templates, diagrams, or original collection artwork.
Final Thoughts
Katie Jane succeeds because it gives the Dresden Plate room to be both decorative and structural. The full and half flowers create the main rhythm, while the chain units carry the eye diagonally across the quilt. That layered design makes the top look complex, even though the work can be divided into repeatable batches.
Accuracy matters, but the project does not require hurried perfection. Verify the printer scale, make one sample blade, test one Dresden unit, and measure the first chain set. Once those foundations are reliable, repeat the process in organized groups. The reward is a substantial floral quilt that respects a traditional block while using it in a distinctive, energetic layout.