
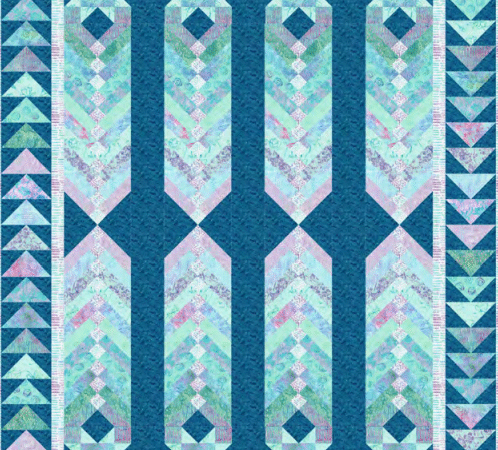
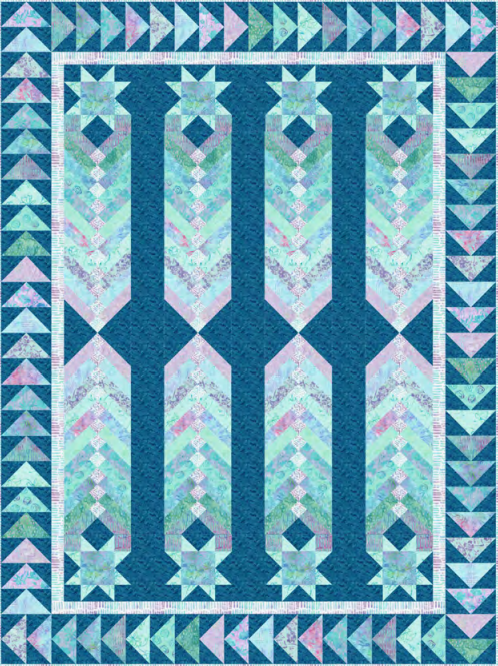
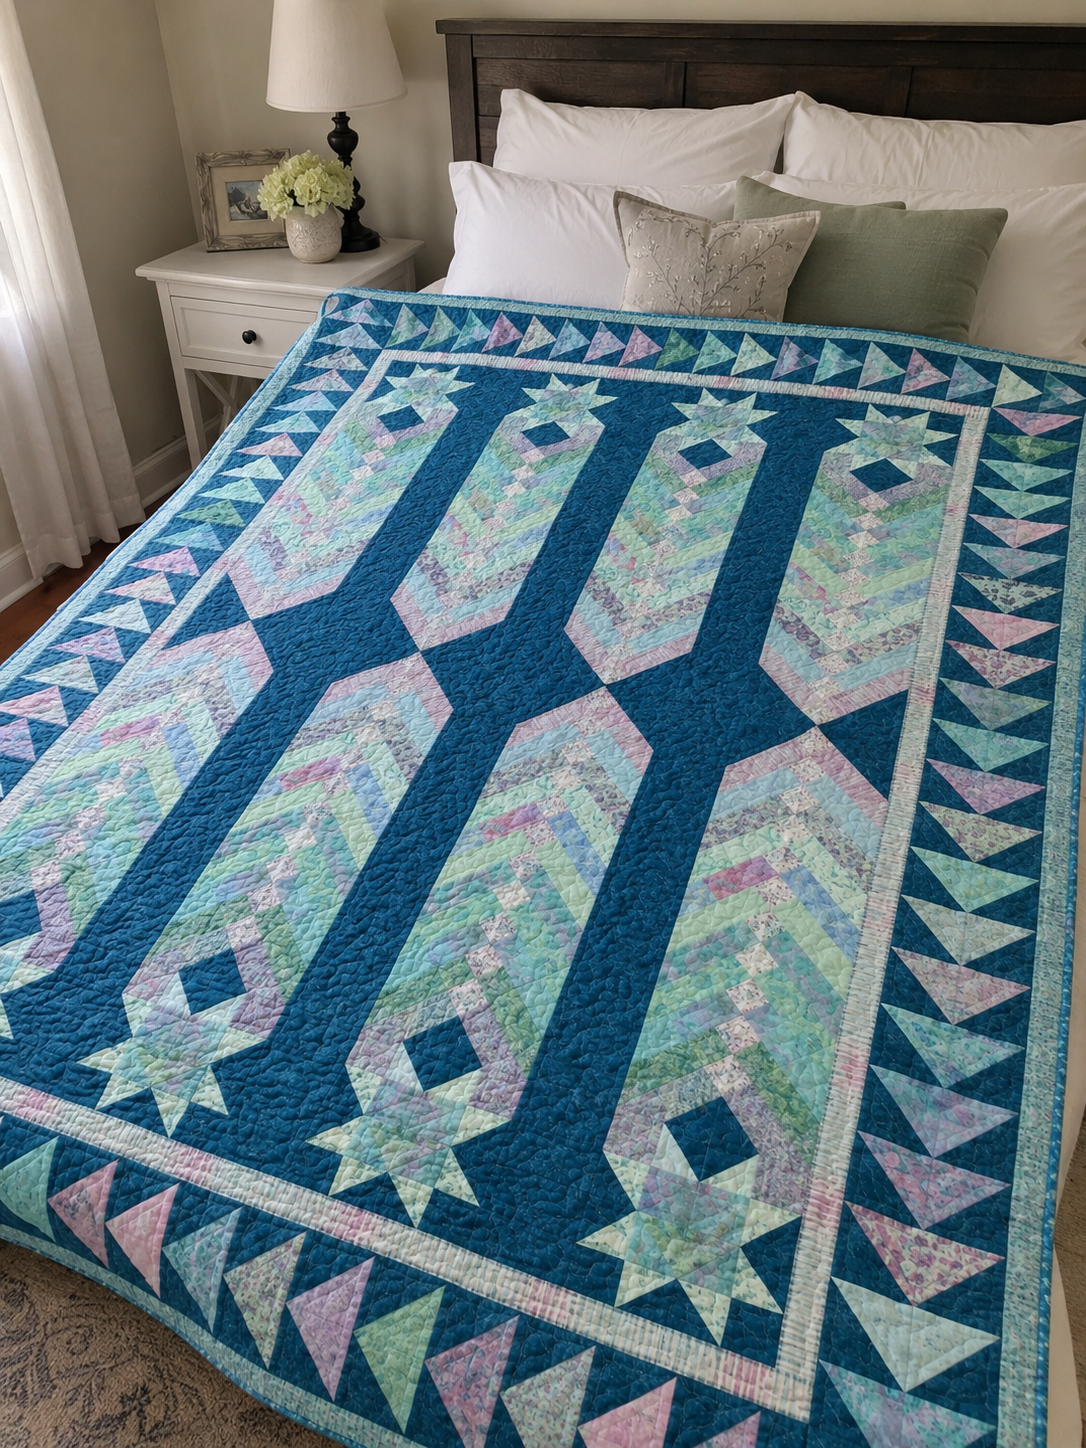
The Flying Braid quilt is a striking intermediate project built from four long braid columns, eight star blocks, and a border of 96 flying geese. The design measures approximately 58″ × 79″ and features the Breeze batik collection by Baliscapes. Windham Fabrics lists Christine Stainbrook as the pattern designer, while the official PDF credits Project House 360; Christine Stainbrook is associated with Project House 360, so both credits belong with the project.
Although this quilt is sometimes described online as the “Breeze Quilt,” its official name is Flying Braid. Breeze is the featured fabric collection, not the pattern title. That distinction matters when searching for the original instructions or checking for updates.
This guide is an independent companion to the free pattern. It explains the design, fabric roles, accuracy checks, and potential trouble spots without replacing the official cutting chart and assembly diagrams.
Flying Braid Quilt at a Glance
| Detail | Official information |
|---|---|
| Pattern name | Flying Braid |
| Featured collection | Breeze by Baliscapes |
| Designer credit | Christine Stainbrook / Project House 360 |
| Publisher | Windham Fabrics |
| Finished size | Approximately 58″ × 79″ |
| Skill level | Intermediate |
| Main components | 4 braid columns, 8 star blocks, 96 flying geese |
| Backing | 5 yards |
| Batting | 66″ × 87″ |
| Binding | 8 strips cut 2½″ × WOF from Fabric N |
The design is best suited to a quilter who can maintain a consistent quarter-inch seam and is comfortable working with bias triangles. None of the individual methods is unusually difficult, but the project contains many repeated pieces. Careful labeling is more important than speed.
Download the Free Pattern from Windham Fabrics
Windham Fabrics currently offers the pattern as a free download and states on the project page that it has no updates. Use the official page so you can see any future revision notice before downloading:
Download the official Flying Braid pattern from Windham Fabrics
The PDF includes the complete cutting chart, braid diagrams, star-block construction, center assembly, border order, and technique sheet. Keep it beside your machine because the position and direction of the border geese are easier to understand from the publisher’s full-page assembly diagram.
Why the Quilt Has So Much Movement
The center is organized into four vertical braids separated by dark background strips. Each braid appears to meet its mirror image near the middle, creating a long diamond-like shape. Star blocks cap the top and bottom of each column, while a narrow light border separates the center from the outer ring of flying geese.
The original Breeze palette combines aqua, mint, lavender, pale blue, and deep sapphire. Most of the batiks are close in value, so they blend smoothly inside the braids. The dark background supplies the contrast that makes every column visible. A pale, lightly patterned Fabric N creates a small visual pause before the geese border.
This balance is the key to a successful substitution. If all the fabrics are light, the braids and stars will disappear. If every braid strip has very strong contrast, the center may look fragmented rather than flowing.
Original Fabric Requirements
The official pattern uses fabrics A through N. Consult the PDF before cutting, but this summary helps with shopping and substitutions.
| Fabric | Original SKU | Amount | Main visual role |
|---|---|---|---|
| A | 2635Q-X | ¾ yard | First braid color, star corners, and geese |
| B | 100Q-1045 white or 100Q-1601 Moroccan blue | 2¾ yards | Main background, triangles, separators, and geese background |
| C | 2649Q-X | ⅝ yard | Braid and geese color |
| D | 2636Q-X | ⅔ yard | Braid, star center, geese, and original backing option |
| E-H | 2648Q-X, 2637Q-X, 2647Q-X, 2638Q-X | ⅝ yard each | Assorted braid and geese colors |
| I | 2646Q-X | ⅔ yard | Braid, star points, and geese |
| J-L | 2639Q-X, 2640Q-X, 2642Q-X | ⅝ yard each | Assorted braid and geese colors |
| M | 2644Q-X | ½ yard | Small squares that form the braid center accents |
| N | 2643Q-X | 1¼ yards | Narrow border and binding |
| Backing | 2636Q-X in the original plan | 5 yards | Quilt back |
| Batting | — | 66″ × 87″ | Middle layer |
WOF means width of fabric. The yardage assumes ordinary quilting-fabric width and the cutting arrangement shown in the official chart. Buy extra for shrinkage, cutting corrections, unusually narrow fabric, or directional motifs.
How to Substitute Fabrics Successfully
The exact Breeze batiks may be difficult to find, but the quilt does not depend on one collection. Preserve the roles instead of matching every SKU.
Choose one dominant background for Fabric B. It must contrast clearly with the braid colors because it fills the spaces between the columns and appears around the star points. The official PDF shows two versions: a light Diamond colorway and a dark Sapphire colorway. This makes value more important than a specific color.
Select eleven coordinated prints for A and C-L. A gradual palette works especially well: sea glass, turquoise, lilac, green, and blue can flow from one strip to the next. Small-scale batiks and tonal prints are easier to use than fabrics with obvious animals, text, or one-way motifs because the strips turn in different directions.
Fabric M should be visible as the small center accent running down each braid. Fabric N should contrast gently with both the center and outer geese border. For a simplified version, the assorted fabrics can come from a coordinated fat-quarter bundle, but compare the official cutting sizes with the usable dimensions of each fat quarter before buying.
Organize Before Cutting
This pattern uses alphabetical order as part of the design. Mixing two letters can change the braid sequence and the color progression around the border.
Prepare one labeled bag or tray for each fabric. Add a description such as “A – blue stacks” rather than relying only on the letter. Separate pieces for the braids, star blocks, and flying geese even when they come from the same fabric.
For the 96 border geese, use a divided box or small envelopes. Label them A and C through L, then keep the additional quick-corner units separate until the PDF calls for them. Do not stack all the finished geese together; the final border uses specific sequences and directions.
Because several large squares are cut twice diagonally for the braid ends, handle those bias edges carefully. Leave the pieces on a small cutting mat or tray and avoid pulling them while moving to the machine.
Test the Quarter-Inch Seam
The official pattern includes a seam-allowance test for good reason. Four long braids and rows of flying geese magnify small inaccuracies.
Sew three 1½″-wide scrap rectangles together along their long edges and press away from the center. The center strip should measure exactly 1″ wide. If it is narrower, the seam allowance is too wide; if it is wider, the seam is too narrow. Adjust the needle position and repeat the test using the same thread and presser foot planned for the quilt.
Do not wait until a 48½″ braid is complete to check accuracy. Measure after the first few additions, after joining braid halves, and before trimming.
Constructing the Four Braids
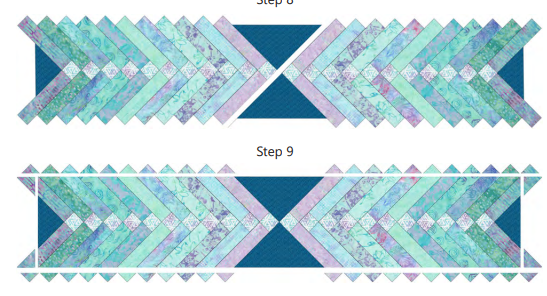
Each braid begins with a large background triangle and receives narrow rectangles alternately from the right and left. Small Fabric M squares create the pale diamonds along the center line. Fabrics A and C-L are added in a defined sequence, producing a controlled color flow rather than a random scrap braid.
The lower edges will look uneven during construction. That is expected. Align the reference edges shown in the official diagrams and resist trimming after every addition. Repeated trimming can remove the seam allowance needed for the final shape.
After the smaller braid sections are completed, the pattern joins them with additional large triangles. Each full braid is then centered and trimmed to 8½″ × 48½″. Make four.
Before trimming, mark the vertical and horizontal center of the braid. Position the ruler so the center accents remain straight and the two halves look balanced. Confirm that the ruler leaves a quarter-inch allowance beyond any points that will be sewn into the neighboring strip.
Important Fabric-Letter Check in Step 1
The official cutting chart places the 9¼″ squares under Fabric B, but Step 1 refers to 9¼″ squares from Fabric A. Fabric A’s cutting list does not include that size. This appears to be an internal label inconsistency, but this guide cannot issue an official correction.
Compare the cutting chart, Step 8, and the diagrams before cutting those large squares. If any doubt remains, contact Windham Fabrics through the official project page. Do not cut extra 9¼″ squares from Fabric A solely because of the Step 1 wording.
Making the Eight Star Blocks
Each star block uses four small flying geese around a square center, plus corner squares that complete an 8½″ block. The official technique sheet uses the no-waste method to make four matching geese at a time.
Draw thin diagonal lines on the wrong side of the smaller squares. Sew with a fine thread and press without stretching the bias edges. Trim each star goose to the size stated in the pattern before assembling the block. When trimming, preserve the quarter inch above the point.
Arrange all nine sections before sewing. The geese must point away from the center square to form the star. Sew the block in rows, nest or pin the intersections, and square each finished block to 8½″. Make eight blocks total: four for the top of the braid columns and four for the bottom.
If a point is repeatedly cut off, check the unit before joining. The tip of the triangle should sit a quarter inch from the raw edge. If it is already at the edge, trimming or piecing has removed the seam allowance.
Assemble the Quilt Center
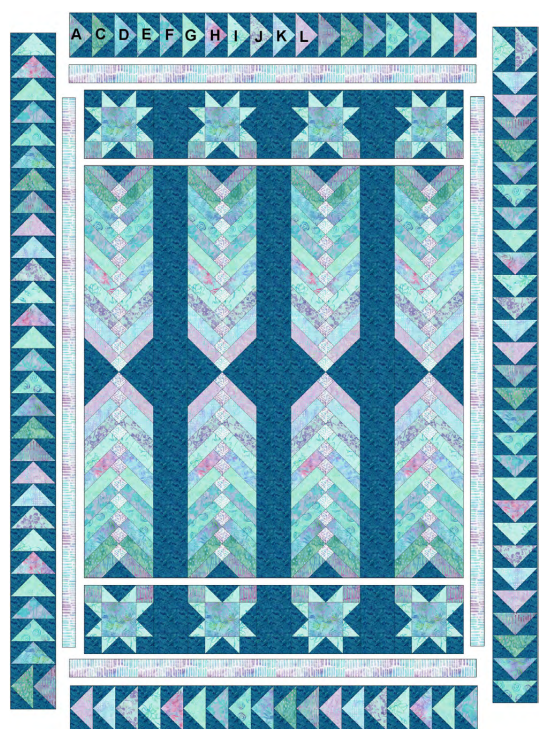
The four trimmed braids alternate with three long background strips. Star blocks and background rectangles form the rows across the top and bottom. Use the assembly diagram to confirm which way each braid points before sewing long seams.
Pin the ends, center, and quarter points of every long seam. If one braid is slightly longer, distribute the difference rather than stretching one end. Pressing long seams toward the background usually reduces bulk, but a flat result is more important than a rigid rule.
Second Fabric-Letter Check in Step 13
Step 12 prepares three long Fabric B strips. Step 13 then refers to alternating the braid strips with “Fabric A strips.” The assembly diagram shows the long separators in the main background color, and the preceding cutting step identifies them as B.
Treat this as another item to verify against the diagram and with Windham Fabrics if necessary. Retain the public warning because it can prevent readers from cutting or attaching the wrong fabric.
First Border and Flying Geese Border
Fabric N forms a narrow first border around the assembled center. Measure the real quilt center before attaching any long border strip. Pin at the ends and midpoint, then distribute the remaining length evenly so the edge stays flat.
The final border contains 96 assorted flying geese. Most are made with the no-waste method; eight are completed with quick corners. The units are trimmed to the pattern’s specified 3⅛″ × 5¾″ before they are joined.
Keep the fabric groups separate. The border is not random: the PDF gives letter sequences for the top, right, bottom, and left sides. Direction also changes as the geese travel around the quilt. Lay all four rows around the center on a design wall or clean floor and label them before sewing.
For accurate geese:
- shorten the stitch length slightly before sewing across bias grain;
- sew consistently on the marked line or at the prescribed offset;
- press with an up-and-down motion instead of sliding the iron;
- trim from the center point, preserving the top seam allowance; and
- check the first unit from every batch before chain piecing the rest.
Attach the top and bottom rows in the order shown by the publisher, then add the side rows. Check the PDF because the side assemblies include specific units added at their ends.
Backing, Quilting, and Binding
The pattern calls for 5 yards of backing and batting measuring 66″ × 87″. Measure the completed quilt top before preparing either layer. If using a longarm service, ask for its required backing margin; many services want about four extra inches on every side.
The long braid columns are ideal for gentle straight-line quilting or elongated feathers. Stitching in the ditch beside the dark separators emphasizes the vertical structure. In the star rows, echo the points or use a simple continuous curve. The outer geese border can be outlined selectively or quilted with an all-over design.
Choose thread that blends across the light batiks and dark background. A pale blue-gray often works for the Breeze palette, but test it on both extremes. Dense quilting may reduce the finished measurements slightly.
The binding uses eight Fabric N strips cut 2½″ × WOF. Join the strips, press them in half lengthwise, and calculate the actual perimeter before trimming away any excess. Fabric N repeats the narrow inner border and gives the design a coordinated finish.
Common Problems and Solutions
The braid curves instead of lying straight
Check the quarter-inch seam and pressing pressure. Bias triangles can stretch easily. Support the braid on the ironing board and press each addition without pulling.
The center accents do not form a straight line
Align seams when adding each new strip and check the braid center after every few pieces. Small Fabric M squares should meet consistently. Correct a drifting section before adding more strips.
A trimmed braid loses its outer points
Center the ruler before cutting and preserve the required seam allowance. If the braid is too narrow, review seam width rather than forcing an 8½″ trim.
Star points are blunt
The geese may have been trimmed without leaving a quarter inch above the point. Make one test unit, mark the future seam line, and confirm the point remains below it.
The geese border does not fit
Measure every unit and seam. Do not stretch the quilt center. If the difference is small, distribute it evenly; if it is large, locate an incorrect unit size or seam allowance.
The color order is confusing
Return to the official assembly diagram. Arrange the geese by fabric letter, build one border at a time, and attach a paper label showing position and direction.
Practical Construction Checklist
Before cutting:
- Download the current PDF from Windham Fabrics.
- Read all eight pages and note the two fabric-letter inconsistencies.
- Confirm the Diamond or Sapphire background choice.
- Label fabrics A-N and separate their construction roles.
Before center assembly:
- Four braids measure 8½″ × 48½″.
- Eight star blocks measure 8½″ square.
- The three long separators match the selected background.
- All columns are oriented like the official diagram.
Before finishing:
- There are 96 border geese in labeled groups.
- All four border rows have been auditioned around the center.
- The top lies flat and is close to 58″ × 79″ when complete.
- Backing and batting provide enough margin for the chosen quilting method.
Frequently Asked Questions
Is Breeze the official pattern name?
No. The official Windham Fabrics pattern is named Flying Braid. Breeze is the Baliscapes fabric collection featured in the sample quilt.
Who designed Flying Braid?
The current Windham product page credits Christine Stainbrook. The PDF cover says “designed by Project House 360.” Crediting it as a design by Christine Stainbrook of Project House 360 reflects both official references.
Is the PDF free?
Yes. Windham Fabrics currently labels it a free PDF pattern and provides the download on the official project page.
Is this a beginner quilt?
The publisher rates it intermediate. A confident beginner could attempt it after practicing quarter-inch seams, bias-edge handling, no-waste flying geese, and accurate trimming.
Can I use scraps for the braids?
Yes, provided each scrap is large enough for the official cut and the fabrics create a controlled sequence. Maintain a strong contrast with the background and label every group.
Are there errors in the pattern?
The official page currently says the pattern has no updates. However, the PDF contains two fabric-letter references that do not align with the preceding cutting steps. Review the chart and diagrams and contact Windham before cutting if uncertain.
Can I make the quilt larger?
Additional borders can increase the size, but first complete and measure the original top. Recalculate backing, batting, binding, and quilting needs. A plain border between the geese and a wider outer border can preserve the original design.
Final Thoughts
Flying Braid is memorable because it combines three familiar ideas in an unusual vertical layout. The braids create long streams of color, the stars anchor every column, and the flying geese turn the movement around the perimeter. The project rewards organization as much as sewing skill.
Work from the official diagrams, test the seam allowance, label every fabric, and verify the two questionable letter references before cutting. Those simple precautions make the repeated construction far more manageable and help the finished quilt remain straight, balanced, and visually clear.
Pattern Credit
Flying Braid features the Breeze batik collection by Baliscapes. The official Windham Fabrics page credits Christine Stainbrook, and the pattern PDF credits Project House 360. The pattern, diagrams, quilt renderings, and fabric artwork belong to their respective creators and publisher.
This article is an independent educational companion and is not affiliated with or endorsed by Windham Fabrics. For the complete cutting chart and official diagrams, visit the Flying Braid pattern page at Windham Fabrics.