
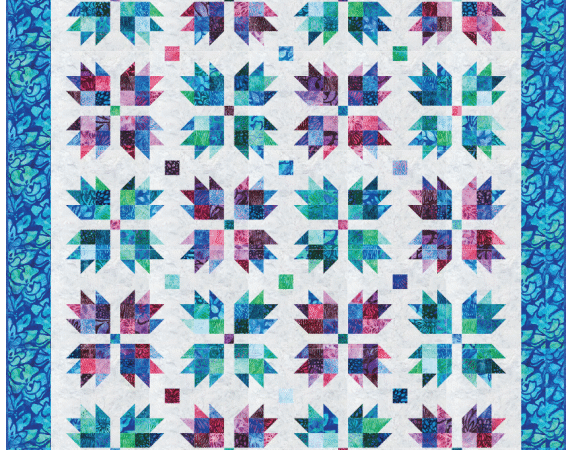
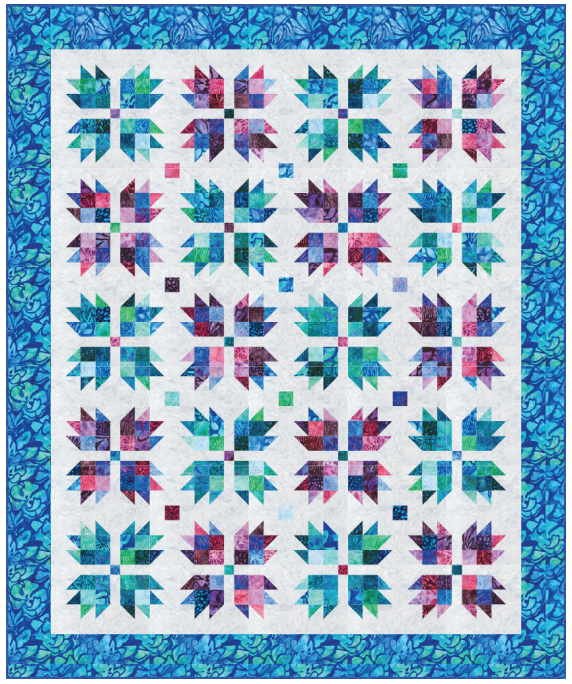
The Bear Paw Roll Up quilt gives a familiar traditional block a colorful precut-friendly update. Designed by Elise Lea for Robert Kaufman, the pattern uses one Roll Up of Garden Style batik strips, a light background, contrasting borders, and a planned mix of warm and cool colors.
The finished quilt measures 56 1/2 × 68 inches, making it a generous throw that can also work as a bed topper or handmade gift. Its construction is based on two-at-a-time half-square triangles, small paw units, larger Bear Paw blocks, sashing, cornerstones, and two borders.
The official PDF contains the complete cutting instructions and assembly diagrams. This companion guide adds fabric-selection help, batch-piecing organization, HST accuracy tips, pressing guidance, troubleshooting, quilting ideas, and a clear explanation of how the 20-block layout is constructed.
Bear Paw Roll Up Quilt at a Glance
- Designer: Elise Lea for Robert Kaufman
- Finished size: 56 1/2 × 68 inches
- Skill level: Confident beginner to intermediate
- Precut: One Roll Up containing forty 2 1/2-inch strips
- Main technique: Two-at-a-time half-square triangles
- Small units: Forty Warm and forty Cool paw units
- Large blocks: Twenty total—ten Warm and ten Cool
- Quilt layout: Four blocks across by five blocks down
- Finishing details: Sashing, cornerstones, inner borders, and outer borders
This is a repetition-heavy project. The individual steps are approachable, but organization and consistent trimming are important because the quilt contains 320 HSTs.
Important Block-Count Correction
The quilt does not require twenty Warm blocks plus twenty Cool blocks. It uses:
- Forty Warm 5-inch paw units, assembled four at a time into ten Warm blocks;
- Forty Cool 5-inch paw units, assembled four at a time into ten Cool blocks;
- Twenty large Bear Paw blocks in total.
Each large block should measure 10 1/2 inches unfinished and finish at 10 inches after being sewn into the quilt. The twenty blocks are arranged in five rows of four.
Materials and Supplies
The featured Garden Style batik version uses:
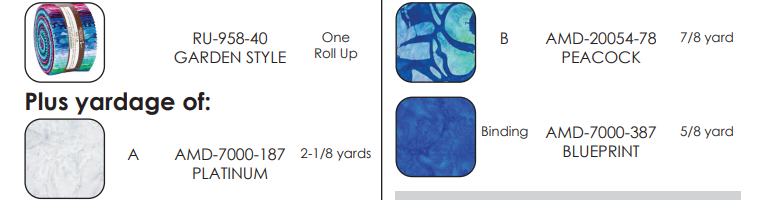
- One Roll Up: RU-958-40 Garden Style
- Fabric A: 2 1/8 yards of AMD-7000-187 Platinum
- Fabric B: 7/8 yard of AMD-20054-78 Peacock
- Binding: 5/8 yard of AMD-7000-387 Blueprint
- Backing: 3 5/8 yards
- Batting: Approximately 64 × 76 inches, or a piece at least several inches larger than the quilt top on every side
You will also need:
- Rotary cutter and cutting mat
- Long acrylic quilting ruler
- Small square ruler for trimming HSTs
- Sewing machine with a reliable 1/4-inch foot
- Fine cotton or polyester piecing thread
- Removable fabric marker
- Pins or quilting clips
- Iron and pressing surface
- Small labels, trays, or resealable bags
- Optional rotating cutting mat
- Optional tailor’s clapper
Fabric requirements in the official pattern assume quilting cotton or batik yardage that is at least 42 inches wide.
Understanding Roll Ups and Jelly Rolls
Robert Kaufman calls its bundle of 2 1/2-inch precut strips a Roll Up. Other manufacturers may call the same general type of precut a jelly roll, strip roll, or design roll.
A substitute bundle should contain forty full-width strips. Before cutting, confirm that:
- Every strip is the full usable width expected by the pattern;
- The bundle includes enough warm and cool colors;
- The strips are truly 2 1/2 inches wide from peak to peak if they have pinked edges;
- The fabrics have similar weight and shrinkage;
- None of the strips contain damage near a fold.
Do not prewash precut strips. Their narrow width and pinked edges can fray or distort in the washing machine. If you substitute yardage, decide whether to prewash all yardage consistently.
Sorting Warm and Cool Fabrics
The original pattern separates the Roll Up into two groups:
- Warm: Reds, pinks, and purples;
- Cool: Blues and greens.
This division creates the alternating rhythm in the finished quilt. The fabrics do not need to be equally divided by exact color, but each group must provide enough pieces for the quantities in the official cutting chart.
When a Color Could Belong to Either Group
Some purples, blue-greens, and yellow-greens can appear warm or cool depending on the surrounding fabrics. Place the entire collection on a table and assign ambiguous strips according to visual balance.
Take a photograph after sorting. If one group looks noticeably darker or more saturated, exchange a few transitional colors. The goal is contrast without making one half of the quilt visually heavier.
Cutting and Organization Strategy
The pattern uses several square and rectangle sizes from both the Roll Up and Fabric A. Cutting everything at once is efficient, but only if the pieces remain labeled.
Create separate containers for:
- Warm HST squares;
- Cool HST squares;
- Warm 2-inch squares;
- Cool 2-inch squares;
- Warm and Cool center squares;
- Fabric A HST squares;
- Fabric A squares for paw units;
- Fabric A rectangles for large blocks;
- Block sashing;
- Quilt sashing and cornerstones;
- Inner and outer borders;
- Binding strips.
Use the official PDF for the exact quantities and subcutting directions. Place a label inside every stack before moving to the next size.
Cutting Pinked Edges Accurately
Precut strips often have zigzag edges. Manufacturers may measure the strip from the outer points, inner valleys, or an average between them. Check the bundle before subcutting and use the same reference on every strip.
Avoid straightening away too much fabric. If a strip is slightly curved, press it gently and align a long section with the ruler rather than trimming repeatedly.
Making 320 Accurate Half-Square Triangles
The quilt uses the two-at-a-time HST method. Each warm or cool print square is paired with a Fabric A square.
Basic HST Workflow
- Place one print square and one Fabric A square right sides together.
- Draw a diagonal line on the wrong side of the lighter square.
- Sew 1/4 inch on both sides of the line.
- Cut directly on the marked line.
- Press each HST toward the darker print.
- Trim every unit to 2 inches square.
The finished quilt requires 160 Warm HSTs and 160 Cool HSTs.
Test Before Chain Piecing
Make one pair first. Press and trim both HSTs to 2 inches. Check that the diagonal seam reaches the corners and that enough fabric remains on all four sides for trimming.
If the units are too small, the seam may be wider than 1/4 inch or the starting squares may have been cut inaccurately. Adjust before sewing the remaining pairs.
Marking Options
A fine mechanical pencil or removable fabric marker produces a consistent line. A specialty diagonal seam guide can eliminate marking, but test it first because the exact offset varies by machine and presser foot.
Mark in batches that can be sewn during one session. Leaving hundreds of marked pieces loose for a long period increases the chance of mixing the Warm and Cool groups.
Chain Piecing
Chain piece one side of each diagonal throughout a manageable batch, then sew the second side. Keep Warm and Cool chains separate.
Do not pull the fabric behind the presser foot. Let the feed dogs move the squares naturally so the diagonal seams remain straight.
Trimming HSTs Efficiently
Trimming is the most repetitive part of this pattern, but it determines whether the paw units finish at the correct size.
To trim each HST:
- Place the ruler’s 45-degree line on the diagonal seam.
- Trim the top and right sides.
- Rotate the unit 180 degrees.
- Align the freshly trimmed edges with the 2-inch marks.
- Confirm the diagonal still follows the 45-degree line.
- Trim the remaining sides.
A rotating cutting mat reduces wrist movement. If using a regular mat, rotate the unit rather than cutting toward your body.
Measure the first unit from every batch. If the diagonal begins shifting, stop and check pressing, seam allowance, and ruler placement.
Building the 5-Inch Paw Units
Each small paw unit is arranged as a three-by-three grid containing four HSTs, four matching 2-inch print squares, and one 2-inch Fabric A square.
The position and rotation of the HSTs create the Bear Paw claws. Use the block diagram in the PDF and place one completed reference unit beside the sewing machine.
Assembly Method
- Arrange the nine pieces in three rows of three.
- Check every HST direction before sewing.
- Join the pieces into rows.
- Press alternate rows in opposite directions.
- Nest the row seams and join the rows.
- Confirm that the unit measures 5 inches square.
Make forty Warm paw units and forty Cool paw units.
Quality-Control Checkpoints
Measure after the first unit, the tenth unit, and at regular intervals afterward. The unit should remain square, with straight edges and visible seam allowances beyond the claw points.
If a unit is slightly oversized, trim only after confirming that it is centered. If it is undersized, inspect the HST measurements and the seams within the three-by-three grid.
Constructing the Large Bear Paw Blocks
Four matching paw units form one large block. Fabric A rectangles separate the paws, and a small warm or cool square completes the center.
The resulting block should measure 10 1/2 inches unfinished. Create:
- Ten blocks using the forty Warm paw units;
- Ten blocks using the forty Cool paw units.
Keep the Paws Rotated Correctly
The four paws should turn around the center rather than point in the same direction. Arrange the complete block on a design board and photograph it before sewing.
Match the Sashing Intersections
Press toward the Fabric A rectangles as directed by the pattern. This helps the center grid lie flat and keeps the sashing visually straight.
When joining the three block rows, pin at both ends and at every important seam intersection. Check the finished block before pressing the final seams.
Planning the 4 × 5 Quilt Layout
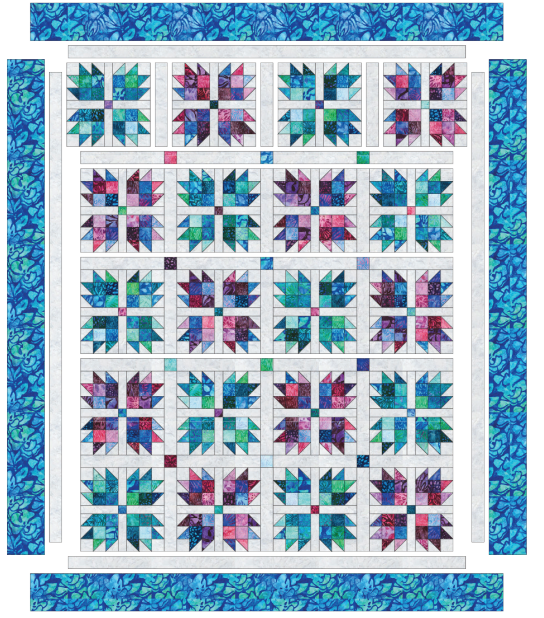
The twenty blocks form four columns and five rows. Alternate Warm and Cool blocks according to the official assembly diagram.
Before sewing:
- Place all twenty blocks on a design wall or clean floor;
- Distribute the darkest prints across the quilt;
- Avoid grouping several similar centers together;
- Check that every paw rotates correctly;
- Photograph the final arrangement;
- Label each row and block position.
A simple label system such as Row 1–Block A through Row 1–Block D will prevent blocks from becoming rearranged during transport.
Sashing and Cornerstones
Fabric A sashing separates the large blocks. Cornerstones made from the Roll Up continue the warm-and-cool color story through the negative space.
The quilt requires five block rows, with four blocks in each row. Build every block row with sashing between neighboring blocks, then construct the horizontal sashing rows with cornerstones.
Press toward the sashing whenever the pattern directs. This keeps bulk away from the paw blocks and helps the block and cornerstone seams nest when the rows are joined.
Measure the quilt center after every row. If one row is longer, do not stretch the shorter row. Recheck the 10 1/2-inch blocks and the sashing length.
Adding the Inner and Outer Borders
Fabric A creates the narrow inner border, while Fabric B creates the wider outer border. Follow the exact lengths in the official PDF.
For flatter borders:
- Measure the quilt through the center in three places.
- Use the average measurement if adjustment is necessary.
- Cut or piece both opposite border strips to the same length.
- Match the center and quarter points of the border and quilt edge.
- Pin between those points before sewing.
- Attach side borders first, followed by top and bottom borders, as directed.
Do not sew an extra-long strip to the quilt and trim it afterward. Measured borders help prevent waves and flares.
Pressing Strategy
The PDF advises pressing seams open unless another direction is given. Some construction stages provide specific pressing instructions to support nesting.
Use these priorities:
- Press HST seams toward the darker print;
- Press alternating paw-unit rows in opposite directions;
- Nest seams when assembling the three-by-three paw units;
- Press toward the Fabric A rectangles in large blocks;
- Press quilt-row seams toward the sashing where indicated;
- Press borders away from the quilt center unless bulk requires another approach.
Press with an up-and-down motion. Sliding the iron can distort the small HSTs and make the paw units difficult to square.
A Manageable Batch-Piecing Plan
This quilt contains many repeated units. Dividing the work into stages makes it easier to maintain accuracy.
| Stage | Goal |
|---|---|
| 1 | Sort the Roll Up into Warm and Cool groups |
| 2 | Cut and label all print and background pieces |
| 3 | Make and trim the 160 Warm HSTs |
| 4 | Make and trim the 160 Cool HSTs |
| 5 | Assemble forty Warm paw units |
| 6 | Assemble forty Cool paw units |
| 7 | Build ten Warm and ten Cool large blocks |
| 8 | Arrange and sew five rows of four blocks |
| 9 | Add sashing rows, inner borders, and outer borders |
| 10 | Prepare backing, baste, quilt, and bind |
Stop at the end of a complete batch rather than in the middle of several different sizes. Store each finished group with a label showing the quantity completed and quantity still needed.
Troubleshooting Common Problems
HSTs finish smaller than 2 inches
Check the starting square size, seam position, and pressing. A seam wider than 1/4 inch can reduce both HSTs. Make a new test pair before continuing.
Paw units are undersized
Confirm that every HST and square measured exactly 2 inches before assembly. Nine slightly undersized pieces can create a noticeable difference in a 5-inch unit.
Claw points disappear
Make sure there is a 1/4-inch allowance beyond each point before joining the next row. Sew just outside the intersection instead of directly through it.
The large block center is bulky
Follow the pressing arrows in the PDF and use a clapper while the block cools. Press the final seam open only when it will not interfere with planned nesting.
Block rows do not match the sashing
Measure every large block. A block should be 10 1/2 inches unfinished. Confirm that the sashing was cut to the PDF measurement and was not stretched during sewing.
The borders wave
The borders were probably cut longer than the quilt center and eased incorrectly. Measure through the center and attach borders cut to a controlled length.
Warm and Cool colors look unbalanced
Redistribute blocks before sewing the rows. Spread dark, light, highly saturated, and transitional colors across the entire layout.
Fabric Substitution Ideas
Modern Rainbow
Divide a rainbow strip roll into warm and cool groups and pair it with white, cream, pale gray, or charcoal.
Romantic Garden
Use rose, burgundy, lavender, blue, and green floral strips with a warm ivory background. Choose a muted border so the paw blocks remain dominant.
Autumn Batiks
Combine rust, red, purple, and gold as the warm group, with olive, teal, forest green, and navy as the cool group.
Two-Color Version
Replace the warm and cool division with two coordinated strip groups, such as red and blue or purple and green. Keep Fabric A consistent to preserve the block definition.
Scrappy Stash Version
Cut 2 1/2-inch strips from your stash, but track the required quantities carefully. Use one background throughout to unify the many prints.
Quilting and Finishing Ideas
The repeated paw units offer several quilting possibilities:
- Echo the diagonal HST seams inside each paw;
- Quilt a simple grid through the sashing;
- Use a continuous curve in the small squares;
- Add a separate motif inside each large Bear Paw center;
- Quilt straight lines in the narrow inner border;
- Use a wider feather, loop, or leaf design in the outer border.
If the quilt top contains many batiks, test the needle and thread on a scrap sandwich. Batiks often have a tighter weave than standard quilting cotton.
Frequently Asked Questions
Is Bear Paw Roll Up suitable for beginners?
It is best for a confident beginner who can sew a consistent 1/4-inch seam and is comfortable trimming HSTs. The construction is repetitive rather than technically complex.
How many large blocks are required?
The quilt contains twenty large blocks: ten Warm and ten Cool. Each large block uses four matching 5-inch paw units.
How many HSTs are required?
The project uses 320 HSTs—160 Warm and 160 Cool—trimmed to 2 inches square.
Can a different 2 1/2-inch strip bundle be used?
Yes. Use a forty-strip bundle with enough warm and cool prints, and confirm that its usable strip width and length match the requirements.
Can the quilt be made without batiks?
Yes. Standard quilting cottons work well. Avoid mixing significantly different fabric weights in the same small units.
Should the precut strips be washed?
No. Narrow precut strips may fray or distort in the washing machine. If using additional yardage, either leave all fabric unwashed or treat the yardage consistently.
Can the pattern be sold or included in a kit?
The official PDF states that it is for individual use only, is not for resale, and may not be reproduced without express permission from Robert Kaufman Fabrics. Consult Robert Kaufman directly before commercial use or kit cutting.
Download the Official Free Bear Paw Roll Up PDF
The safest download is the official file hosted by Robert Kaufman:
👉 Download the Free Bear Paw Roll Up Quilt PDF Pattern Here
Pattern Credit
Bear Paw Roll Up was designed by Elise Lea for Robert Kaufman and features the Garden Style Roll Up batik collection. The free pattern was published by Robert Kaufman Co., Inc. and is copyrighted 2020.
Easy Quilting Patterns does not claim authorship or ownership of the original pattern, diagrams, photographs, fabric designs, or PDF. The official pattern is provided by Robert Kaufman for individual use only, is not for resale, and may not be reproduced without express permission from Robert Kaufman Fabrics.
This independent companion article adds fabric-planning, batch-piecing, accuracy, troubleshooting, pressing, quilting, and finishing guidance. For questions about the original pattern, use the contact information supplied by Robert Kaufman in the official PDF.
Final Thoughts
Bear Paw Roll Up is a substantial but manageable project when it is divided into batches. The key checkpoints are 2-inch HSTs, 5-inch paw units, 10 1/2-inch unfinished large blocks, and a final layout of twenty blocks arranged four across by five down.
Take time to sort the colors, make one test HST pair, measure units throughout construction, and photograph the final layout. Consistent preparation will make the repeated piecing smoother and help the warm-and-cool Bear Paw design remain balanced across the finished quilt.