
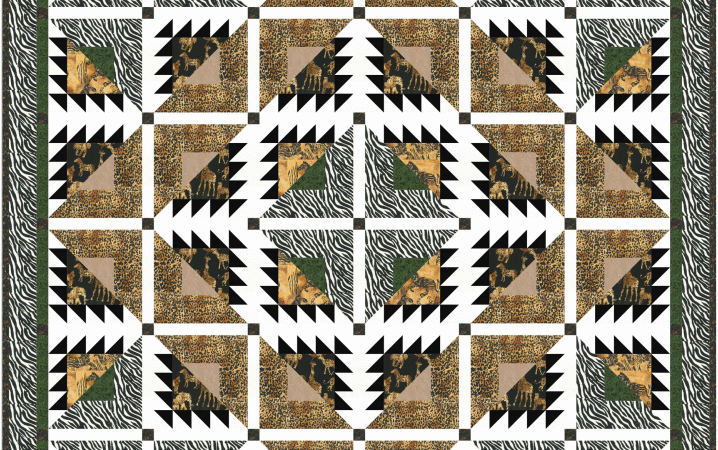
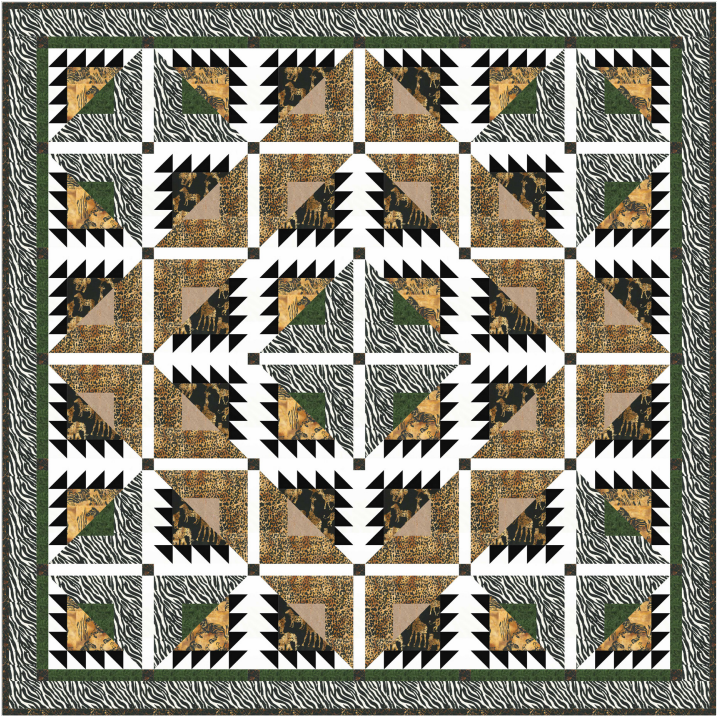
The Animal Tracks quilt pattern combines safari-inspired fabric with crisp geometric piecing to create a bold 90-inch-square quilt. Designed by Natalie Crabtree for Anthology Fabrics, the original 2019 project features the Safari novelty collection, four coordinating Lava Solids, black-and-white triangle rows, narrow sashing, and a strong outer border.
At first glance, the quilt looks like a complex arrangement of arrows, tracks, and rotating frames. Its construction is more orderly than the finished design suggests. The quilt is built from two 12½-inch unfinished block types, repeated half-square triangle units, pieced sashing, and straightforward borders. The visual movement comes from rotating those blocks in carefully planned directions.
This is not a one-afternoon quilt. The original design contains 252 small black-and-white half-square triangle units, along with larger triangles and several bias-edged sections. Accurate cutting, consistent seam allowances, controlled pressing, and a reliable labeling system matter more than speed. A confident intermediate quilter will find the repetition satisfying, while an adventurous beginner should first practice making and trimming half-square triangles.
This independent guide explains the design, fabric roles, efficient HST workflow, block orientation, assembly checkpoints, color substitutions, quilting choices, and common fixes. It is intended to be used alongside an authorized copy of the original pattern. It does not reproduce the publisher’s cutting chart, numbered diagrams, or complete assembly instructions.
Animal Tracks Quilt at a Glance
| Detail | Original pattern information |
|---|---|
| Pattern name | Animal Tracks |
| Designer | Natalie Crabtree |
| Original publisher | Anthology Fabrics |
| Featured collection | Safari novelty collection |
| Pattern date | May 14, 2019 |
| Finished size | 90″ × 90″ |
| Main block size | 12½″ unfinished |
| Main techniques | Traditional piecing, half-square triangles, block rotation, sashing, and borders |
| Block types | Block One and Block Two |
| Block count | 16 Block One units and 20 Block Two units |
| Small black-and-white HST count | 252 units, trimmed to 3″ |
| Quilt layout | 36 blocks arranged in six columns and six rows, with pieced sashing |
| Suggested skill level | Intermediate |
| Original backing requirement | 8¾ yards |
| Original batting size | 98″ × 98″ |
The finished quilt is large enough for a generous bed quilt or a dramatic wall display in a spacious room. Because 90 inches is both wide and long, verify the mattress dimensions and desired drop before purchasing substitute fabrics. Mattress sizes are not fully standardized, and a 90-inch square will sit differently on a queen bed than on a full bed.
What Creates the “Animal Tracks” Effect?
The quilt does not depict literal paw or hoof prints. Instead, the name is expressed through movement. Repeated black triangles travel along the edges of selected blocks like a sequence of tracks. As the blocks rotate, those triangle rows turn corners, change direction, and create larger paths across the quilt.
The safari prints support that idea without carrying the design alone. Zebra stripes appear in framing areas and the outer border. Gold and black animal motifs occupy large triangular regions. Leopard-like texture fills other sections, while green and hemp solids provide visual rest. White sashing divides the activity and helps the block rotation remain readable.
There are several layers of design:
- Small black triangles create the most obvious directional rhythm.
- Large diagonal triangles divide each block into strong light and dark regions.
- Two block variations introduce controlled differences in color and print.
- White and green sashing organize the blocks into a grid.
- Dark cornerstones punctuate the intersections.
- The black-and-white outer print contains the entire composition.
This is why contrast is more important than finding the exact discontinued fabrics. If the value relationships are preserved, the design can still feel like Animal Tracks even in a completely different palette.
Skill Level: Why This Is an Intermediate Quilt
The construction uses familiar techniques, but the scale and repetition raise the difficulty. The most demanding tasks are not decorative or specialized. They are accuracy tasks performed many times.
The pattern requires the quilter to:
- Cut hundreds of small triangles without stretching them.
- Pair contrasting triangles into consistent HST units.
- Trim 252 HSTs to the same unfinished size.
- Rotate the HSTs correctly within two longer unit types.
- Add larger triangles without distorting their bias edges.
- Build two similar-looking block variations.
- Make 36 square blocks that finish at a consistent size.
- Rotate those blocks according to a full-quilt diagram.
- Keep long sashing and border seams straight.
- Manage a 90-inch quilt top during final assembly.
A new quilter could complete the project with patience, but describing it as a simple beginner pattern would be misleading. If you have never made HSTs, begin with eight or ten practice units from scrap fabric. Test the cutting method, seam allowance, pressing direction, and trimming routine. A short practice session will prevent the same error from being repeated hundreds of times.
Understanding the Original Fabric Roles
The original design uses nine labeled fabrics, identified as A through I. Four are Lava Solids and five are prints from the Safari novelty collection. The following table summarizes the role and original yardage without reproducing the publisher’s cutting directions.
| Key | Original fabric | Yardage | Main visual role |
|---|---|---|---|
| A | Lava Solids White, 100Q-1046 | 2⅝ yd | Light half of the small HSTs and major sashing |
| B | Lava Solids Black, 100Q-1045 | 1¼ yd | Dark half of the small HSTs |
| C | Lava Solids Pine, 100Q-1441 | ⅞ yd | Green triangles and selected sashing |
| D | Lava Solids Hemp, 100Q-1647 | ⅜ yd | Neutral triangle in Block Two |
| E | Safari 956Q-6 Black | 2½ yd | Zebra-style framing and outer border |
| F | Safari 956Q-1 Gold | ½ yd | Gold feature triangle in Block One |
| G | Safari 953Q-1 Gold | 1½ yd | Gold animal-texture framing in Block Two |
| H | Safari 954Q-5 Cashew | ⅞ yd | Dark feature triangle in Block Two |
| I | Safari 957Q-5 Cashew | ⅞ yd | Sashing cornerstones and binding |
The original also specifies 8¾ yards of backing and a 98-inch-square piece of batting. Treat these numbers as a planning reference and confirm them in an authorized copy of the pattern before buying or cutting. Fabric width, shrinkage, directional motifs, and changes to the layout can alter the required amount.
Why each role matters
Fabric A and Fabric B create the repeating black-and-white triangle chain. They must contrast strongly at a distance. Fabric C introduces dark green at selected block corners and in particular sashing positions. Fabric D is a lighter neutral that separates two gold-toned regions in Block Two.
Fabrics E through H carry most of the safari personality. Their scale and contrast prevent the quilt from becoming a simple black-and-white exercise. Fabric I is visually quieter but strategically important: its small squares mark the sashing intersections, and the same print frames the quilt as binding.
When substituting fabrics, think in terms of jobs, not color names. Your Fabric A substitute must be the light HST fabric. Your Fabric B substitute must remain clearly darker. The E substitute should work as both a framing print and a broad outer border. The F and H substitutes need enough interest to hold large triangular spaces.
How to Build a Substitute Palette
The Safari collection may no longer be easy to find. Fortunately, the geometry supports many themes. Start by creating a value map that matches the original roles.
Role 1: High-contrast HST pair
Choose one light and one dark fabric that remain distinct when viewed from several feet away. White and black create maximum contrast, but cream and navy, pale gray and charcoal, or light aqua and deep teal can also work.
Avoid two medium-value fabrics, even if their colors are different. Red and green may look distinct in full color but merge when converted to grayscale. The repeated triangle path depends on a clear light-dark boundary.
Role 2: Secondary solid accents
Choose two colors for the Pine and Hemp positions. One should be dark enough to anchor selected blocks. The other should sit between the feature prints in value and provide a quieter transition.
For a woodland version, use forest green and warm taupe. For a desert version, try deep rust and sand. For a coastal version, use navy and weathered blue-gray.
Role 3: Graphic framing print
The original zebra print acts almost like a stripe. It creates strong edges around part of Block One and becomes the outer border. A substitute should have a clear directional or high-contrast texture. Consider a narrow stripe, irregular line print, bold geometric, or two-color abstract.
If the replacement is directional, add extra yardage and plan the border orientation before cutting. A one-way print may require more fabric than the original amount.
Role 4: Large feature motifs
Choose two or three feature fabrics with enough scale to be interesting in large triangles and rectangular frames. Wildlife prints are an obvious choice, but maps, leaves, florals, stars, or abstract textures can work.
Place a clear acrylic ruler over each candidate fabric to preview the portion that will appear after cutting. A beautiful large-scale print can become unrecognizable if every important motif falls across a seam.
Role 5: Cornerstone and binding print
The Fabric I substitute should remain visible where small squares intersect the sashing. It also needs to look attractive as a narrow binding. A dark small-scale print is practical because it defines the edge and hides handling better than a pale solid.
Four Colorways That Preserve the Design
Woodland trail
- Light HST: warm cream
- Dark HST: espresso brown
- Accent solids: pine and mushroom
- Framing print: bark-like stripe
- Feature prints: deer, leaves, ferns, and small woodland animals
- Cornerstone/binding: dark plaid
This version keeps the nature theme but replaces the African safari feeling with a forest atmosphere.
Desert sunset
- Light HST: pale sand
- Dark HST: charcoal
- Accent solids: terracotta and camel
- Framing print: black-and-cream linear print
- Feature prints: ochre, burnt orange, rust, and desert botanicals
- Cornerstone/binding: deep burgundy
The warm palette emphasizes movement and makes the white sashing less stark.
Modern monochrome
- Light HST: white
- Dark HST: black
- Accent solids: medium gray and charcoal
- Framing print: narrow black stripe
- Feature prints: black, white, and gray geometrics
- Cornerstone/binding: one bright accent color
This interpretation highlights geometry. A controlled pop of red, yellow, or turquoise at the sashing intersections can prevent the quilt from feeling flat.
Jewel-tone tracks
- Light HST: very pale gray
- Dark HST: deep navy
- Accent solids: emerald and muted gold
- Framing print: navy-and-cream stripe
- Feature prints: sapphire, plum, emerald, and metallic-style motifs
- Cornerstone/binding: deep violet
This version keeps the dramatic quality of the original while moving away from novelty wildlife fabric.
Tools for a Large HST Project
The pattern can be made with standard quilting tools, but reliable equipment reduces fatigue and variation.
- Sharp rotary cutter with a fresh blade
- Large cutting mat with visible grid lines
- Long ruler for width-of-fabric strips
- Square ruler larger than 3 inches for HST trimming
- Quarter-inch presser foot or tested seam guide
- Fine pins or washable glue for key intersections
- Removable labels, sticky notes, or numbered clips
- Small rotating cutting mat, if available
- Design wall or large clean floor
- Dry iron and firm pressing surface
- Seam ripper with a fine point
- Digital camera or phone for layout records
A rotating mat is optional but useful when trimming hundreds of small squares. Turning the mat instead of repeatedly repositioning the unit can reduce hand strain and accidental distortion.
Prepare a comfortable cutting station. The ruler should be visible without leaning forward excessively, and the mat should not slide. Repetitive work magnifies poor ergonomics just as it magnifies inaccurate seams.
Prepare Before Cutting
Read the original four-page pattern from beginning to end before touching the fabric. The quilt uses the same fabrics in multiple jobs, and cutting all of one fabric without noticing its later role can create a shortage.
Decide whether to prewash based on your normal practice and the fabric type. Whatever you choose, treat all fabrics consistently. Mixed shrinkage is especially noticeable in a 90-inch top containing both solids and prints.
Press yardage flat and identify the true fold before cutting width-of-fabric strips. Yardage can be folded off-grain on the bolt. If the fold creates a diagonal wrinkle or the selvages do not align naturally, refold without forcing the fabric.
Create labels A through I and place each one on the corresponding fabric. Do not rely on remembering that “gold animals” means F or that “gold texture” means G. Those descriptions become confusing once small pieces are stacked.
Use a cutting checklist with separate boxes for:
- Small HST triangles
- Larger feature triangles
- Block framing rectangles
- Sashing rectangles
- Sashing cornerstones
- Border strips
- Binding strips
Cut one fabric at a time, count the pieces twice, and store each group in a labeled container. Do not mix leftover rectangles with uncut yardage until the entire chart is complete.
The Original HST Method
The pattern’s small black-and-white HSTs are not made with the common two-at-a-time method in which two squares are sewn on both sides of a drawn diagonal. Instead, the original chart cuts 3½-inch squares diagonally into individual triangles. One light triangle and one dark triangle are then sewn together, pressed, and trimmed to a 3-inch unfinished square.
That distinction matters. Once a square is cut diagonally, its long edge is on the bias and can stretch. Handling those triangles gently is essential.
The original method gives the designer precise control over the number of triangles and how they enter later units. Do not replace it with another HST method unless you understand the unfinished size, seam allowance, grain direction, required quantity, and resulting fabric use. If you want to test an alternative, make a small sample first and compare it with the pattern dimensions.
Managing Bias Edges
Bias edges are not defective; they simply behave differently from straight-grain edges. They can grow longer when pulled, steamed, or slid across a surface.
Use these habits throughout the project:
- Lift triangles instead of dragging them off the cutting mat.
- Store them flat in shallow stacks.
- Do not hang triangle chains over a chair.
- Use minimal steam before the unit is stabilized.
- Press by lowering and lifting the iron rather than scrubbing.
- Support long pieced units when moving them.
- Avoid stretching one piece to match another.
Some quilters prefer a light starch or fabric-stabilizing spray before cutting. Test it on scraps, apply it consistently, and allow the fabric to dry before pressing. Heavy starch added directly to exposed bias triangles can introduce distortion if the pieces are moved while damp.
An Efficient Workflow for 252 HST Units
Making 252 identical units can feel overwhelming when treated as one task. Divide the work into batches of 24 to 36 units. A batch should be small enough to inspect closely but large enough for efficient chain piecing.
Step 1: Pair without stretching
Place one light and one dark triangle right sides together. Align the straight ends and the diagonal edges gently. If one triangle appears longer, confirm that neither has been stretched. Do not pull the shorter edge into submission.
Step 2: Chain piece
Sew one pair after another with a small thread bridge between them. Keep the triangle tips supported in front of the presser foot. Let the feed dogs move the fabric rather than pushing from behind.
Chain piecing saves time and reduces thread waste, but it should not become a race. Stop after the first five units and verify the seam allowance.
Step 3: Press consistently
The original pattern directs the seams toward the dark Fabric B. This keeps the dark allowance from showing behind the white side and creates a consistent pressing plan. Set the seam first, then press toward the dark triangle.
Step 4: Trim to the required size
The units are trimmed to 3 inches unfinished. Align the ruler’s 45-degree line with the diagonal seam. Trim two adjacent sides, rotate the unit, and trim the remaining sides to size.
The diagonal seam should run from corner to corner after trimming. If the seam misses a corner, the unit will not align correctly in the longer triangle rows.
Step 5: Count and bundle
Stack trimmed units in bundles of ten with a final labeled remainder. Keep a running total. Counting only at the end makes it difficult to know whether missing units were never sewn or were placed in the wrong project container.
Step 6: Perform a batch audit
Measure several units from different parts of the stack. Check that seams are pressed in the same direction and that the black triangle occupies the expected half. If a batch contains inconsistent units, correct it before joining longer sequences.
Why HST Accuracy Matters So Much Here
One HST that is 1⁄16 inch too small seems insignificant. When three or four units are joined in a row, the error becomes visible. Those rows then connect to a large triangle and become part of a 12½-inch block. Thirty-six blocks later, a small repeated discrepancy can create wavy rows or sashing that does not fit.
The goal is not perfection to a microscopic standard. The goal is repeatable dimensions. Two units that are both slightly imperfect but identical often assemble more successfully than two individually beautiful units of different sizes.
If your HSTs consistently finish smaller than 3 inches before trimming, check the seam allowance and triangle cutting size. Do not simply trim every unit smaller, because the longer HST rows and final blocks are designed for the listed dimension.
Building the Two Directional HST Units
The pattern uses the small HSTs to create two longer unit types. One contains three black-and-white HSTs plus a light triangle. The other contains four HSTs plus a light triangle. Their dark triangles must face the direction shown in the original diagram.
These are directional units. Rotating one after construction may not produce the needed mirror because the number of HSTs and the placement of the end triangle differ.
Use a master sample for each type:
- Make one Unit 1 carefully.
- Confirm it against the original diagram.
- Place it on a labeled card marked “Unit 1 — right side up.”
- Make and verify one Unit 2.
- Keep the two masters visible while chain piecing.
The original pattern calls for 36 of each longer HST unit. Count them separately. A stack of 72 mixed units will create confusion during block construction.
When joining small HSTs into a row, the diagonal seams form repeated points along one edge. Preserve a quarter-inch seam allowance beyond those points. If the point touches the raw edge, it will disappear when the row is attached to the next section.
Adding the Larger Triangles
The longer black-and-white units combine with larger feature triangles to create dramatic diagonal sections. Large triangles also contain bias edges, so the same gentle handling rules apply on a larger scale.
Find the center of a long triangle edge by folding it lightly or marking within the seam allowance. Find the center of the pieced HST edge. Match centers and ends before adding intermediate pins. This prevents all extra fullness from collecting at one end.
Sew with the pieced side visible if you need to watch the small triangle points. Stop if the layers begin to shift. After sewing, press toward the larger feature triangle when directed by the pattern, supporting the entire unit on the pressing surface.
The completed section should lie flat and retain a clean diagonal. If it curves, inspect the long seam before trimming. Stretching can rarely be solved by cutting away more fabric.
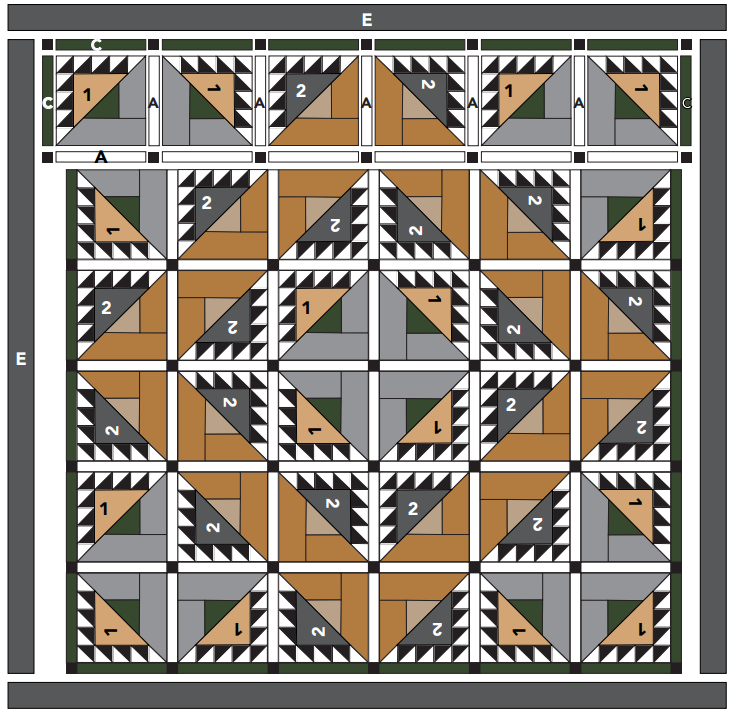
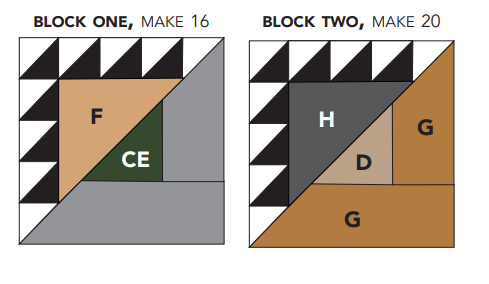
Understanding Block One
Block One combines a feature triangle and black-and-white HST path with a second unit containing the Pine solid and the graphic framing print. The result has a strong diagonal division, but its two halves are not interchangeable.
The original pattern makes 16 Block One units, each squared to 12½ inches unfinished.
Before joining the halves, place them on the table exactly as shown in the diagram. Identify three landmarks:
- The direction of the small black triangle path
- The location of the Pine triangle
- The direction of the framing print
Photograph one correct block and keep the image available. When chain piecing, compare every block with the same orientation rather than comparing each block with the previous one. A single reversed reference can otherwise spread through the entire batch.
Square the block only after confirming the orientation. The diagonal junction and important points should remain positioned correctly within the 12½-inch square. Remove as little fabric as possible from each side.
Understanding Block Two
Block Two uses the same general square format but changes the feature fabrics and internal arrangement. It includes a dark feature triangle, the Hemp solid, and gold-toned framing areas. The design requires 20 Block Two units.
Because Block Two lacks some of the visual landmarks of Block One, it can be easier to rotate accidentally. Choose one distinctive print motif or color boundary as the “top” while assembling. Add a removable arrow label to the back after squaring.
Do not assume that Block Two is merely Block One in another colorway. Follow its dedicated diagram. Similar structure can hide a reversed triangle or incorrectly positioned rectangular section.
After making the first Block Two, place it beside a correct Block One. Both should measure 12½ inches unfinished even though their internal seams differ. If one block type is consistently smaller, investigate before completing all 36 blocks.
Squaring 36 Blocks Consistently
Squaring is a quality-control step, not an opportunity to redesign the block. Use the ruler’s diagonal lines and the pattern landmarks to center each unit.
For every block:
- Confirm that it lies flat.
- Check the orientation.
- Align the ruler with the main diagonal seam.
- Verify that important points retain a quarter-inch allowance.
- Trim the smallest possible amount from two sides.
- Rotate and trim to 12½ inches.
- Label the block type and orientation.
If a block is too small, do not add a narrow strip to disguise it without considering the layout. A replacement block usually produces a cleaner result. If many blocks share the same small discrepancy, determine whether they can be corrected consistently before cutting sashing differently.
Block Rotation Is the Design
The final quilt uses 36 blocks in a six-by-six grid, but the blocks do not all face the same direction. Their rotations create rings, corners, arrows, and traveling paths. Correct block construction alone is not enough; the layout determines whether the design appears.
Set up the full layout before sewing rows. Number the positions from left to right and top to bottom. For example, label the first row R1C1 through R1C6. Place a small label on the back of every block only after the entire design matches the diagram.
Use these checks:
- Trace the black triangle paths with your finger.
- Look for the central rotated motif.
- Confirm symmetry along the vertical and horizontal axes.
- Compare the four corner regions.
- Convert a photograph to grayscale to check large value shapes.
- Step away for several minutes and inspect again with fresh eyes.
Take a high-resolution photo of the approved layout. If blocks are carried to the machine, the photo becomes the reconstruction map.
Sashing and Cornerstones
Narrow sashing separates the large blocks and gives the eye a place to rest. The original design uses light sashing in many positions, green sashing in selected positions, and dark print squares at intersections. Those color changes contribute to the larger pattern.
The pattern creates two types of long pieced sashing strips. One type alternates the dark cornerstone squares with light rectangles; the other alternates the same squares with Pine rectangles. The completed strips are positioned according to the quilt diagram.
Do not treat all sashing as identical. Label the light and green versions separately and mark the end that belongs on the left side of the quilt. A reversed sashing strip can move the dark cornerstones out of alignment.
When sewing many rectangles and cornerstones into a long strip:
- Confirm the seam allowance with the first two pieces.
- Chain-piece repeat pairs where practical.
- Press consistently so intersections can nest with block-row seams.
- Measure the finished strip without stretching it.
- Compare repeated strips before attaching them.
If one strip is substantially longer than another, find the source of the difference. Do not cut off a cornerstone or stretch a block row to make them equal.
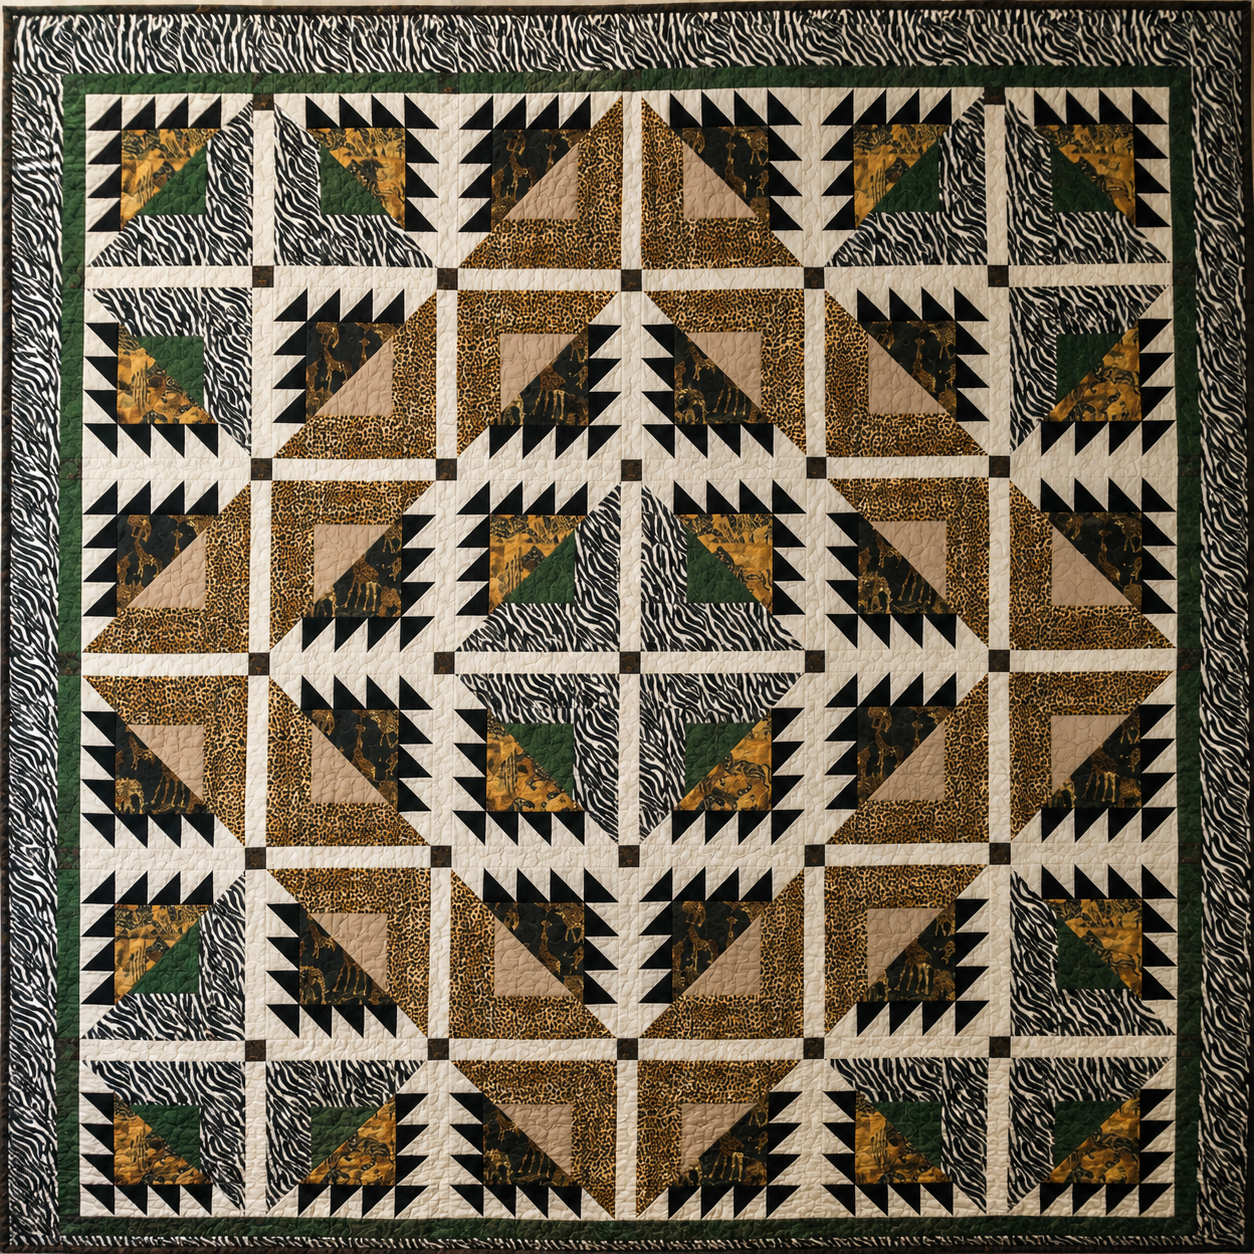
Assembling the Quilt Center
The original pattern organizes the quilt into seven pieced horizontal rows before the final row-by-row joining. Use its diagram for the exact sequence of blocks, sashing rectangles, and rotations.
An effective assembly system is to work one row at a time:
- Place the full row on the design wall.
- Add position labels to every component.
- Sew adjacent pairs.
- Return the pairs to the wall.
- Compare with the layout photo.
- Join the pairs into a complete row.
- Measure the row and record the result.
Returning pieces to the wall may seem slower than continuous chain piecing, but it prevents directional mistakes. Unpicking one 12½-inch seam is faster than discovering an inverted block after the center is assembled.
When joining rows with sashing, match the cornerstones and block boundaries first. Pin those landmarks, then distribute the fabric between them. If a row and sashing strip differ slightly, easing a very small discrepancy may be reasonable. A large difference signals an earlier measurement problem.
Support the growing quilt top on the sewing table. Do not allow most of the 90-inch project to hang from the needle area. Its weight can stretch seams and pull the stitching line off course.
Keeping the Grid Square
Measure the quilt center in three places after every major assembly stage: near the top, through the middle, and near the bottom. Also measure both diagonals when the center is complete. Similar diagonal measurements indicate that the top is reasonably square.
If the center bows outward, check whether the long sashing was stretched or cut too long. If it pulls inward, the sashing may be too short or the block rows may have grown. Correct the issue before adding borders, because a border cannot permanently flatten an inaccurate center.
Press row seams in a planned direction. Large quilt tops are easier to manage when pressed in sections on a broad surface. Avoid ironing across the top with force; press individual seam areas and allow them to cool flat.
Adding the Outer Border
The original border uses long strips of Fabric E, the bold black framing print. The side borders are added before the top and bottom borders, bringing the quilt to approximately 90 inches square.
Measure the quilt center through the middle before cutting each border pair. The authorized pattern supplies its planned dimensions, but measuring the actual pieced top reveals whether your work matches those dimensions.
For a straight border:
- Measure the quilt center in three parallel positions.
- Use the middle measurement or an average if the differences are tiny.
- Cut both opposite borders to the same length.
- Mark the center and quarter points of the border and quilt edge.
- Match and pin those points.
- Sew without stretching either layer.
Joining strips with diagonal seams distributes bulk and makes the joins less noticeable in a busy print. If the print is directional, audition the seams before sewing. Zebra-like lines can look abruptly broken if the join cuts through them at an awkward angle.
Backing and Batting for a 90-Inch Quilt
The original pattern lists 8¾ yards of backing and a 98-inch-square batting. Before preparing either, ask your longarm quilter for their required extra margin. Many services request several inches beyond the quilt top on all sides, but the exact amount varies by machine and workflow.
A 98-inch batting provides four inches beyond each edge of a 90-inch top if everything is perfectly centered. Confirm whether that is sufficient for your quilting method.
If piecing a standard-width backing:
- Pre-plan the seam arrangement.
- Remove selvages before joining lengths.
- Use a sturdy seam and press it flat.
- Match directional motifs if that matters to you.
- Check that the backing remains larger than the top after squaring.
A 108-inch-wide backing may reduce seams and simplify preparation. Calculate the needed length based on the fabric’s actual usable width and the longarm requirement.
Quilting Ideas for Animal Tracks
The top contains strong geometry and several busy prints, so the quilting can either reinforce the paths or add a softer layer.
Straight-line echo quilting
Echo the major block diagonals and sashing lines. This emphasizes the directional movement and can be completed with a walking foot if the large quilt is manageable on your machine.
Diagonal crosshatch
A broad diagonal grid relates naturally to the HST seams. Keep the spacing wide enough that the quilting does not overwhelm the novelty motifs.
Angular edge-to-edge design
Choose a pattern with chevrons, arrows, triangles, or overlapping lines. A medium-density design can provide texture without competing with the piecing.
Organic contrast
Use gentle curves, leaves, or a loose meander to soften the many straight seams. Organic quilting is especially effective in a woodland or botanical colorway.
Custom block quilting
Quilt the black-and-white triangle paths with simple lines, add motifs inside the large feature triangles, and define the sashing separately. This takes more time but highlights the two block types.
Thread color should be tested across both the light HSTs and the darkest prints. Medium gray, taupe, or muted gold may blend more evenly than pure white or black. If custom quilting, different threads can be used in the light sashing and feature areas.
Binding the Quilt
The original instructions use ten 2¼-inch width-of-fabric strips from Fabric I to create the binding. Confirm the quantity in the pattern and measure the actual quilt perimeter before joining the strips.
Join binding strips with diagonal seams, trim the excess, and press those seams open. Fold the long strip wrong sides together. Attach it with a consistent seam allowance, miter the corners, and join the final ends cleanly.
A dark binding is practical on a large bed quilt. It defines the perimeter and is less likely to show wear than a pale solid. If substituting a stripe, decide whether you want the stripe to run parallel, perpendicular, or diagonally around the edge.
A Realistic Project Schedule
Breaking the work into sessions helps maintain accuracy.
Session 1: Planning
- Read the complete original pattern.
- Assign substitute fabrics to A–I roles.
- Make a grayscale palette photo.
- Label all yardage.
- Test the quarter-inch seam.
Session 2: Cutting
- Cut one fabric group at a time.
- Count and label every group.
- Keep border and binding pieces separate.
- Prepare a small HST test batch.
Sessions 3–5: Small HSTs
- Pair and chain-piece manageable batches.
- Press toward the dark fabric.
- Trim each unit to 3 inches.
- Audit size and count after every batch.
Session 6: Directional HST rows
- Make master samples of Unit 1 and Unit 2.
- Complete and count each type separately.
- Preserve the points along the outer edges.
Sessions 7–8: Block components
- Add large feature triangles.
- Construct the secondary block sections.
- Check bias edges and dimensions.
Sessions 9–10: Blocks
- Complete 16 Block One units.
- Complete 20 Block Two units.
- Square each to 12½ inches.
- Add back labels showing type and orientation.
Session 11: Layout
- Arrange all 36 blocks.
- Verify rotations and symmetry.
- Photograph the approved layout.
Sessions 12–13: Sashing and rows
- Construct and label the two sashing types.
- Assemble rows, returning units to the design wall frequently.
- Measure each completed row.
Session 14: Center and borders
- Join the rows and sashing.
- Measure and square the center.
- Add border pairs without stretching.
Sessions 15–16: Finishing
- Prepare backing and batting.
- Baste and quilt.
- Trim and bind.
- Add a label crediting the designer and pattern publisher.
The number of sessions is flexible. The important idea is to separate repetitive work from orientation-sensitive work. HST chain piecing can be efficient; block layout should be slow and deliberate.
Common Problems and How to Fix Them
The small HSTs finish under 3 inches
Possible causes: seam allowance too wide, triangles cut too small, fabric stretched before sewing, or aggressive pressing.
Fix: measure the unsewn triangles and test the seam allowance. Make a new sample before continuing. Do not trim every unit to a smaller dimension because later components rely on the planned size.
The diagonal seam does not reach the corners
Possible causes: the unit shifted during sewing or the ruler’s 45-degree line was not aligned during trimming.
Fix: center the diagonal seam under the ruler before trimming. If the seam cannot reach both corners within the 3-inch square, remake the unit.
HST rows curve
Possible causes: bias edges stretched, units have different sizes, seams were pressed with sliding motion, or the row was pulled while sewing.
Fix: compare the individual units, resew the inconsistent section, and support the row. Press vertically without dragging the iron.
Triangle points disappear
Possible cause: there was no quarter-inch allowance beyond the point before attaching the next piece.
Fix: check the point position before every joining seam. Sew with the pieced side visible so the needle can pass just outside the existing intersection.
Block One and Block Two become mixed
Possible cause: the blocks were stored without labels or were rotated after squaring.
Fix: label the back of every block with its type and a top arrow. Compare it with a master photograph before placing it in the quilt.
The full layout looks random
Possible cause: correct blocks are in incorrect rotations.
Fix: trace the black triangle paths and compare the central motif, corners, and axes with the original diagram. Rotate one block at a time, then photograph the corrected layout.
Cornerstones do not align
Possible causes: inconsistent block or sashing dimensions, sashing reversed, or seam allowances pressed unpredictably.
Fix: measure the row sections. Match cornerstone seams with pins before sewing the long row seam. Check whether a sashing strip belongs in the opposite orientation.
Long sashing ripples
Possible causes: the strip was stretched during assembly, it is longer than the block row, or the block row is too short.
Fix: measure both pieces flat. Correct the source rather than steaming the ripple. Pin at center and quarter points before resewing.
The quilt center is not square
Possible causes: cumulative size variation, forced row seams, or stretched bias sections.
Fix: measure the top, middle, bottom, sides, and diagonals. Identify where the change begins. Correct a badly distorted row before adding borders.
The outer border waves
Possible cause: the border was cut from the outside edge measurement rather than the center measurement or was sewn on without pinning.
Fix: remove the border, measure through the quilt center, cut both opposite strips equally, and pin at matched intervals.
A directional print is upside down
Possible cause: the print direction was not marked before cutting or the block was rotated during assembly.
Fix: decide whether the direction is noticeable in the complete quilt. Some motifs naturally rotate with the design. If it disrupts an important focal area, remake the affected component rather than rotating the entire block incorrectly.
Accuracy Checkpoints
Pause at these points instead of waiting until final assembly:
| Checkpoint | What to verify |
|---|---|
| After first five HSTs | 3″ size, corner-to-corner diagonal, consistent pressing |
| After each HST batch | Count, dimensions, flatness, dark/light orientation |
| First directional unit | Number of HSTs and triangle direction |
| First large diagonal section | Flat edge, preserved points, correct feature fabric |
| First Block One | 12½″ size and three visual landmarks |
| First Block Two | 12½″ size and correct internal placement |
| All 36 blocks | 16/20 count, labels, top arrows, consistent size |
| Full design wall layout | Block rotation, central motif, symmetry, color balance |
| Each completed row | Length, orientation, cornerstone positions |
| Completed center | Top/middle/bottom widths, side lengths, diagonals |
| Border stage | Equal opposite borders and a flat outer edge |
Document the checkpoints with photographs. The images are useful not only for troubleshooting but also as original editorial material for a high-quality article.
Photographing the Project for Your Own Record
Original process photographs add value and help future quilters understand the techniques without reproducing the pattern diagrams.
Useful photos include:
- Nine substitute fabrics labeled A through I
- A grayscale comparison of the palette
- Individual light and dark triangles before sewing
- Correctly trimmed 3-inch HST beside a ruler
- Unit 1 and Unit 2 shown on labeled cards
- One original Block One and one original Block Two
- The 36-block layout on a design wall
- Close-up of matched sashing cornerstones
- Border pinning at center and quarter marks
- Quilting detail on the black-and-white triangle path
- Finished quilt in natural light
Do not use screenshots of the publisher’s cutting chart, diagrams, or full PDF pages as article illustrations. Photographing your own work produces more useful, trustworthy content and avoids presenting copyrighted page design as site-owned material.
Frequently Asked Questions
What size is the Animal Tracks quilt?
The original Natalie Crabtree design finishes at 90 inches by 90 inches. Measure your completed top before preparing backing, batting, or binding because individual seam allowances can change the final measurement slightly.
Who designed the Animal Tracks pattern?
The pattern credits Natalie Crabtree as the designer and Anthology Fabrics as the original publisher. It was created to feature the Safari novelty collection.
When was the pattern released?
The original document is dated May 14, 2019.
Is Animal Tracks a beginner quilt?
It is best classified as intermediate. The techniques are traditional, but the quilt requires 252 small HST units, directional unit construction, 36 rotated blocks, long sashing, and large-scale assembly. A confident beginner should practice HST accuracy first.
How many blocks are in the quilt?
The center uses 36 blocks: 16 Block One units and 20 Block Two units. They are arranged in a six-by-six grid and rotated according to the original layout.
What size are the blocks?
Both block types are squared to 12½ inches unfinished. They finish at 12 inches after being sewn into the quilt.
How many small HST units are needed?
The original pattern makes 252 black-and-white HST units, each trimmed to 3 inches unfinished.
Are the HSTs made two at a time?
Not in the original instructions. The chart cuts light and dark squares diagonally into individual triangles, then pairs those triangles. If using another method, test the unfinished size and grain behavior before changing the entire cutting plan.
Can I use the eight-at-a-time HST method?
Only after recalculating and testing. The original fabric quantities and grain placement were planned for pre-cut triangles. An alternate method may change yardage, trimming room, and the direction of the outer grain. One correct 3-inch sample is not enough; confirm that the later directional units also match.
Can I replace the Safari collection?
Yes. Preserve the fabric roles: a high-contrast HST pair, two secondary solids, a graphic framing print, several feature prints, and a cornerstone/binding print. Check the palette in grayscale.
Do the fabrics need to show animals?
No. The “tracks” are created mainly by the directional triangle paths. Woodland, floral, abstract, monochrome, coastal, or holiday prints can work if the value relationships remain clear.
Is the zebra-style fabric directional?
The original print has a strong linear appearance even if it is not a strict one-way motif. A substitute stripe or one-way print needs extra planning for block frames, borders, and diagonal joins. Purchase extra yardage if matching direction is important.
Why do my points disappear when I join the block sections?
The triangle point may not have a quarter-inch seam allowance beyond it. Check the position before sewing and stitch just outside the existing intersection. Inaccurate HST trimming can also move the point too close to the edge.
How should I label the blocks?
Mark the back with the block type, a top arrow, and optionally its row-and-column position. Removable paper labels or safety pins with numbered tags work well. Do not write in an area that might show through a light fabric.
Can I make the quilt smaller?
Removing rows or columns changes the central movement and border proportions. Reducing every component requires recalculating HSTs, large triangles, rectangles, sashing, and borders. The safest smaller project is to use one or four completed blocks for a pillow or wall hanging, then design separate finishing dimensions rather than scaling the full PDF.
How much backing is needed?
The original pattern lists 8¾ yards. Confirm the backing width, seam plan, and longarm margin before purchasing. A wide backing may require less length and fewer seams.
What batting size is listed?
The original document specifies a 98-inch-square piece of batting. Ask your longarm quilter whether that provides enough extra space for their setup.
What kind of quilting works best?
Straight-line echoes, diagonal crosshatching, angular edge-to-edge quilting, or soft organic motifs can all work. Choose based on whether you want to strengthen the geometry or soften it.
Can I sell a quilt made from the pattern?
Rights to sell finished items depend on the designer’s and publisher’s terms, which are separate from permission to download or redistribute the PDF. Contact the current rights holder for a definitive answer. Always credit the pattern and designer when appropriate.
Can another website upload the free PDF?
A free download is not automatically a redistribution license. The document calls itself a free project, but it does not provide express permission for third-party rehosting. The current Windham terms also state that site content may not be reproduced without express written permission. Link to an authorized publisher source or request permission instead of uploading a copied file.
Finding the Pattern Responsibly
The original Animal Tracks document identifies Anthology Fabrics as the publisher and tells readers to check the company’s free-project section for updates. Anthology patterns are now presented through the Windham Fabrics website, which includes an official free-pattern library and an Anthology Batiks section.
At the time this guide was reviewed, the exact 2019 Animal Tracks file was not readily listed in the current official free-pattern catalog. The responsible approach is to search the publisher’s official library or contact Windham/Anthology for an authorized archive link. Avoid Google Drive reuploads, document-sharing sites, marketplace resellers, and copies hosted by unrelated blogs.
- Search the official Windham Fabrics free-pattern library
- Contact Windham Fabrics about older Anthology patterns
This article does not replace the original pattern. The exact cutting quantities, labeled diagrams, block rotations, and assembly map remain in the publisher’s document. Use an authorized copy for those details and this guide for preparation, color planning, technique, and troubleshooting.
Final Checklist Before Sewing
- I have an authorized copy of the original pattern.
- I have read all four PDF pages.
- My fabrics are labeled A through I.
- My light and dark HST fabrics contrast in grayscale.
- I understand that the original method begins with separately cut triangles.
- My rotary blade is sharp.
- My quarter-inch seam has been tested.
- I have a ruler that can trim accurately to 3 inches.
- I have flat storage for bias-edged pieces.
- I will work in audited batches rather than making all 252 units unchecked.
- I have separate master samples for HST Unit 1 and Unit 2.
- I will label Block One and Block Two immediately.
- I have enough space to arrange all 36 blocks.
- I will photograph the approved layout before sewing rows.
- My backing and batting meet my quilter’s requirements.
Pattern Credit
Pattern: Animal Tracks
Designer: Natalie Crabtree
Original publisher: Anthology Fabrics
Featured collection: Safari novelty collection
Original release date: May 14, 2019
Original finished size: 90″ × 90″
The original pattern, cutting chart, diagrams, fabric artwork, and PDF layout belong to their respective designer and publisher. Easy Quilting Patterns provides this independent planning and technique guide for educational commentary and does not claim ownership of the original design.
Final Thoughts
Animal Tracks is a strong example of how simple geometric units can create sophisticated movement. The individual techniques—half-square triangles, rectangular frames, sashing, cornerstones, and borders—are familiar. The artistry comes from repetition and rotation.
Success depends on a few disciplined habits: protect the bias, trim every HST consistently, make master orientation samples, label both block types, and verify the entire design on a wall before sewing rows. Work in manageable batches and correct small problems when they first appear.
With those systems in place, the 252 HSTs become less intimidating and the 36 blocks begin to reveal their larger paths. The result is a generous statement quilt with clear structure, bold contrast, and a sense of motion that suits wildlife prints as beautifully as a completely new color theme.
The Animal Tracks Quilt Pattern is a powerful combination of movement, contrast, and design precision. Its large size makes it perfect for a master bedroom or as a dramatic decorative quilt.
With careful attention to triangle rotation and block placement, you will create a quilt that feels alive with motion and personality.