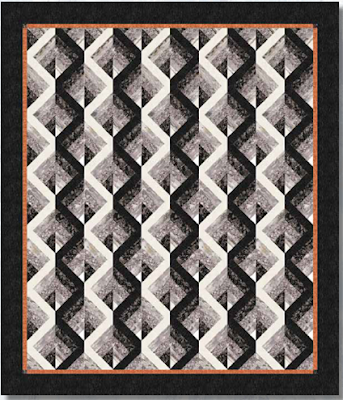
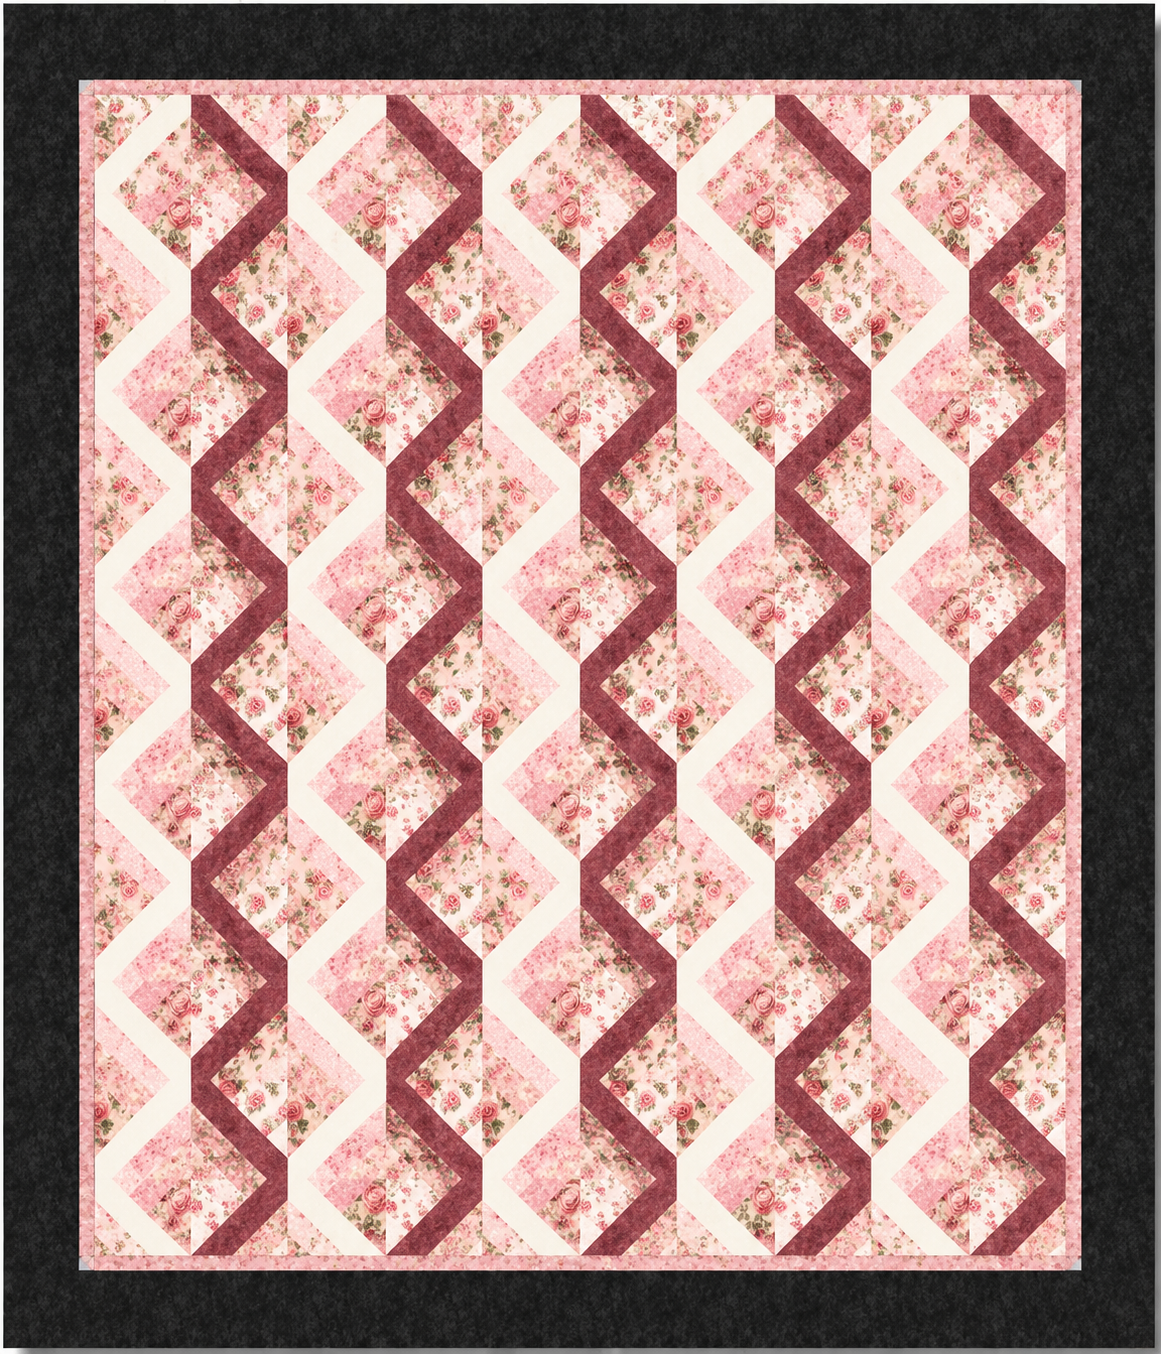
The Pearl Luxe Quilt 1 turns long strip sets into a striking procession of interlocking diamonds. Designed by Heidi Pridemore for Henry Glass & Co., the finished quilt measures 82 x 95 1/2 inches a generous size for a bed and the publisher rates it intermediate. Its high-contrast original palette uses charcoal, onyx, oyster, gray, and a narrow burnt-orange accent.
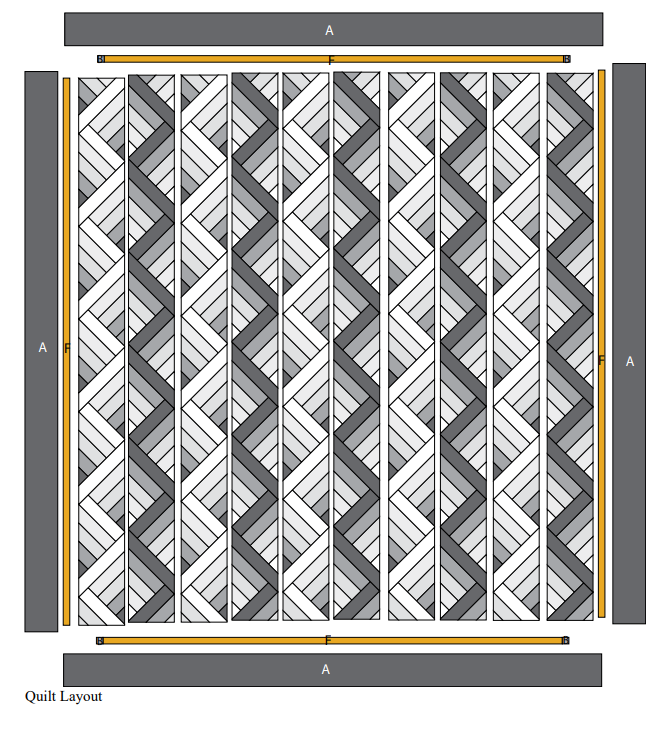
Although the design looks like a field of individually pieced diamonds, it is organized as ten long vertical columns. Two related column types alternate across the quilt center, creating the continuous light-and-dark zigzags. Strip piecing makes that repetition practical, but the project still rewards careful labeling, accurate seams, and patient trimming.
This guide is an independent sewing companion to the publisher’s pattern. It explains the structure, highlights the steps that deserve extra attention, and offers troubleshooting advice. Use it alongside the diagrams, cutting chart, and templates in the official free PDF rather than as a replacement for them.

Pearl Luxe quilt at a glance
| Detail | Pattern information |
|---|---|
| Pattern name | Pearl Luxe Quilt 1 |
| Designer | Heidi Pridemore |
| Publisher | Henry Glass & Co. |
| Finished size | 82 x 95 1/2 inches |
| Skill level | Intermediate |
| Main method | Strip piecing, template cutting, and vertical-column assembly |
| Center construction | Five Column 1 units alternating with five Column 2 units |
| Borders | Narrow accent border followed by a wide dark border |
| Binding | Nine 2 1/2-inch width-of-fabric strips from Fabric A |
| Pattern status | Free project sheet; not for resale |
Download the official free pattern
Get the pattern from the publisher so you have the latest file and its full-size diagrams:
The PDF is seven pages and is marked updated June 29, 2018. Save a copy for reference, but revisit the official project page before cutting in case Henry Glass posts a later revision. The publisher asks that its free projects remain free and not be resold.
Read this before printing the templates
The final PDF page contains Template 1 and Template 2, and both must be enlarged to 200%. This is not an optional scaling suggestion. If you print that page at ordinary size and cut directly from it, every triangle will be too small and the units will not reach the dimensions needed for the columns.
A reliable template workflow is:
- Print or copy the template page at 200%.
- Disable settings such as “Fit,” “Shrink oversized pages,” or automatic scaling.
- Measure the printed calibration box with a physical ruler. It must be exactly 1 inch after enlargement.
- Check both the horizontal and vertical sides of the box. A printer can distort one direction.
- Transfer each verified shape to template plastic, sturdy card, or a clear acrylic sheet.
- Mark the template number, seam line, grain direction, and orientation before cutting it out.
Some home printers tile a 200% page over several sheets. If yours does, assemble the tiles by matching registration marks and recheck the one-inch box after taping. A copy shop can usually enlarge the page in one piece. Whichever method you choose, never trust the percentage displayed on the screen without measuring the printed result.
Materials listed in the pattern
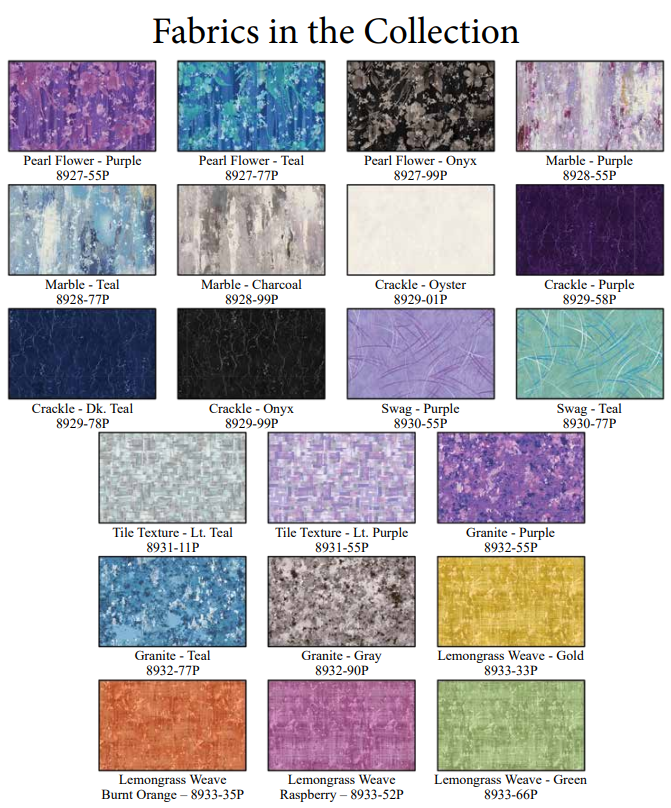
The original quilt uses fabrics from the Pearl Luxe collection. Older collections may be difficult to find, so the table also describes the visual job of each fabric. That makes it easier to create a successful substitute palette without copying the exact prints.
| Label | Original fabric | Yardage | Visual role |
|---|---|---|---|
| A | Crackle – Onyx, 8929-99P | 5 yards | Dark structural band, outer border, and binding |
| B | Pearl Flower – Onyx, 8927-99P | 2 1/2 yards | Dark-to-medium patterned band |
| C | Granite – Gray, 8932-90P | 2 1/3 yards | Middle-value transition |
| D | Marble – Charcoal, 8928-99P | 2 1/2 yards | Medium-dark transition |
| E | Crackle – Oyster, 8929-01P | 3 yards | Light structural band |
| F | Lemongrass Weave – Burnt Orange, 8933-35P | 1/2 yard | Narrow accent border |
| Backing | Granite – Gray, 8932-90P | 7 1/2 yards | Pieced backing |
Fabric A’s five yards include the binding. The pattern pieces the backing to approximately 90 x 104 inches from three 90-inch width-of-fabric lengths. Confirm the backing size with your longarm quilter before buying or cutting: preferred overage varies by quilting method and provider.
Batting is not specified in the materials list. Choose a package or cut piece that extends beyond the quilt top on all sides and suits the amount of shrinkage and loft you want. Prewashing is a personal choice, but use one policy consistently across all six top fabrics.

Helpful tools
In addition to ordinary quilting supplies, this project benefits from a long ruler, a fresh rotary blade, a dry iron, fine pins or clips, a seam gauge, and removable labels. A large cutting surface is useful when trimming the 84-inch columns. Starch or a light fabric stabilizer can make the diagonal edges easier to handle, provided it is applied consistently before cutting.
How the design is organized
Understanding the construction map before sewing prevents most orientation mistakes. The quilt center is not assembled row by row. Instead, it is built from two families of strip-pieced triangles.
The first family begins with an AD strip set, which arranges Fabrics A, B, C, and D across a graded dark sequence. Template 1 cuts produce mirrored Unit 1-A and Unit 1-B triangles. A separate DA strip set, made with wider outer strips, supplies five Template 2 triangles for the tops of the light-column units.
The second family uses Fabrics B, C, D, and E. Its repeated BE strip sets yield the mirrored Unit 3-A and Unit 3-B triangles. A separate EB strip set supplies the five Template 2 triangles used at the tops of the dark-column units.
Pairs of mirrored triangles are then sewn to opposite ends of narrow rectangles. Unit 1-A and Unit 1-B surround a Fabric E rectangle to create Unit 5. Unit 3-A and Unit 3-B surround a Fabric A rectangle to create Unit 6. Thirty of each unit are needed.
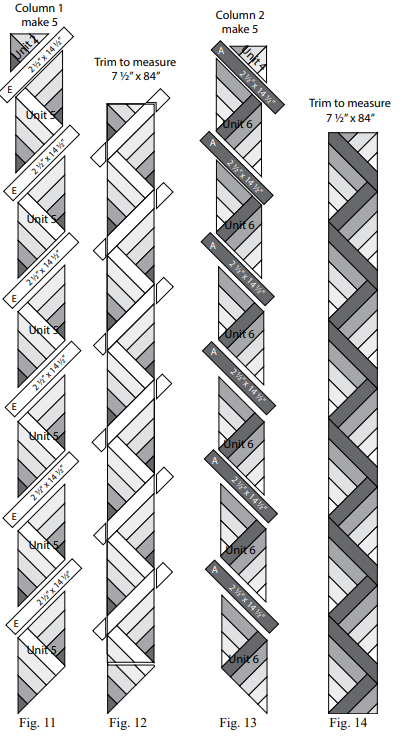
Six Unit 5 blocks alternate with six long Fabric E strips to form each Column 1. Six Unit 6 blocks alternate with six long Fabric A strips to form each Column 2. Five columns of each type are trimmed to 7 1/2 x 84 inches, then joined in alternating order.
This repetition is why a sample unit matters. One reversed triangle can interrupt the zigzag, while a slightly inaccurate seam repeated many times can make a whole column bow or finish short.
Choosing substitute fabrics
The pattern depends more on value contrast than on a specific collection. Take a grayscale photo of your proposed fabrics. Fabric A should read as a strong dark and Fabric E as a clear light. Fabrics B, C, and D should bridge them without collapsing into one value. Fabric F can be quiet or vivid, but it should remain visible as a thin frame between the center and outer border.
For a controlled modern look, try black, charcoal, medium gray, pale gray, cream, and one saturated accent. For a softer version, combine deep plum, dusty mauve, rose, blush, ivory, and a muted green accent. Batiks and tone-on-tone prints work especially well because their motifs are less likely to look chopped when cut into narrow diagonal bands.
If using directional prints, decide whether consistent motif direction matters to you. Strip sets are rotated and mirrored during template cutting, so words, stripes, or one-way figures may point in several directions. Make a paper mock-up before committing valuable fabric. Also avoid placing two busy, similarly valued prints next to each other; the continuous diamond path becomes much harder to read.
Buy a little extra when substituting narrower fabric, prewashing, fussy cutting, or working with noticeable skew. The published quantities assume standard quilting cotton cut across the width of fabric.

Preparation and cutting strategy
Press every fabric before measuring. Square one end, cut only a manageable number of strips at a time, and replace the rotary blade as soon as it drags. The design uses many 2 1/2- and 2 3/4-inch strips; confusing those widths is an easy and expensive mistake.
Create six labeled fabric bins or resealable bags, then divide the pieces by purpose: repeated strip sets, special single strip sets, connector rectangles, borders, small corner squares, and binding. Keep the 3-inch strips for the DA and EB sets separate from the similar-looking 2 3/4-inch strips.
The PDF states that strips are cut across the width of fabric from selvage to selvage unless noted otherwise. Measure the usable width after removing both selvages. If it is significantly less than the width assumed by the pattern, make one test set and confirm that it yields the required template cuts before processing all fifteen sets.
Do not cut the verified paper or plastic templates with your best fabric rotary blade. Trace around them, or use a dedicated template blade. Mark the seam-line corners so you can see where diagonal seams should intersect.
Sewing straight strip sets without waves
Long strip sets can curve when every seam is sewn in the same direction or when one layer feeds faster than the other. Alternate the direction of stitching from seam to seam. Use a neutral presser-foot pressure, support the fabric behind the machine, and avoid pulling the strips.
Press each seam before adding the next strip. First set the seam flat, then press it to the side indicated by the diagram or in the direction that gives the cleanest nesting later. Lift and lower the iron rather than sweeping it along the strip. Stretching a warm strip set can change both its width and the angle of the template cuts.
Measure the first completed strip set at several points. Its bands should be parallel, and the overall width should remain consistent from selvage to selvage. If it narrows, first check the seam allowance and pressing technique. Correct the setup before chain piecing the remaining sets.
Make a controlled cutting station
Place the strip set on the mat without tension. Align the verified template exactly as shown in the publisher’s diagrams, including its orientation. Cut the first side, reposition rather than twisting your wrist, and make the second cut. Because Template 1 alternates direction, label the resulting A and B orientations immediately.
Stack mirrored pieces in separate trays. A label such as “Unit 1-A—left,” “Unit 1-B—right,” “Unit 3-A—left,” and “Unit 3-B—right” is more useful than a pile marked only “triangles.” Preserve the small angled points until assembly; trimming them too early may remove the reference needed for alignment.

A nomenclature issue to check in the PDF
There is a likely label inconsistency between Steps 7 and 8 of the updated PDF. Step 7 tells you to make one EB strip set from Fabrics B, C, D, and E, and Figure 7 shows that order. Step 8 then says to cut the five Unit 4 triangles from a BE strip set.
Figure 8 visually corresponds to the special set just made in Step 7, not one of the fifteen repeated sets from Step 5. For that reason, read Steps 7–8 together and compare the color order in Figures 7 and 8 before cutting. This observation is not an official erratum from Henry Glass. If you are uncertain, contact the publisher through the official project page rather than guessing or cutting all five pieces at once.
Assemble one sample before chain piecing
Make one Unit 5 and one Unit 6 first. Lay the triangle halves and center rectangle on a design board exactly like Figures 9 and 10. The bands should continue in the intended direction, and the mirrored pieces should open away from the narrow center strip.
Pin at the strip-set seam intersections rather than only at the ends. Sew with an accurate quarter-inch seam, press, and compare the unit with the diagram. Check that the points needed for joining are present and that the unit lies flat. If it is correct, keep it beside the machine as a physical reference for the other 29 copies.
For efficient chain piecing, sew the same side of every correctly oriented unit, clip the chain apart, press, and then add the opposite side. Do not mix the Unit 1 and Unit 3 families on the worktable. Their similar geometry makes an accidental swap hard to notice until column assembly.
Build and trim the two column types
Lay out each long column on the floor, a portable design wall, or a clean sheet before sewing. Column 1 alternates six Unit 5 blocks with six light Fabric E strips and finishes with a Unit 2 triangle at the top. Column 2 alternates six Unit 6 blocks with six dark Fabric A strips and finishes with a Unit 4 triangle at the top.
Compare every placement with Figures 11 and 13. The diagonal paths must continue rather than forming isolated arrows. Sew the sections into pairs, then join pairs into longer segments. This approach is easier to control than feeding an increasingly heavy 84-inch strip through the machine after every seam.
Press and let each column cool completely before measuring. The pattern instructs you to trim both column types to 7 1/2 x 84 inches. Mark the center and quarter points along the intended trim line. A long ruler can be walked down the column in overlapping sections; never assume that aligning only the two ends will produce a straight edge.
If a column is wider than 7 1/2 inches, distribute the trimming evenly so the design stays centered. If it is substantially narrower or shorter, do not stretch it or hide the discrepancy in the border. Recheck unit sizes and seam allowances first. All ten columns should match before they are joined.
Assemble the center and borders
Arrange the five Column 1 units and five Column 2 units in alternating order. Step back or take a phone photo to check the overall rhythm. Label the columns 1 through 10 at the top; this prevents a rotation while carrying them to the machine.
Pin the top, bottom, midpoint, and quarter points of each long seam. Add pins at major diagonal intersections. Sew without pulling, then press the seam while supporting the full length of the top. Recheck the next column’s orientation before every join.
The narrow Fabric F border goes on first. The side strips are cut to 84 inches. The top and bottom accent strips use a small Fabric B square at each end, a detail that visually connects the accent frame to the dark outer border. Measure the quilt center through the middle before attaching any border. If your measurement differs slightly from the pattern length, resolve why; do not simply stretch a border strip to fit.
The wide Fabric A border completes the top, with the side borders added before the top and bottom borders. Fold both the quilt edge and border strip into quarters and match those points. This distributes fullness and helps prevent wavy edges.

Backing, quilting, and binding ideas
The official cutting chart makes a pieced backing approximately 90 x 104 inches. Remove selvages before joining backing panels because tightly woven selvage edges can pucker. Use a wider seam than the quarter-inch piecing allowance and press backing seams open to reduce bulk.
The strong vertical geometry offers several quilting options. Straight or gently wavy lines following the columns emphasize the height. Echo quilting inside the light and dark zigzags reinforces the interlocking effect. A simple edge-to-edge texture provides contrast without competing with the fabric bands. If the prints are busy, use thread that blends with the middle values rather than matching only the darkest fabric.
The pattern uses nine Fabric A strips cut 2 1/2 inches wide for binding. Join them with diagonal seams, trim the allowances, press the binding in half lengthwise, and test the color against all four sides. Because the outer border is also Fabric A, the binding visually merges with the frame. A contrasting binding is possible, but it will create a much stronger outline than the original design.
Troubleshooting common problems
The strip set bows
Alternate stitching direction, reduce presser-foot pressure if possible, and press without sliding the iron. Confirm that the fabric was cut on a straight grain. Correct the method before producing fifteen identical bowed sets.
Mirrored triangles get mixed up
Keep A and B orientations in separate labeled containers. Place the first correct Unit 5 and Unit 6 beside the sewing machine as references. If necessary, mark the wrong side of every left-hand piece with a removable dot.
The template pieces are too small
Return to the calibration box. The template page must be enlarged 200%, and the box must measure exactly one inch after enlargement. Printer settings are the first thing to check.
Points disappear at the center rectangle
Confirm the quarter-inch seam and align the marked seam-line intersections, not just the raw-edge tips. Make a fresh sample from scraps before unpicking a whole batch.
A column twists or waves
Let it cool after pressing, then place it on a flat surface without tension. Check whether individual units have consistent widths and whether the joining seams were stretched. Square in small overlapping sections while preserving the design center.
The ten columns do not match in length
Measure the repeated units and connector strips separately. A small error multiplied across twelve alternating sections becomes noticeable. Correct any outlier before final trimming; do not force unlike lengths together.
A practical project workflow
This is a good quilt to divide into checkpoints:
- Session 1: choose fabrics, test contrast in grayscale, read the entire PDF, and enlarge both templates.
- Session 2: verify the one-inch box, make durable templates, cut one trial strip set, and sew sample units.
- Session 3: cut and label the remaining pieces only after the samples pass inspection.
- Session 4: chain piece the AD and BE strip sets, checking width every few sets.
- Session 5: cut and organize mirrored triangles; make the special DA and EB sets separately.
- Session 6: assemble all Unit 5 and Unit 6 blocks.
- Session 7: build, press, and trim five columns of each type.
- Session 8: assemble the center, add both borders, and prepare the backing.
- Session 9: quilt, square, and bind.
Photograph each approved layout before moving pieces. Notes such as machine setting, measured seam allowance, and pressing direction are valuable if the project is paused between sessions.

Frequently asked questions
Is Pearl Luxe suitable for a beginner?
Henry Glass rates it intermediate. A confident beginner who can sew an accurate quarter-inch seam, manage long strip sets, and use enlarged templates could succeed by making test units first. It is not the best first project for someone still learning rotary cutting.
Does the free PDF include full-size templates?
It includes Template 1 and Template 2, but the page explicitly says to enlarge them to 200%. The calibration square must measure one inch after enlargement.
Can I use precut 2 1/2-inch strips?
Only for some pieces. The design also requires 2 3/4-inch and 3-inch strips, long border pieces, small squares, and yardage for backing and binding. Precuts will not replace the complete cutting list.
Can I make the quilt scrappy?
Yes, if each fabric group maintains a consistent value role. Keep the A group dark, the E group light, and the transition groups distinct. Test the collection in grayscale before cutting.
Why are there two similar column types?
Alternating a light-dominant column with a dark-dominant column creates the repeating interlocked diamond paths. The different top triangles and center rectangles control where each path begins.
Should I enlarge the entire PDF to 200%?
No. Enlarge only the template page. Print the written instructions and diagrams at a comfortable reading size. Always measure the calibration box on the enlarged template copy.
Is the PDF on this page created by Easy Quilting Patterns?
No. The pattern and project sheet belong to their credited designer and publisher. This article is an independent companion with additional planning, construction, and troubleshooting guidance.
Final checklist before you cut
- Download the file from the official Henry Glass project page.
- Confirm that you have the updated seven-page PDF.
- Read every instruction and study the quilt layout.
- Enlarge the template page 200% and measure the one-inch test box.
- Separate the 3-inch, 2 3/4-inch, and 2 1/2-inch strips.
- Sew one sample strip set and one sample of each connector unit.
- Keep mirrored triangle orientations labeled.
- Compare Steps 7–8 with Figures 7–8 before cutting Unit 4.
- Measure all ten columns before joining them.
- Check the official page again for updates before beginning.
Pearl Luxe is most manageable when treated as a sequence of controlled, repeatable operations. Verify the templates, protect the fabric order, and approve one complete sample before multiplying it. Those habits preserve the crisp light-and-dark paths that make this quilt so effective.
Pattern credits
Pearl Luxe Quilt 1 was designed by Heidi Pridemore for Henry Glass & Co. The official project sheet is provided free by the publisher and is marked not for resale. All pattern instructions, diagrams, templates, fabric artwork, and the original quilt image remain the property of their respective rights holders. Easy Quilting Patterns is not affiliated with or endorsed by Henry Glass & Co.; this independently written article is intended to help readers plan and understand the project. Please download the pattern from the official source linked above.