
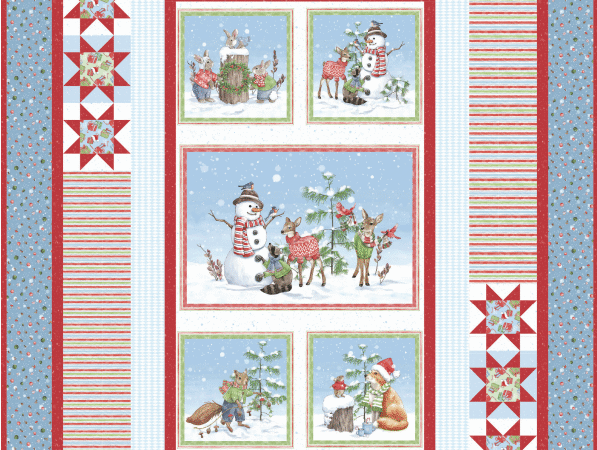
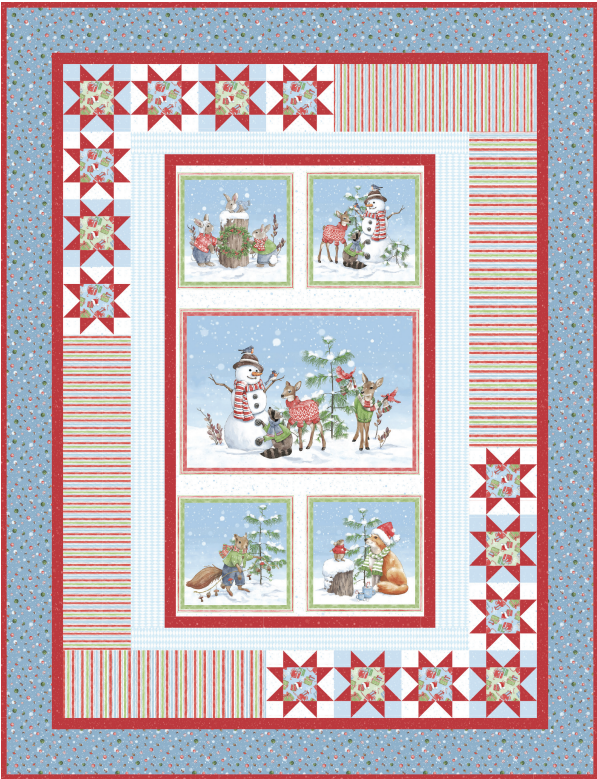
The Winter Friends Quilt is a cheerful panel quilt that combines a large illustrated center with simple frames, two coordinating star-like blocks, striped sections, and generous outer borders. It was designed by Lisa Swenson Ruble for P&B Textiles to feature the Frost & Fable fabric collection by Leslie Trimbach. The finished quilt measures approximately 52 inches by 68 inches, a useful size for a sofa throw, reading quilt, guest-room accent, or seasonal wall display.
The official pattern is only six pages long, but the project asks for more planning than its friendly appearance suggests. The panel must be centered before it is cut. More than fifty stitch-and-flip units need consistent orientation. The four asymmetrical pieced borders must be assembled in the correct order. Long borders should fit the quilt rather than stretch it. There is also a backing measurement in the PDF that deserves attention before any fabric is trimmed.
This independent companion guide explains those decisions in detail. It does not replace the designer’s diagrams or cutting chart. Keep the official P&B Textiles pattern open while you work, and use the notes below to plan the project, check dimensions, choose substitutions, avoid common mistakes, and understand why the parts fit together.
Winter Friends Quilt at a Glance
| Project detail | Information |
|---|---|
| Pattern name | Winter Friends Quilt |
| Quilt designer | Lisa Swenson Ruble |
| Featured collection | Frost & Fable |
| Fabric collection designer | Leslie Trimbach |
| Original publisher | P&B Textiles |
| Finished size | Approximately 52″ × 68″ |
| Main format | Panel center with framed and pieced borders |
| Pieced blocks | 6 Block One units and 8 Block Two units |
| Block size in the pattern | 6½″ unfinished |
| Primary technique | Stitch-and-flip corner triangles |
| Suggested skill level | Confident beginner to intermediate |
| Best reason to make it | It turns one scenic panel into a substantial throw without requiring an all-over field of blocks |
The quilt is approachable because it relies on straight seams and repeatable units. It is not quite a first-day sewing project, however. A quilter should already be comfortable cutting accurately, sewing a reliable quarter-inch seam, pressing without stretching, and checking unit size before making a full batch.
What Gives This Panel Quilt Its Character
Many panel quilts place a printed scene in the middle and add several plain borders. Winter Friends uses a more interesting strategy. The center illustration remains the focal point, but the surrounding patchwork creates a visual path around it.
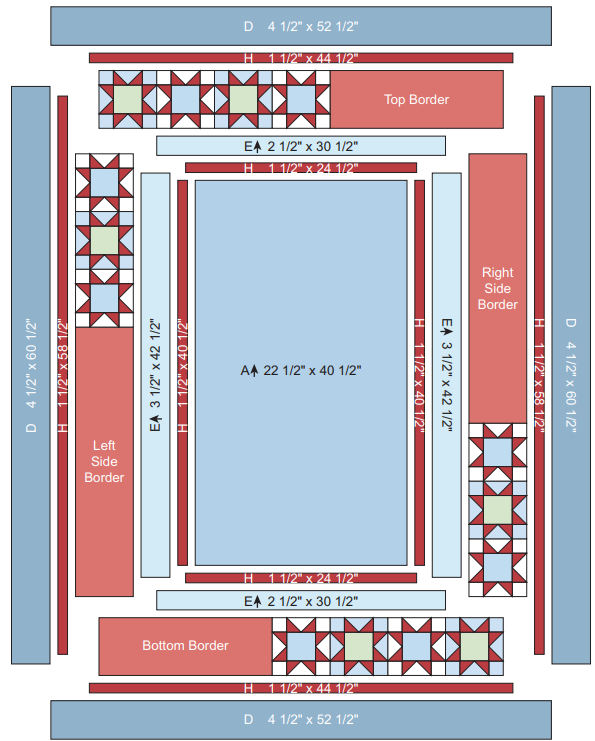
The first narrow red frame separates the art from the pale blue area around it. The wider pale frame gives the detailed panel room to breathe. Next come four pieced borders: each contains a run of small blocks at one end and a long strip of the multicolor stripe at the other. The block runs change position as they travel around the center, so the quilt has movement without becoming visually crowded. A second narrow red frame unifies those four borders, and the blue outer border provides a calm ending.
This structure is useful beyond one fabric collection. It shows how to balance three kinds of print:
- A large narrative print works best as the focal center.
- A directional stripe creates long quiet sections while still carrying color around the quilt.
- Small-scale blenders make the geometric blocks readable from a distance.
The original palette uses icy blue, white, light green, bright red, and a touch of multicolor stripe. The red is especially important. It appears in the stitch-and-flip points, both narrow frames, and the binding, so the eye can travel from the blocks to the panel and finally around the outside edge.
Download the Pattern from the Original Publisher
P&B Textiles provides the Winter Friends Quilt as a free pattern on its own website. Use the publisher’s page as the primary download source:
Download the official Winter Friends Quilt pattern from P&B Textiles
The product page identifies Lisa Swenson Ruble as the quilt designer, names Frost & Fable as the featured collection, gives the 52″ × 68″ size, and links to the pattern file. Downloading from the publisher helps readers get the current file and keeps the designer and fabric company attached to their work.
Print the PDF at actual size if you want a paper copy. This pattern does not depend on printed templates, but choosing “actual size” prevents a printer from shrinking the diagrams and makes written measurements easier to compare. Before cutting, write the date of your download on the first page. If the publisher later posts a revised file, you will know which version is in your project folder.
Read the Whole Pattern Before Choosing Fabric
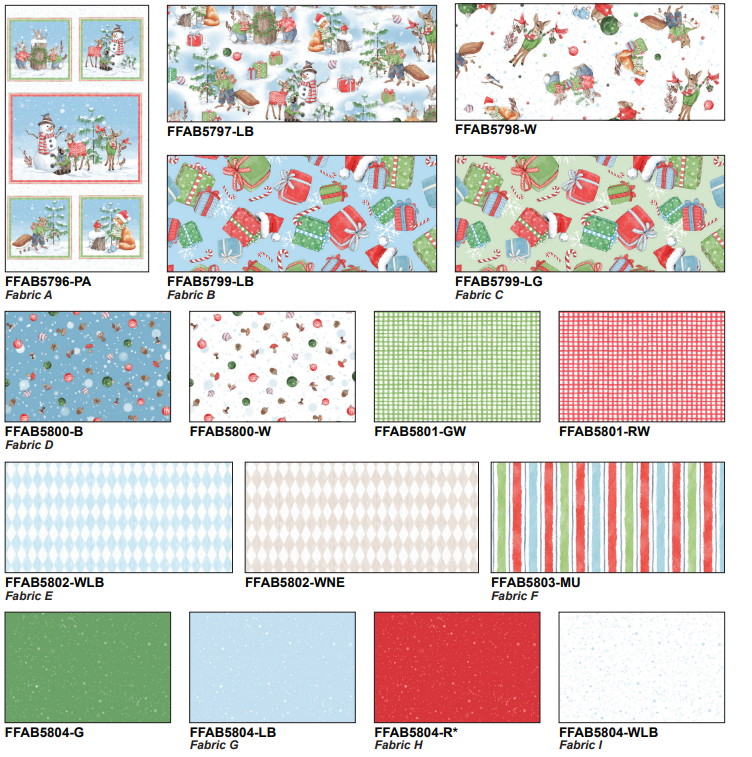
The official fabric chart is not merely a color list. Each letter has a construction job. Understanding those jobs makes substitution far easier than trying to match every print exactly.
| Pattern role | Original fabric and amount | What the fabric needs to do |
|---|---|---|
| Fabric A | FFAB5796-PA, 1 panel | Supply a motif that can be centered and cut to 22½″ × 40½″ |
| Fabric B | FFAB5799-LB, ¼ yard | Provide eight centers for Block Two |
| Fabric C | FFAB5799-LG, ¼ yard | Provide six centers for Block One |
| Fabric D | FFAB5800-B, 1 yard | Form the wide outer border |
| Fabric E | FFAB5802-WLB, ⅝ yard | Create the light frame around the panel |
| Fabric F | FFAB5803-MU, ⅔ yard | Fill the long sections of the four pieced borders |
| Fabric G | FFAB5804-LB, ⅓ yard | Make Unit 1 backgrounds and Block One corner squares |
| Fabric H | FFAB5804-R, 1⅓ yards | Make all point triangles, two narrow frames, and the binding |
| Fabric I | FFAB5804-WLB, ⅜ yard | Make Unit 2 backgrounds and Block Two corner squares |
| Backing | 3⅜ yards | Cover the back after it is pieced |
| Batting | 60″ × 76″ | Provide the middle layer with working allowance |
These are the publisher’s stated requirements. Buy a little extra when a fabric has a strong direction, when you plan to prewash, or when the usable width is less than the width assumed by the pattern. Extra yardage is also wise for the red Fabric H because it appears in many small pieces, long strips, and the binding. A single cutting error in that fabric can affect several stages of the quilt.
Do not cut from this article. The official PDF contains the authoritative cutting list and assembly diagrams. This guide focuses on preparation and verification so the numbers in that list are easier to use correctly.
If the Original Frost & Fable Fabrics Are Hard to Find
A fabric line can become scarce even while its free pattern remains available. The solution is to match scale, contrast, and function rather than chase identical stock numbers at any price.
Start with the panel. The official design requires a centered usable area at least 22½″ wide by 40½″ high. A replacement panel with different proportions changes the math of every frame that follows. Measure the actual printed scene, including any borders you want to preserve, before buying the coordinating yardage.
For Fabric F, choose a directional stripe or another print that looks intentional in long rectangles. The original stripe changes orientation around the center because the border sections turn with the quilt. If a substitute stripe has words, animals standing upright, or another obvious one-way design, preview all four border positions on a sketch. A nondirectional geometric print is the easiest alternative.
Fabric H must contrast with Fabrics G and I because it creates the pointed shapes. A medium or dark red against pale blue and white gives strong definition. If all three fabrics are close in value, the block design will disappear at viewing distance. Photograph the candidates in black and white with a phone; the points should remain obvious after the color is removed.
Fabric D has a different job. It is a large resting area around a lively center, so a small tossed print, subtle texture, or near-solid usually works better than another large scene. Fabric E should also be quiet enough to separate the panel from the pieced border.
A reliable substitution palette contains:
- one panel or large focal print;
- one strong accent for the points, narrow borders, and binding;
- two light but distinguishable block backgrounds;
- two small feature prints for the block centers;
- one pale framing fabric;
- one stripe or directional print for the long border sections; and
- one calm medium-value print for the outer border.
Put the fabrics in order on a table before cutting. The eye should move from the panel to the red frame, pause in the light frame, notice the pieced blocks, and then settle at the outer border. If every fabric demands equal attention, replace one or two with quieter choices.
The Most Important First Step: Evaluate the Panel
Printed panels are not always perfectly square to the grain, and the artwork may not be centered between the selvages. Treat the printed motif—not the outer edge of the fabric—as your first reference.
Press the panel from the wrong side using the temperature recommended for the fabric. Avoid dragging the iron across the surface, which can distort a large rectangle. Place the panel on the biggest cutting surface available and let it relax completely.
The official pattern asks for a 22½″ × 40½″ rectangle centered on the motif. Before making a cut, use two long rulers, painter’s tape, or lengths of string to mark a temporary window of that size. Check four things:
- Are all important animals and illustrated details inside the window?
- Do the visible printed frames look balanced on the left and right?
- Do the top and bottom margins feel intentional?
- Can the rectangle be cut square without exposing an unwanted part of the adjacent repeat?
If the printing is slightly skewed, there may be no way to make both the fabric grain and every printed line perfectly square. Favor the part viewers will notice. A centered scene with visually level internal borders is usually more successful than a grain-perfect cut that makes the art look tilted.
Mark the horizontal and vertical centerlines of the desired cut on removable tape, not directly on the artwork. Align those marks with the motif first. Then place the ruler and trim in stages, leaving a little extra until the final pass. After cutting, confirm 22½″ × 40½″ at several points, not just along one edge.
If your panel cannot produce that exact rectangle, stop and redesign the surrounding frame on paper. Do not simply cut it smaller and hope the later borders will fit. A difference of half an inch at the center travels through every subsequent border.
Make a Cutting and Labeling System
Nine lettered fabrics, repeated dimensions, and four border assemblies can overwhelm a sewing table. A simple labeling system prevents most mix-ups.
Prepare one tray, zip bag, or paper plate for each fabric letter. Add a second label for the function: “H—points/frame/binding” is more useful than “red.” As pieces are subcut, group them by destination. Keep binding strips away from the 2″ point squares and the narrow frame strips, even though all three come from Fabric H.
For the blocks, make two kits:
- Block One kit: Fabric C center squares, Fabric G rectangles and corner squares, and the required Fabric H point squares.
- Block Two kit: Fabric B center squares, Fabric I rectangles and corner squares, and the required Fabric H point squares.
Label the long border pieces with both a letter and a position. “D side” and “D top/bottom” are safer than four loose blue strips. Do the same for the first H frame, second H frame, and E frame. The lengths in these groups are close enough that an unlabeled strip can be used in the wrong stage.
Directional Fabric F strips also need an arrow showing the visual top of the print. That small mark makes it possible to rotate and audition the left, right, top, and bottom border sections before sewing.
Test the Quarter-Inch Seam Before Chain Piecing
The small blocks are repeated around the quilt, and their combined length determines whether the pieced borders match the framed center. A seam allowance that is only slightly too wide can shorten a run of four blocks enough to create puckers later.
Make a three-strip test with scraps cut to known widths. Sew, press as you plan to press the blocks, and measure the center strip. Adjust the needle position or seam guide until the result is accurate. Use the same thread, foot, and pressing method for the real units.
The pattern calls the blocks 6½″ unfinished. That means each block should measure 6½″ square before it is sewn into a border and should finish at 6″ inside the quilt. “Unfinished” includes seam allowance; it does not mean the block should be trimmed to 6″.
Make one complete test block before cutting or sewing all the repeated units. If it is undersized, investigate the seam allowance and pressing. Do not automatically trim every other piece smaller to match. If it is oversized, check whether the stitch-and-flip corners were sewn on the marked line and fully pressed open.
How the Stitch-and-Flip Units Work
Both block versions use the same underlying technique. A small Fabric H square is placed on an end of a contrasting rectangle. A diagonal seam replaces one corner of that rectangle with a triangle. The process is repeated on the other end to create a pointed unit.
Accuracy here matters for two reasons. The diagonal points form the visible star-like design, and the outer edges of the original rectangle must remain straight so the units fit around the center square.
For consistent results:
- Draw the diagonal on the wrong side of every Fabric H square with a fine removable marker.
- Place the square on the rectangle with the raw edges aligned.
- Sew just to the waste side of the drawn line. The thread and fold consume a tiny amount of fabric; sewing directly through the center of a thick marked line can make the replacement corner short.
- Fold the corner open before trimming and check that it reaches the original edges.
- If it covers the corner, fold it back, trim the excess behind it to a quarter-inch seam allowance, and press.
- Add the second corner while watching the direction shown in the official diagram.
The pattern requires 24 Unit 1 pieces using Fabric G and 32 Unit 2 pieces using Fabric I. That is 56 repeated units and 112 diagonal seams. Batch the work, but do not sew the entire batch before checking the first few.
A practical rhythm is to mark eight squares, sew eight first corners, inspect them, trim and press, then add the second corners. Smaller batches reduce the chance of repeating an orientation error dozens of times.
Preventing Blunt or Floating Points
A point “floats” when the colored triangle stops short of the seam that should meet it. It is chopped off when the seam crosses the point. Both problems are easier to prevent than repair.
After pressing each stitch-and-flip corner, place the unit on a small ruler. The replacement triangle should fill the original corner and the rectangle should retain its intended outside dimensions. Keep the intersection where the point meets the unit edge a quarter inch away from the raw edge when assembling the block. That space becomes the seam allowance.
If many points are short, move the stitching a thread or two farther toward the waste corner. If they extend beyond the rectangle, the corner was not pressed fully or the diagonal seam bowed. Correct the method before continuing.
Optional Bonus Triangles
The trimmed corners are small, but they can become bonus half-square triangles. Sew a second line roughly half an inch toward the waste corner before trimming between the two seams. The resulting units are not part of the Winter Friends design, so store them for a label, zipper pouch, or another project. Only do this if the extra seam does not slow you down or distort the main unit.
Building Block One and Block Two
The two block types share the same layout. Each has a 3½″ center square, four pointed units around the center, and four small corner squares. The fabric assignments create the difference:
- Block One uses Fabric C in the center and Fabric G in the surrounding units and corners. Make six.
- Block Two uses Fabric B in the center and Fabric I in the surrounding units and corners. Make eight.
Arrange each block as a nine-patch before sewing. The top and bottom rows contain a corner square, a horizontal pointed unit, and another corner square. The middle row contains a vertical pointed unit, the center square, and a second vertical pointed unit. Compare the layout with the official diagram, especially the direction of the red triangles.
Sew the three rows, pressing in a consistent way. Pressing the top and bottom rows toward the corner squares and the middle row toward the center may allow seams to nest, but fabric bulk and personal preference can change the best direction. The important point is to test one block and then repeat the same pressing plan.
Join the rows while matching the vertical seams. Place a pin immediately before and after each intersection if the nested seams can shift. Press the completed block flat rather than pulling it square with the iron.
Each block should measure 6½″ unfinished. Check the center, corners, and all four edges. If a block is slightly oversized, trim evenly while preserving a quarter inch beyond every point. If it is undersized by more than a tiny amount, remaking it is usually safer than stretching it into a border.
Use removable labels to number the finished blocks by type. The two pale backgrounds may look similar under artificial light, and mixing them changes the planned rhythm around the quilt.
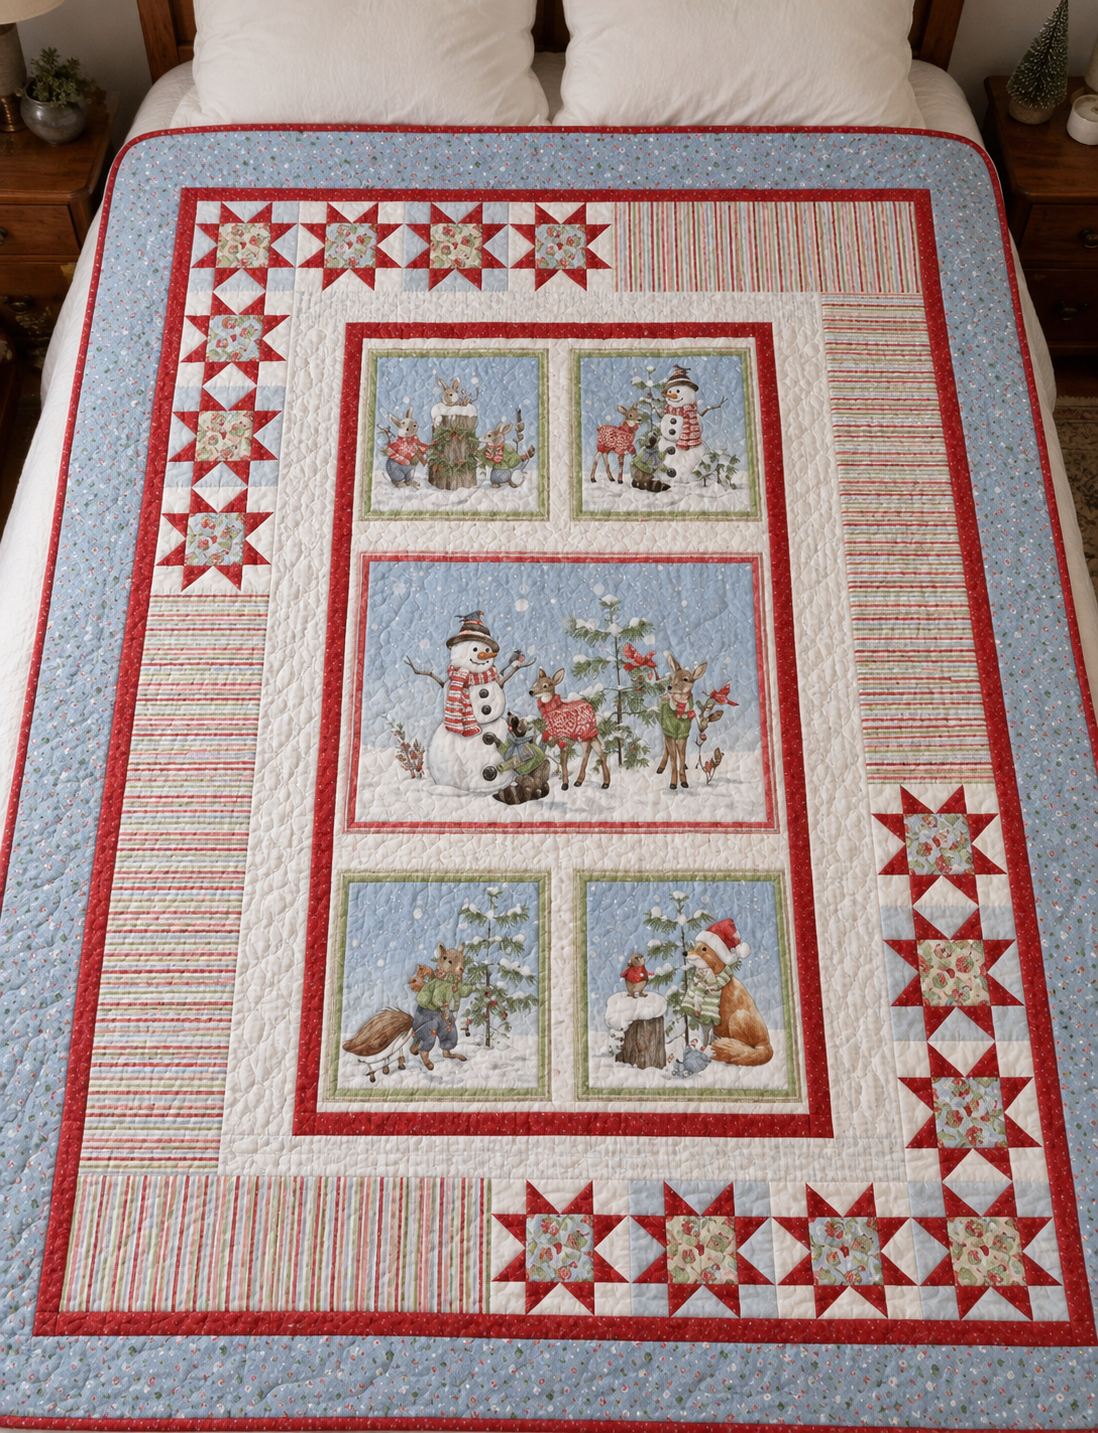
Winter Friends succeeds because the panel does not have to carry the whole design. Repeated red points echo its festive details, the stripe moves around the center, pale frames preserve visual space, and the wide blue border settles the composition. The quilt looks elaborate while relying on a small vocabulary of straight seams and repeated units.
The key is to work in checkpoints. Center the panel before cutting. Test one pointed unit and one complete block. Label each border by position. Measure the quilt through its center before fitting long strips. Most importantly, calculate backing allowance from the completed top rather than cutting automatically from a questionable line.
With that preparation, the project becomes a satisfying lesson in panel framing, value placement, repeated stitch-and-flip piecing, and controlled border construction—and the finished throw keeps the whimsical winter artwork at the center of attention.