
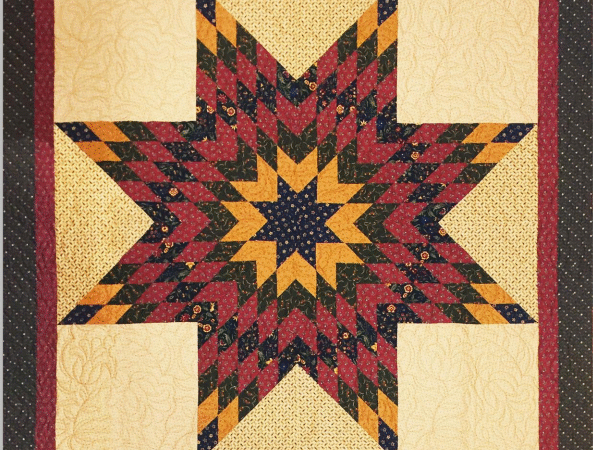
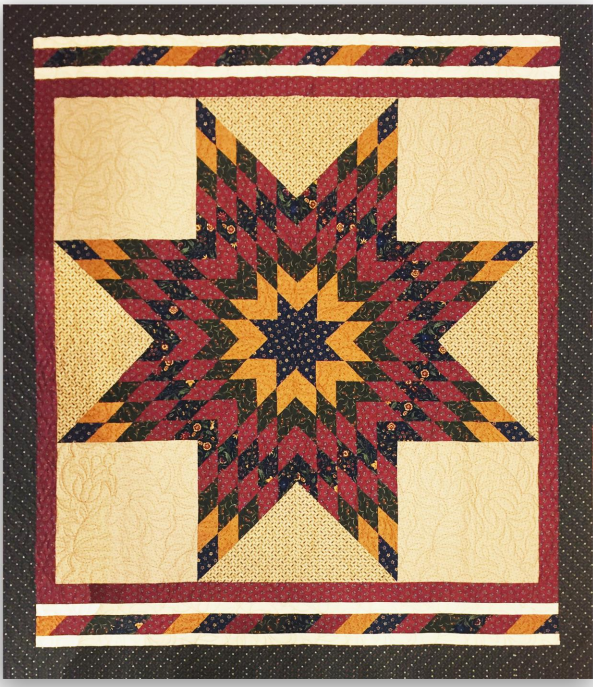
The Lone Star Quilt is one of the most iconic and beloved quilt designs in the quilting world. Known for its striking starburst effect, this pattern transforms simple diamond-shaped pieces into a bold, radiant star that immediately catches the eye. With careful fabric selection and precise cutting, the Lone Star quilt creates a showstopping centerpiece that embodies both tradition and timeless elegance.
The beauty of the Lone Star quilt lies not only in its bold star design but also in its adaptability. Quilters can choose soft pastels for a delicate, vintage look, or vibrant contrasting fabrics for a dramatic centerpiece. Each version tells a different story, making this pattern one of the most versatile and expressive designs in the quilting world.
This quilt design has roots in early American quilting history and continues to be cherished by modern quilters for its versatility and visual impact. Whether you choose vibrant fabrics for a contemporary look or traditional prints for a classic style, the Lone Star quilt is sure to become a treasured piece in your collection.
Fabric Requirements
To create the Lone Star Quilt, you will need a selection of fabrics for the diamonds, background, and borders. Here’s what the original pattern recommends:
-
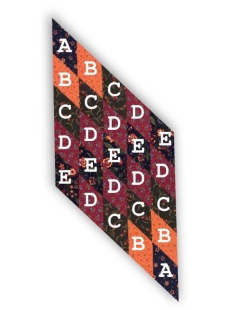
Diamonds:
-
Fabric A: ¼ yard
-
Fabric B: ½ yard
-
Fabric C: ⅝ yard
-
Fabric D: ¾ yard
-
Fabric E: ½ yard
-
-
Background Fabric: 2 yards (or use two different prints: 1⅛ yard of one and ⅞ yard of another)
-
Optional Borders and Binding:
-
Border 1: ¾ yard (red)
-
Border 2: ½ yard (white strips)
-
Border 3: 1¼ yards (green)
-
Binding: 1 yard
-
Backing: 5½ yards
-
Finished size with borders: 74″ × 84″ – a beautiful full-size quilt that works wonderfully on a bed or as a display piece.
Cutting and Piecing the Diamonds
The Lone Star quilt is built from carefully cut diamond shapes. To maintain accuracy:
-
Cut each diamond fabric in half along the fold.
-
Stack fabrics into two sets—right side up and right side down—to avoid bias stretching.
-
Cut 3″ strips along the 45° line on your cutting mat to form diamonds.
-
Each strip will yield four diamonds. Repeat until you have all required pieces.
You will then sew the diamonds into 5×5 diamond blocks, making sure to alternate seam directions for accuracy. Press carefully to prevent distortion.
Constructing the Star
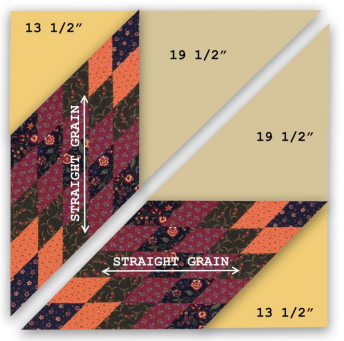
Once you have eight large diamond sections, you will assemble the star:
-
Use 19½” and 13½” background triangles to attach to the diamond sections.
-
Four upper (left) and four lower (right) sections are joined to create the star points.
-
Carefully match all intersections to keep the star crisp and precise.
After sewing, press with steam to flatten and reduce stretching.
Borders and Finishing
For a striking finish, you can add the optional pieced borders:
-
A red border strip for bold contrast.
-
White strips to highlight the design.
-
A wide green border to frame the star beautifully.
Finally, layer your quilt top with batting and backing, quilt as desired, and add the binding for a polished look.
Why the Lone Star Quilt is a Favorite
-
Timeless design that has stood the test of generations.
-
A great project to practice precision cutting and piecing.
-
Perfect for showcasing a variety of fabrics in harmonious color schemes.
-
A quilt that makes a bold statement in any home.

At the end of this article, I will make the free PDF pattern by Donna Jordan available for download, so you can start creating your own stunning Lone Star Quilt today.
The Lone Star Quilt Pattern is a masterpiece of traditional quilting that every quilter should try at least once. With its radiant star design, balanced geometry, and endless color possibilities, it’s a rewarding project that will leave you with a quilt to cherish for years to come.